HexTool's central built-in Logic Finder — the same engine referenced throughout the other Developer Tools (Checksum Scanner's "Copy Info (for Skeleton)", Offset Tool's "Apply to Logic Finder", Qwojtsoft Standalone's codec testing). Its job is to figure out how a real-world value (mileage, hours, a counter, a PIN…) is actually encoded into hex bytes — which offset(s), which endianness, whether it's scaled/XOR'd/complemented/BCD, whether it's duplicated across several places with its own checksum — and then let you package that discovered logic into a reusable codec you can test, merge with other codecs, or turn into a small library entry.
How to open it
Tools → Developer Tools → Logic Finder (embedded). It opens as its own tab. You can also arrive here indirectly via Apply to Logic Finder in the Offset Tool, or by pasting output copied from the Checksum Scanner / CRC Compare.
Basic workflow: finding the logic
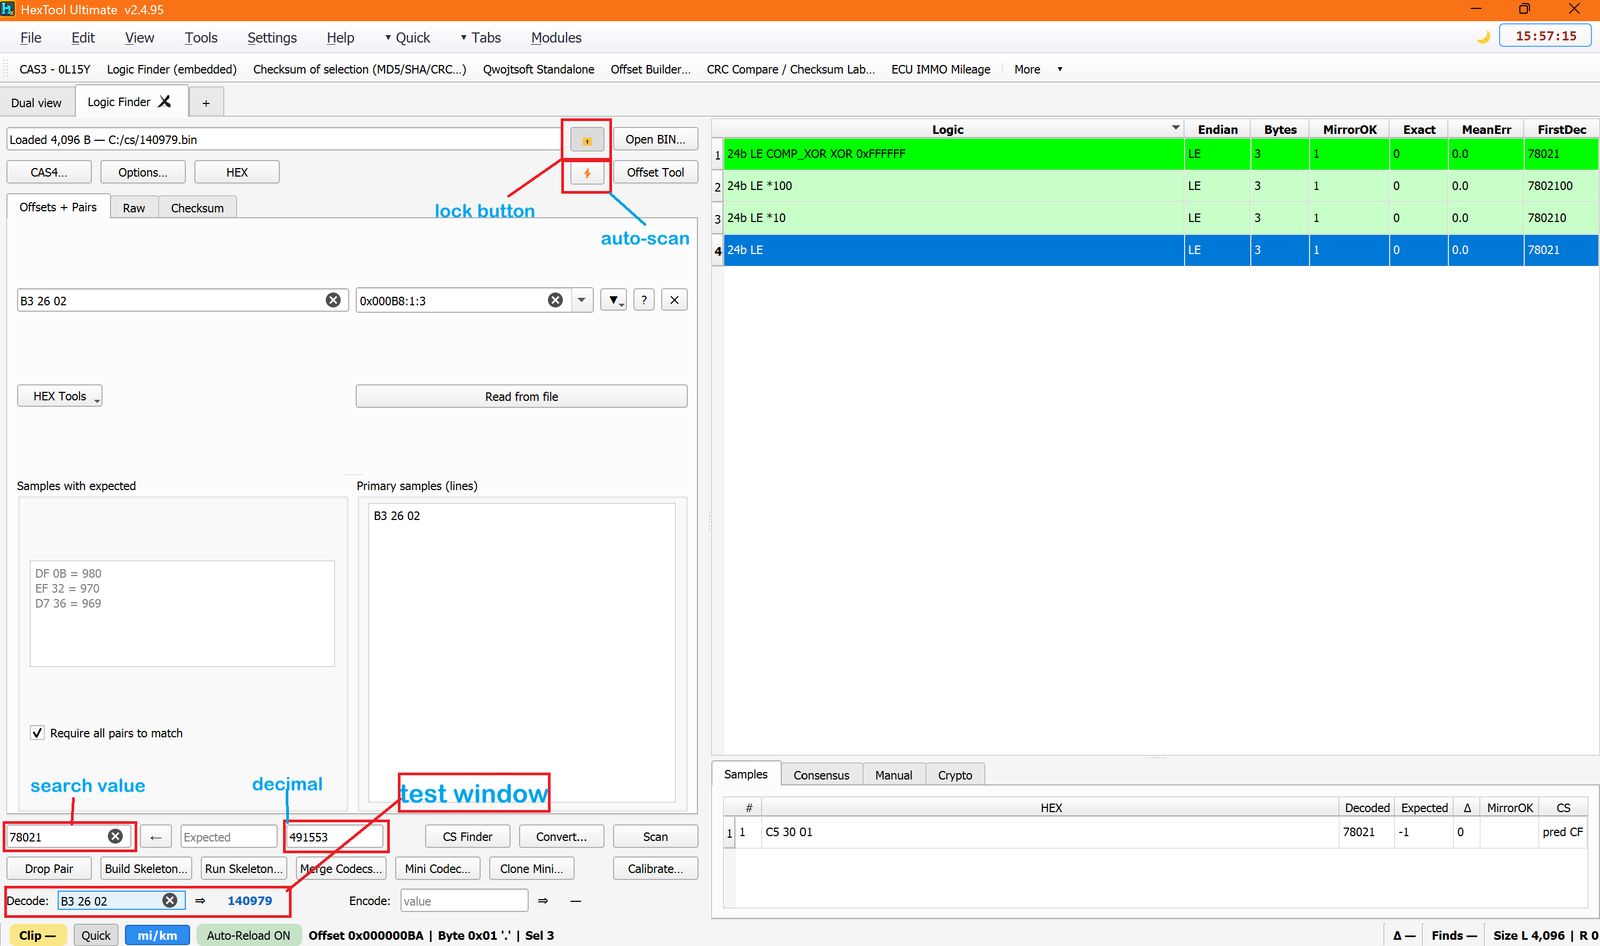
Open BIN… loads the dump to work from; the lock (🔒) and lightning (⚡) buttons next to it control automatic testing (below).
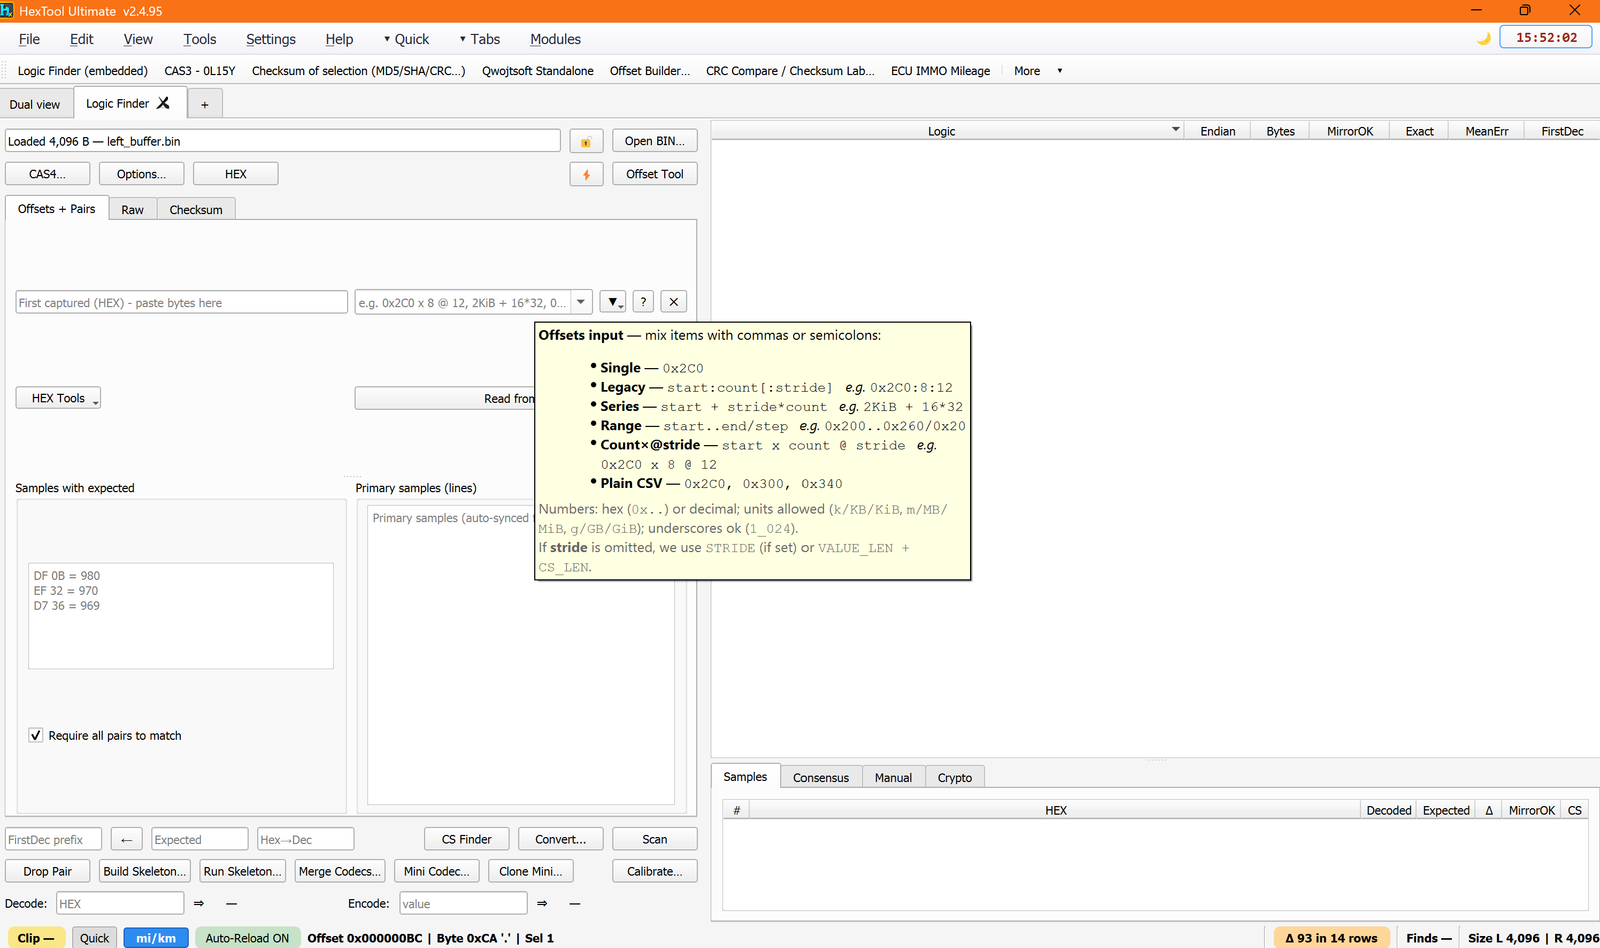
In Offsets + Pairs, paste the hex bytes you captured at a known value into the first box, and describe the offset(s) they came from in the second (accepts single offset, start:count:stride, a start + stride*count series, a start..end/step range, count×stride, or a comma-separated list).
Samples with expected — build a list of HEX = decimal pairs at different known values (e.g. DF 0B = 980), so a candidate logic must explain all of them; Require all pairs to match enforces that.
Primary samples (lines) — auto-synced hex read directly from the file at your offsets, used alongside the manual samples.
Scan runs the search; results land in the grid on the right.
Lock / auto-scan
Lock button (🔒) — when on, if the file name itself encodes the value you're looking for (e.g. a dump named with its mileage), that value is auto-tested against the selected candidate logic.
Auto-scan (⚡) — broader: when the file name is your known value, HexTool runs a full scan for it the moment the file is opened.
Search value — the decimal value you're hunting for; Decimal — a secondary readout for comparing raw vs. scaled; Test window (the Decode field) — a scratch spot to decode an arbitrary hex snippet with the active logic.
Results grid
Each row is a candidate encoding: Logic (e.g. 24b LE COMP_XOR XOR 0xFFFFFF, 24b LE *100, 24b LE), Endian, Bytes, MirrorOK (how many duplicate/mirrored locations agree), Exact, MeanErr, and FirstDec. Rows are shaded by confidence — solid green = strong candidates, pale green = related scaled variants (*10, *100) worth double-checking.
Bottom tabs
Samples — a table of every sample tested against the selected logic: HEX, Decoded, Expected, Δ (error), MirrorOK, CS.
Consensus — set a Tolerance (±) and press Build consensus to find which decoded value/pattern shows up consistently across candidates within that tolerance — useful when no single sample is conclusive alone.
Manual — manually specify/tweak a formula instead of relying on the auto-search.
Crypto — see below.
Crypto tab — advanced two-sample solver
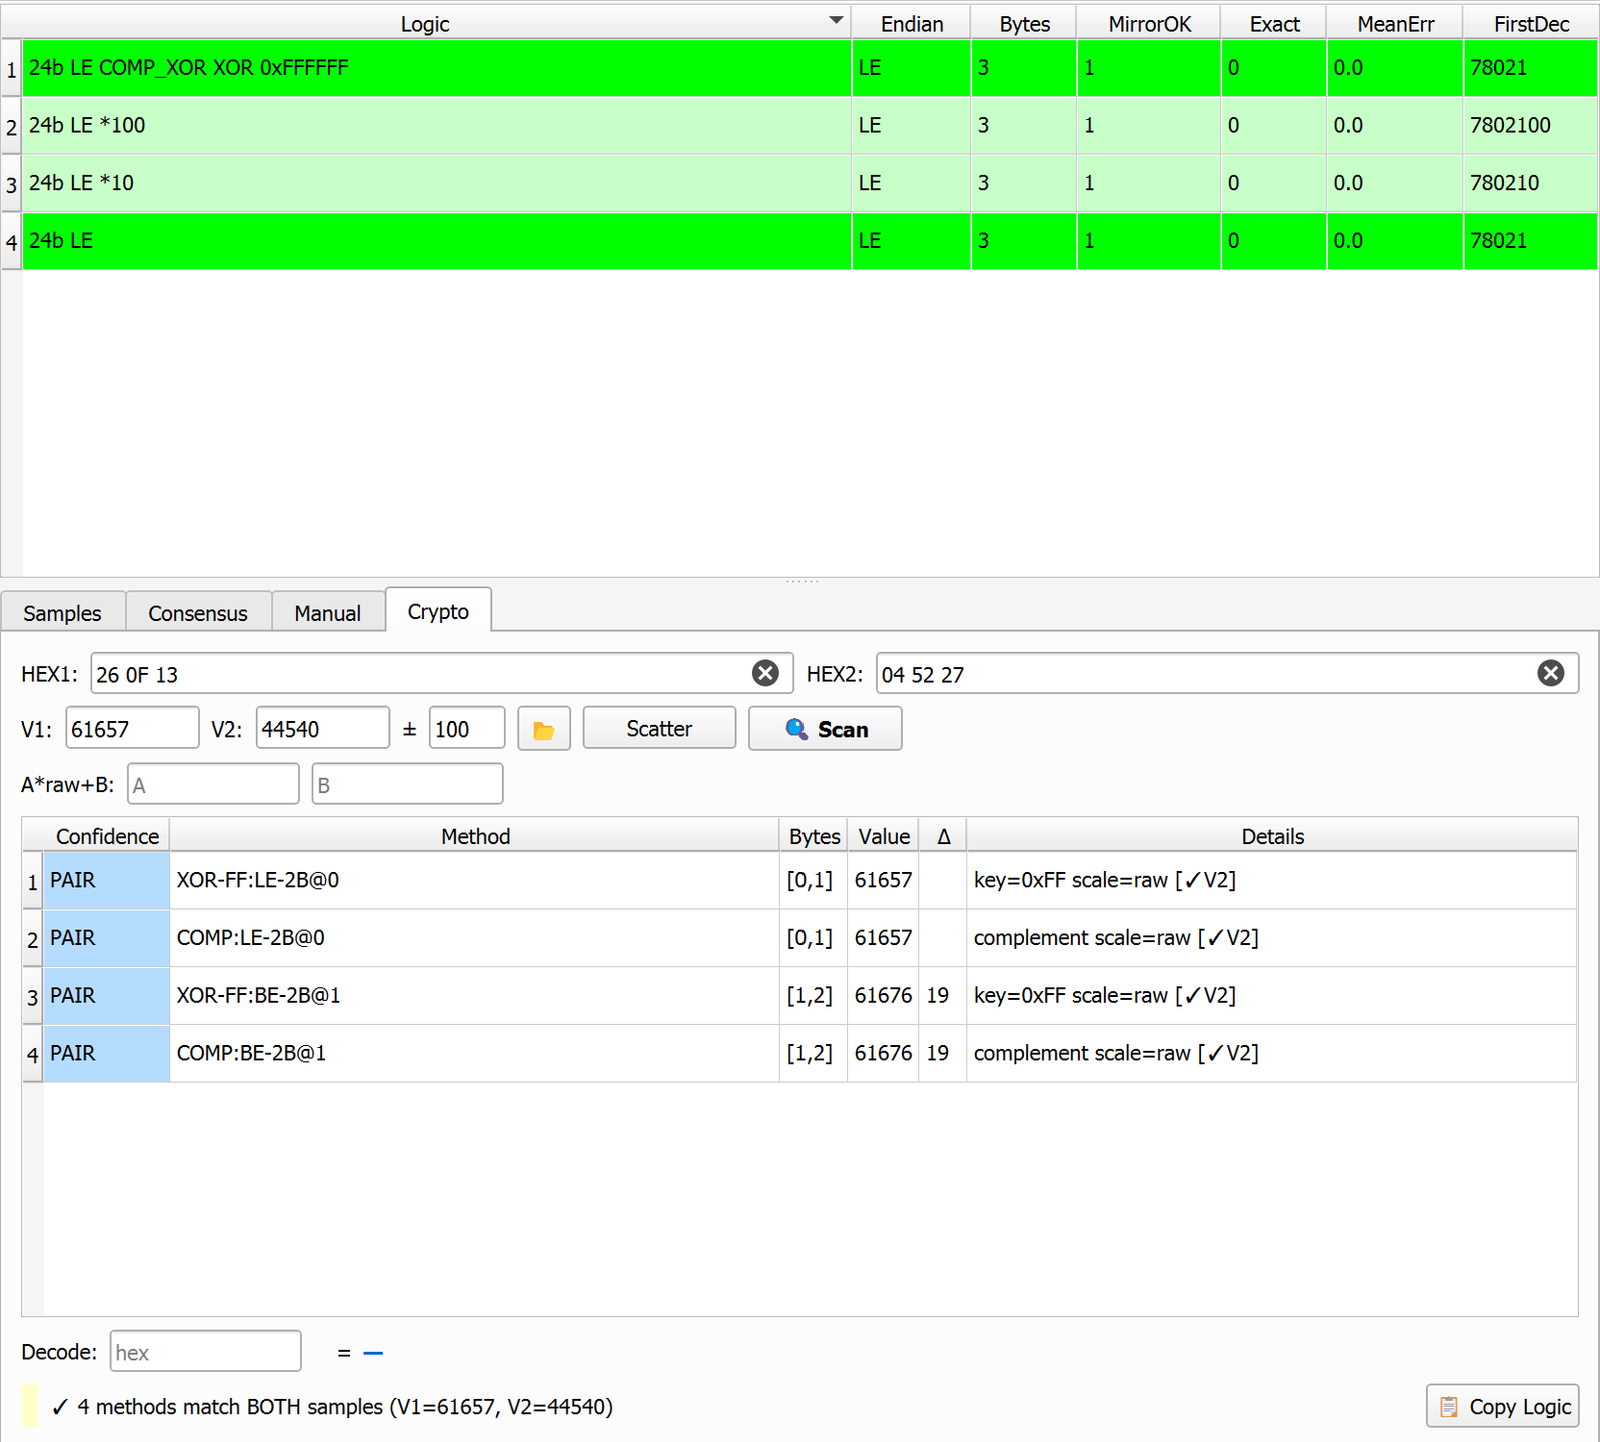
A deeper solver for when you have two known samples and want every plausible byte-level transform between them — XOR keys, complement, bit-shifted/scattered patterns — scanned and compared:
HEX1 / HEX2 — the two raw hex samples; V1 / V2 — their known decimal values (if known), with a ± tolerance.
Scatter — also test scattered/non-contiguous byte transforms (like Nibble PW Finder, but at the byte/crypto level).
Scan — results show Confidence (e.g. PAIR when a method matches both), Method (XOR-FF:LE-2B@0, COMP:LE-2B@0), Bytes, Value, Δ, Details.
A*raw+B — test a simple linear scale/offset relationship directly.
The status line ("✓ 4 methods match BOTH samples (V1=61657, V2=44540)") tells you how many methods are confirmed on both — the ones worth trusting. Copy Logic copies a confirmed method for use elsewhere.
Calibration Wizard — multi-offset + checksum
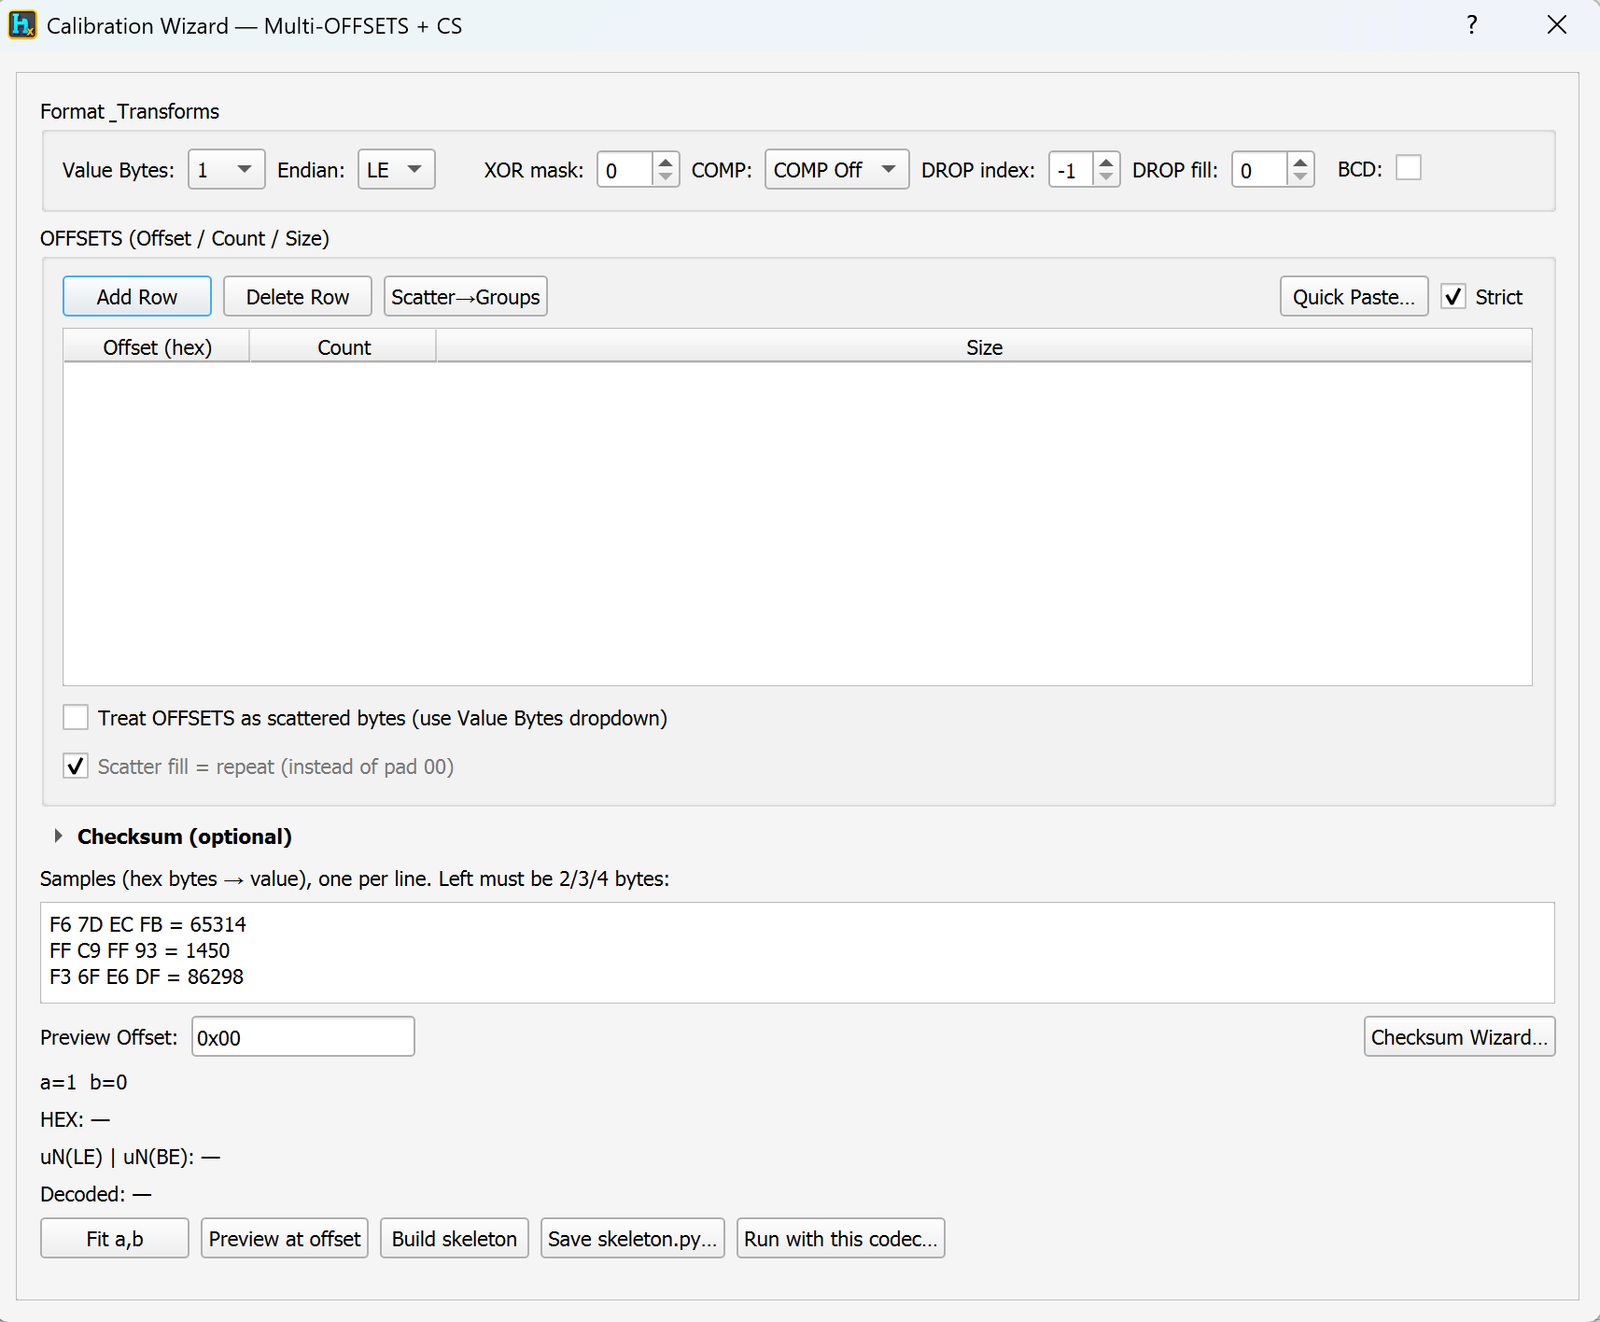
A structured builder for values that live at several offsets at once, optionally with their own checksum:
Format Transforms — Value Bytes, Endian, XOR mask, COMP (complement), DROP index/fill (skip/replace a byte), BCD.
OFFSETS table — Add/Delete Row to list every offset/count/size the value is duplicated at; Scatter→Groups and Quick Paste… speed up building a long list; Strict enforces exact matches.
Treat OFFSETS as scattered bytes — for values whose bytes are spread rather than contiguous (pairs with Scatter fill = repeat).
Checksum (optional) — an expandable section to define a checksum tied to this value/offset set.
Samples (hex → value) plus Preview Offset and Checksum Wizard… to test live; Fit a,b solves the linear scale/offset automatically.
Preview at offset / Build skeleton / Save skeleton.py… / Run with this codec… — move straight from a working calibration into a saved, testable codec.
Build Skeleton
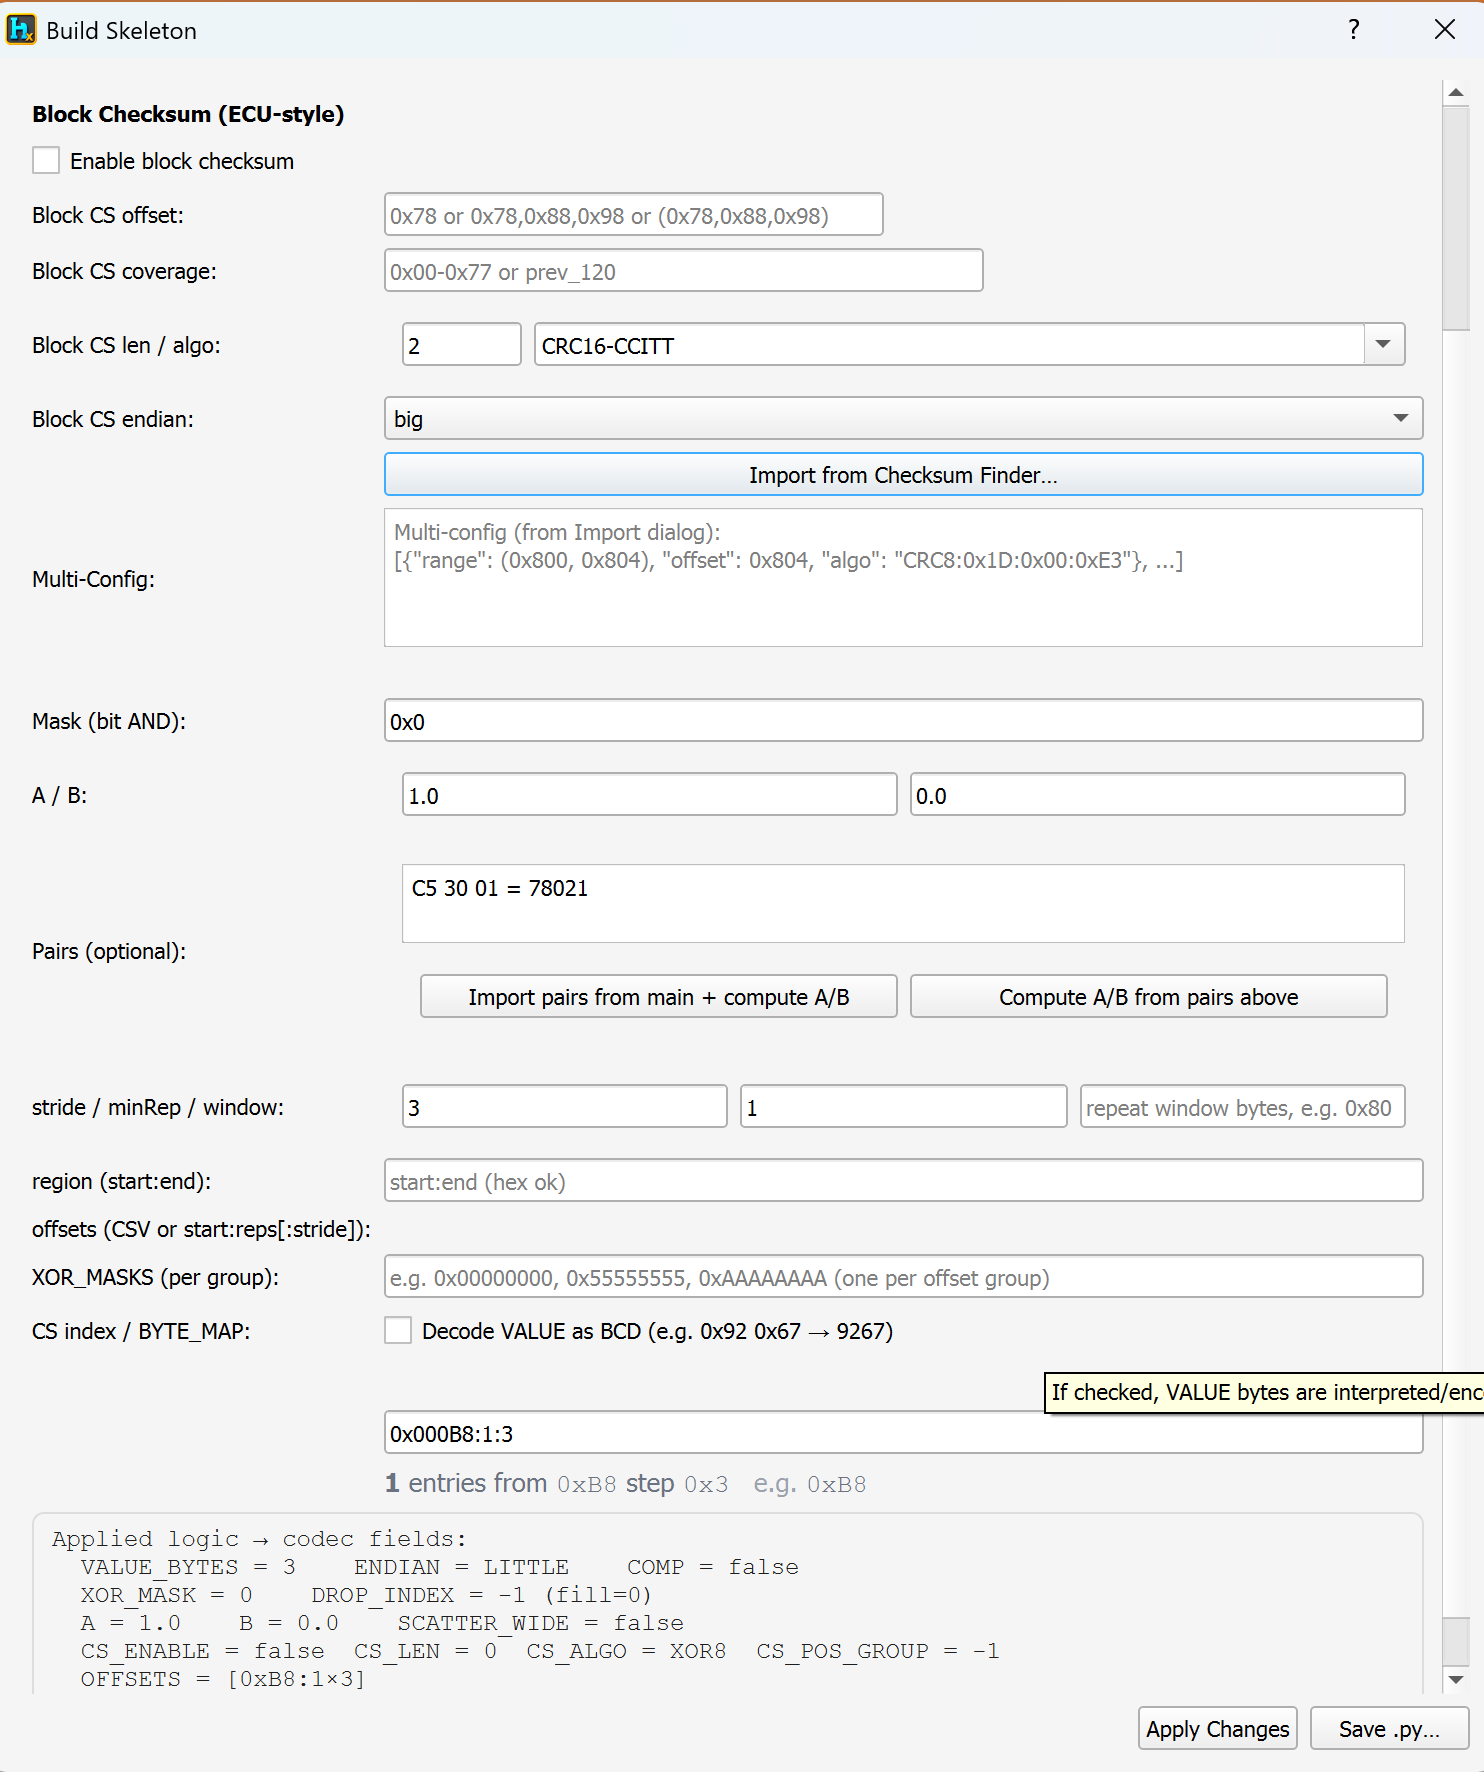
Once you're happy with a logic, Build Skeleton… turns it into a concrete codec definition (what you'd hand to Qwojtsoft Standalone or Run Skeleton). It can fold in a full Block Checksum (ECU-style): Enable block checksum, CS offset/coverage/len/algo (e.g. CRC16-CCITT)/endian, Import from Checksum Finder… (pulls a confirmed algorithm straight from the Checksum Scanner into a Multi-Config box), Mask (bit AND), A/B linear scale, Pairs (known hex→value), stride/minRep/window, region, offsets, XOR_MASKS per group, and Decode VALUE as BCD. The Applied logic → codec fields box is a live summary of every setting; Apply Changes / Save .py… apply or export it.
Run Skeleton
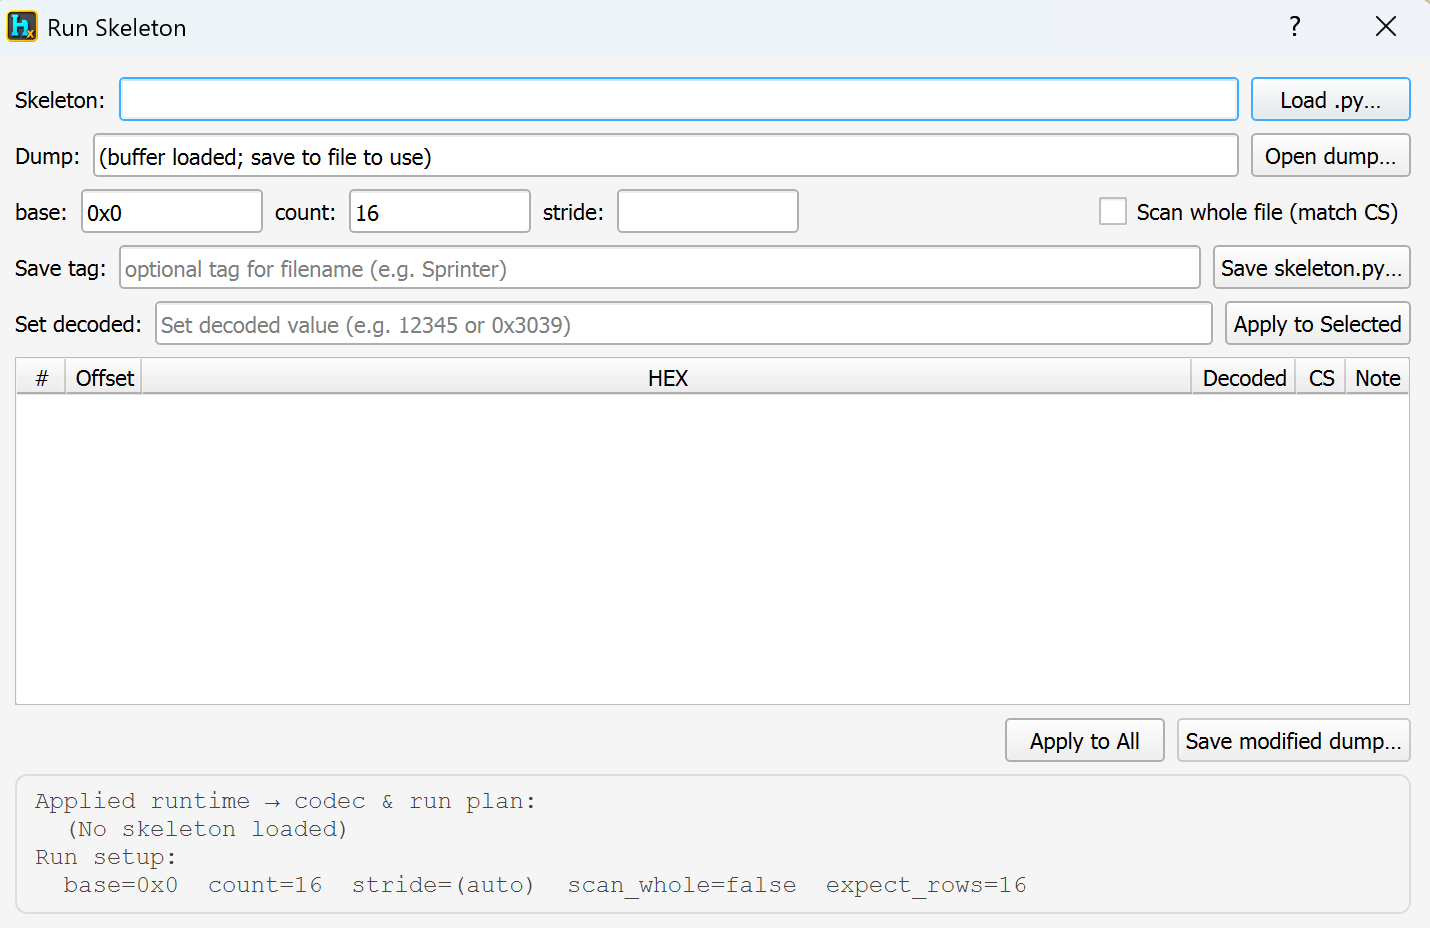
Tests a saved codec (.py skeleton) against a real dump — the same idea as Qwojtsoft Standalone, from inside Logic Finder: Load .py… the codec, Open dump… the file (or the loaded buffer), set base/count/stride for which repeated instances to check, or Scan whole file (match CS). Results list Offset, HEX, Decoded, CS, Note per instance. Set decoded + Apply to Selected writes a new value into a row; Apply to All / Save modified dump… apply across every instance and save.
Merge Codecs
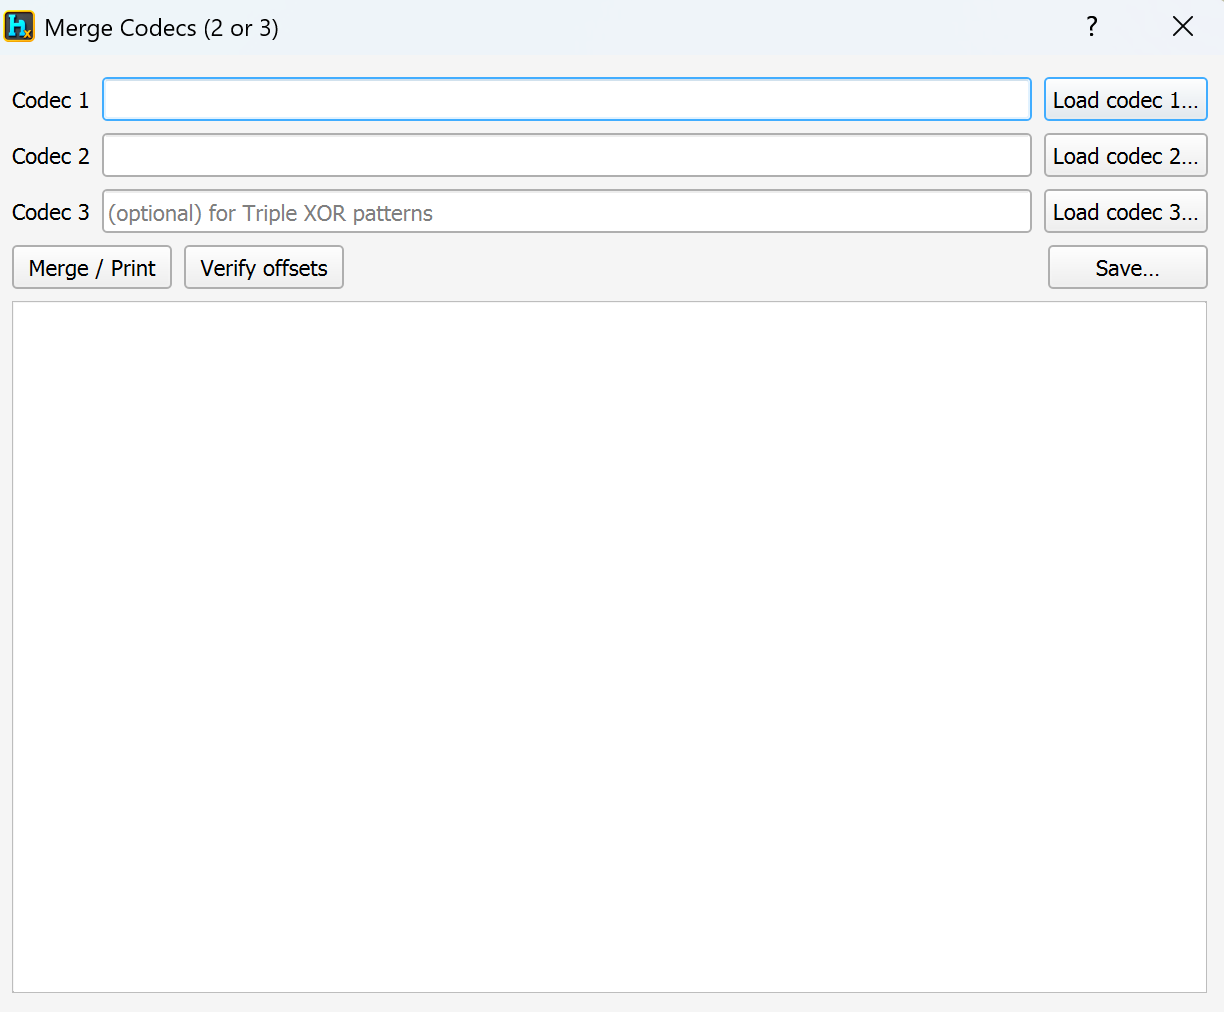
When a value's real encoding turns out to be two or three separate logics combined (e.g. different XOR keys per region, forming a triple-XOR pattern), Merge Codecs… loads Codec 1, Codec 2 and optionally Codec 3, Merge / Print them into one definition, Verify offsets to confirm they agree, and Save… the merged result.
Mini Codec Generator
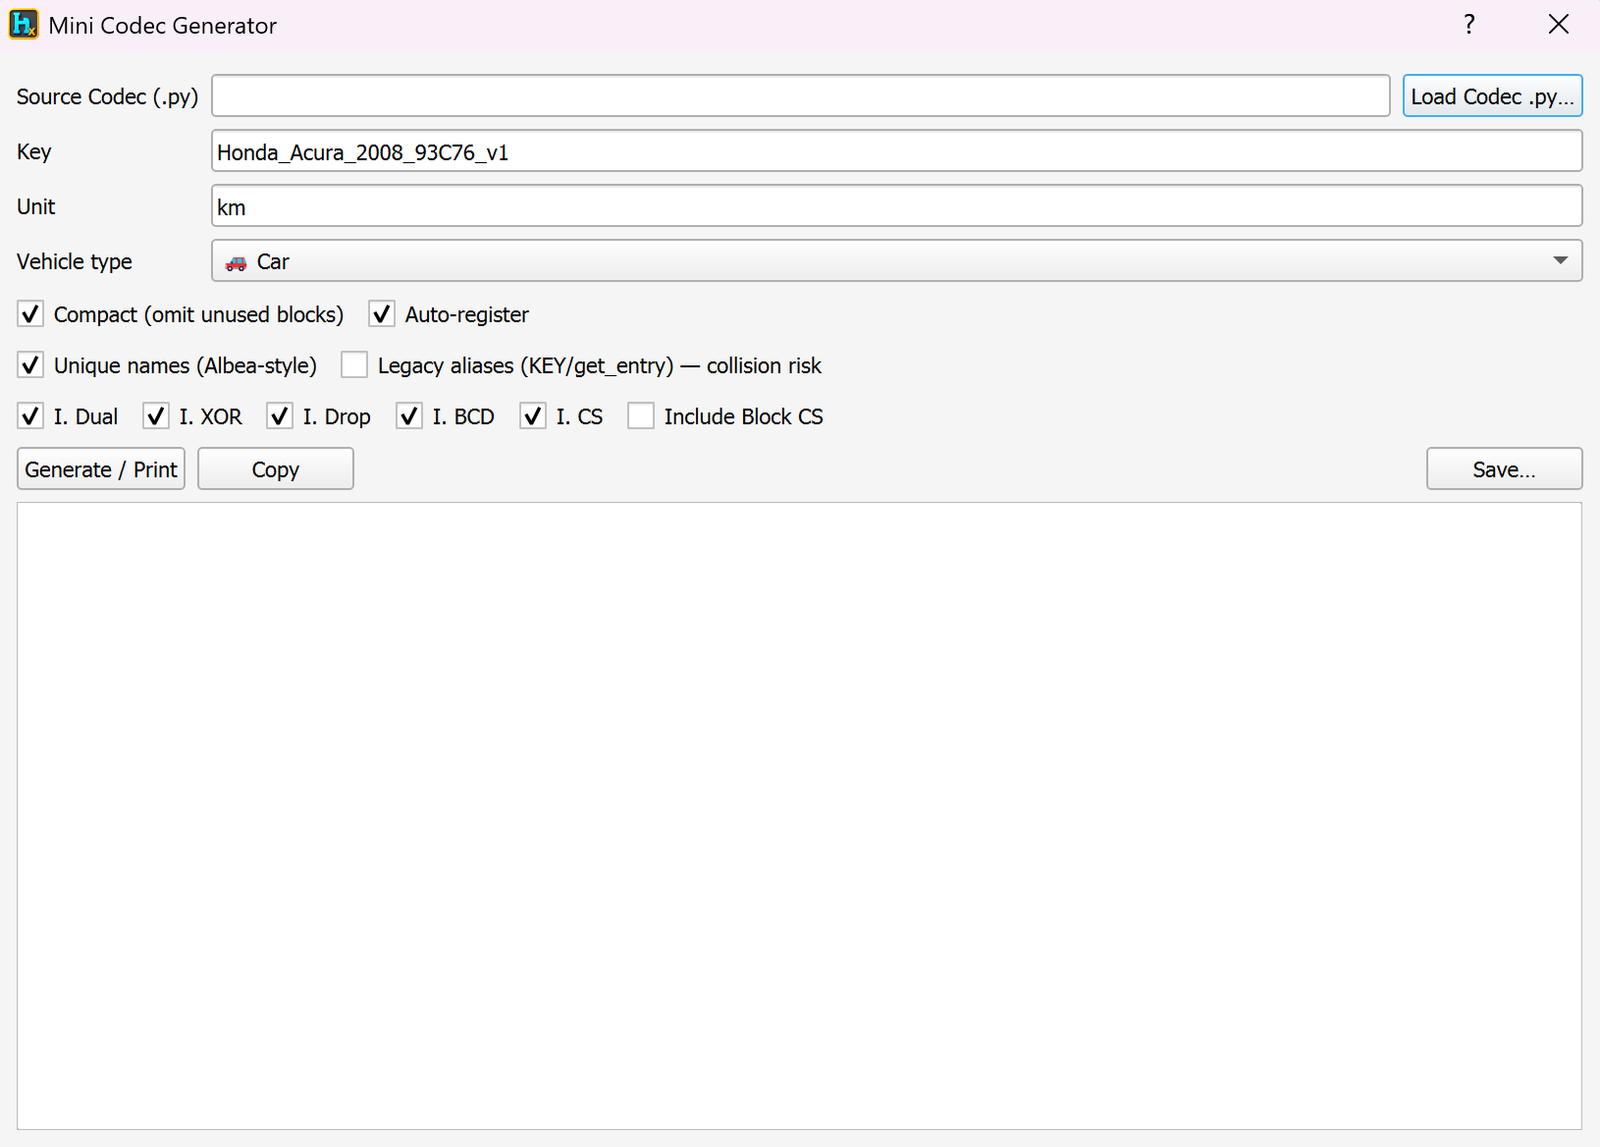
Converts a full codec into a small, named, registry-style entry — useful once you're maintaining logic for many vehicles/modules: Load Codec .py…, a unique Key (e.g. Honda_Acura_2008_93C76_v1), Unit (e.g. km) and Vehicle type, plus Compact, Auto-register, Unique names, and per-feature include toggles (Dual, XOR, Drop, BCD, CS, Block CS). Generate / Print, Copy, Save… export it. Clone Mini… duplicates an existing entry as a starting point for a similar vehicle.
Typical use cases
Working out exactly how an odometer/hours value is stored (offset, endianness, scaling, XOR, BCD) from a handful of known hex/value samples.
Confirming a checksum found in Checksum Scanner actually ties to the value's real offsets before relying on it.
Building a reusable, testable codec for a specific ECU/module, then compacting it into a small registry entry for future reuse.
Combining two or three independently-solved partial logics into the one real combined encoding.
Requirements
At least one hex sample with a known real-world value to start solving from.
Ultimate edition.
Developer Tools / Checksum Scanner (CsF)
Checksum Scanner (Checksum Finder CsF)
Available in Ultimate
Video walkthrough
What is this?
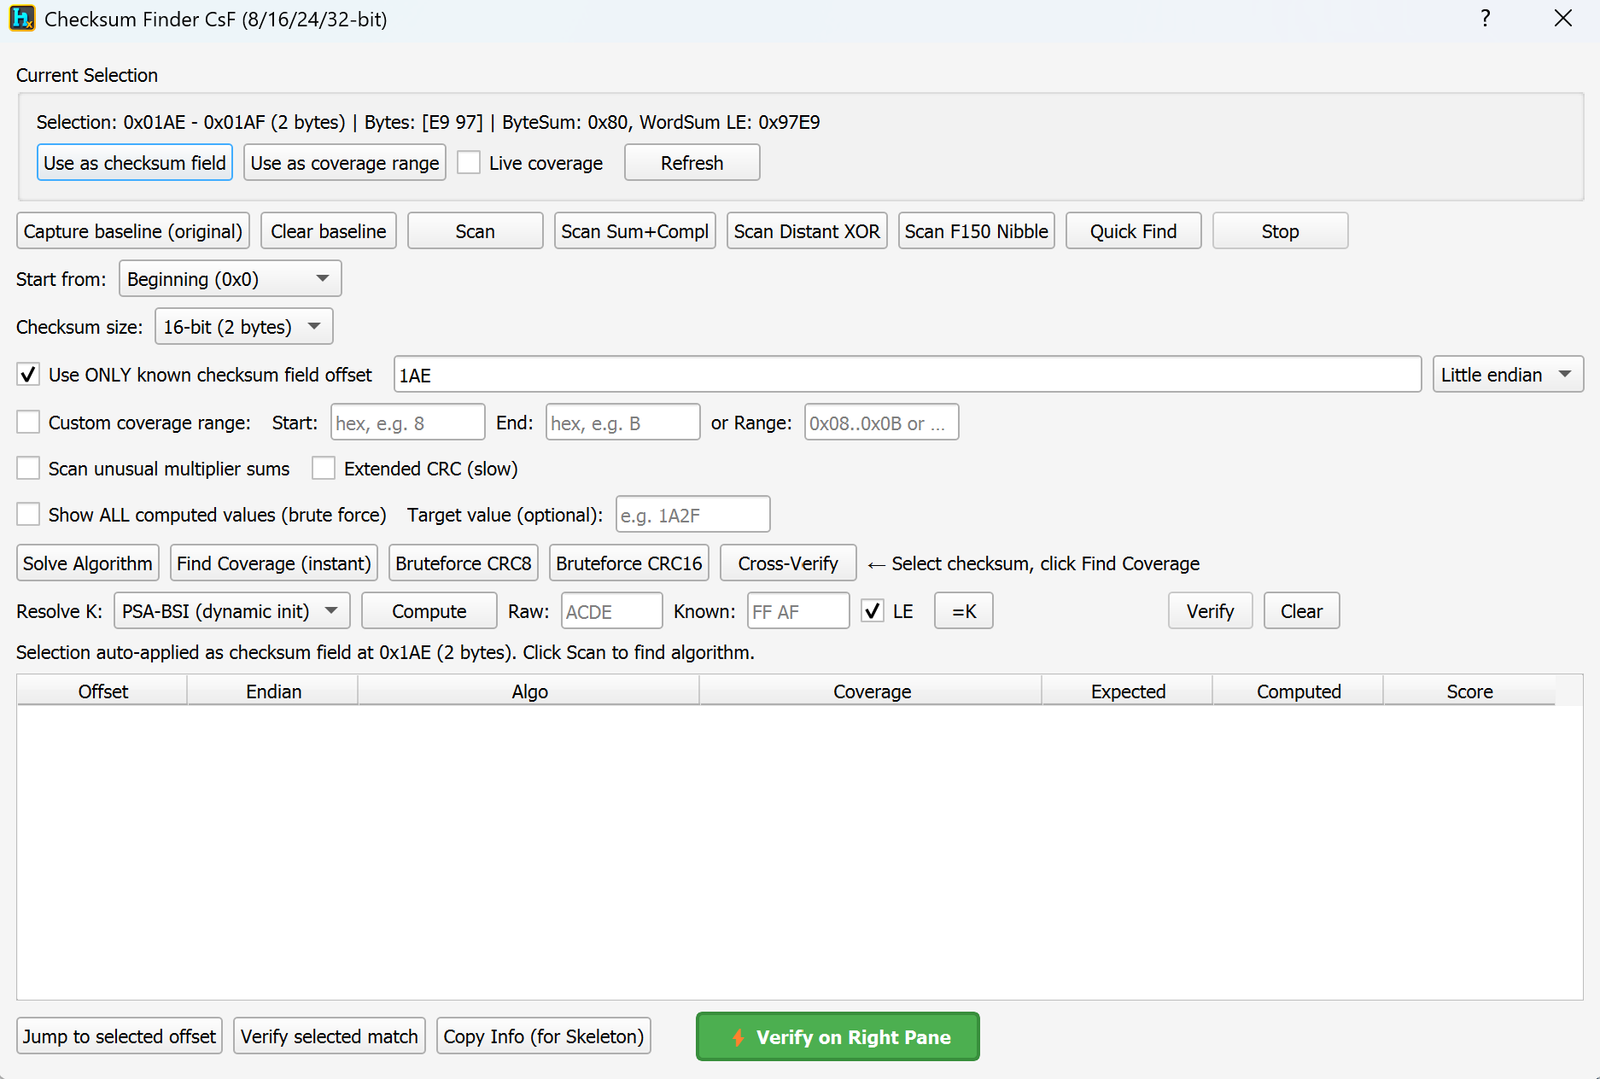
The advanced counterpart to Checksum of Selection: instead of just computing known algorithms over a selection, this brute-forces which checksum algorithm and coverage range actually produce a known checksum byte, and can cross-verify a candidate across two open dumps at once so you know it's the real algorithm and not a coincidence.
How to open it
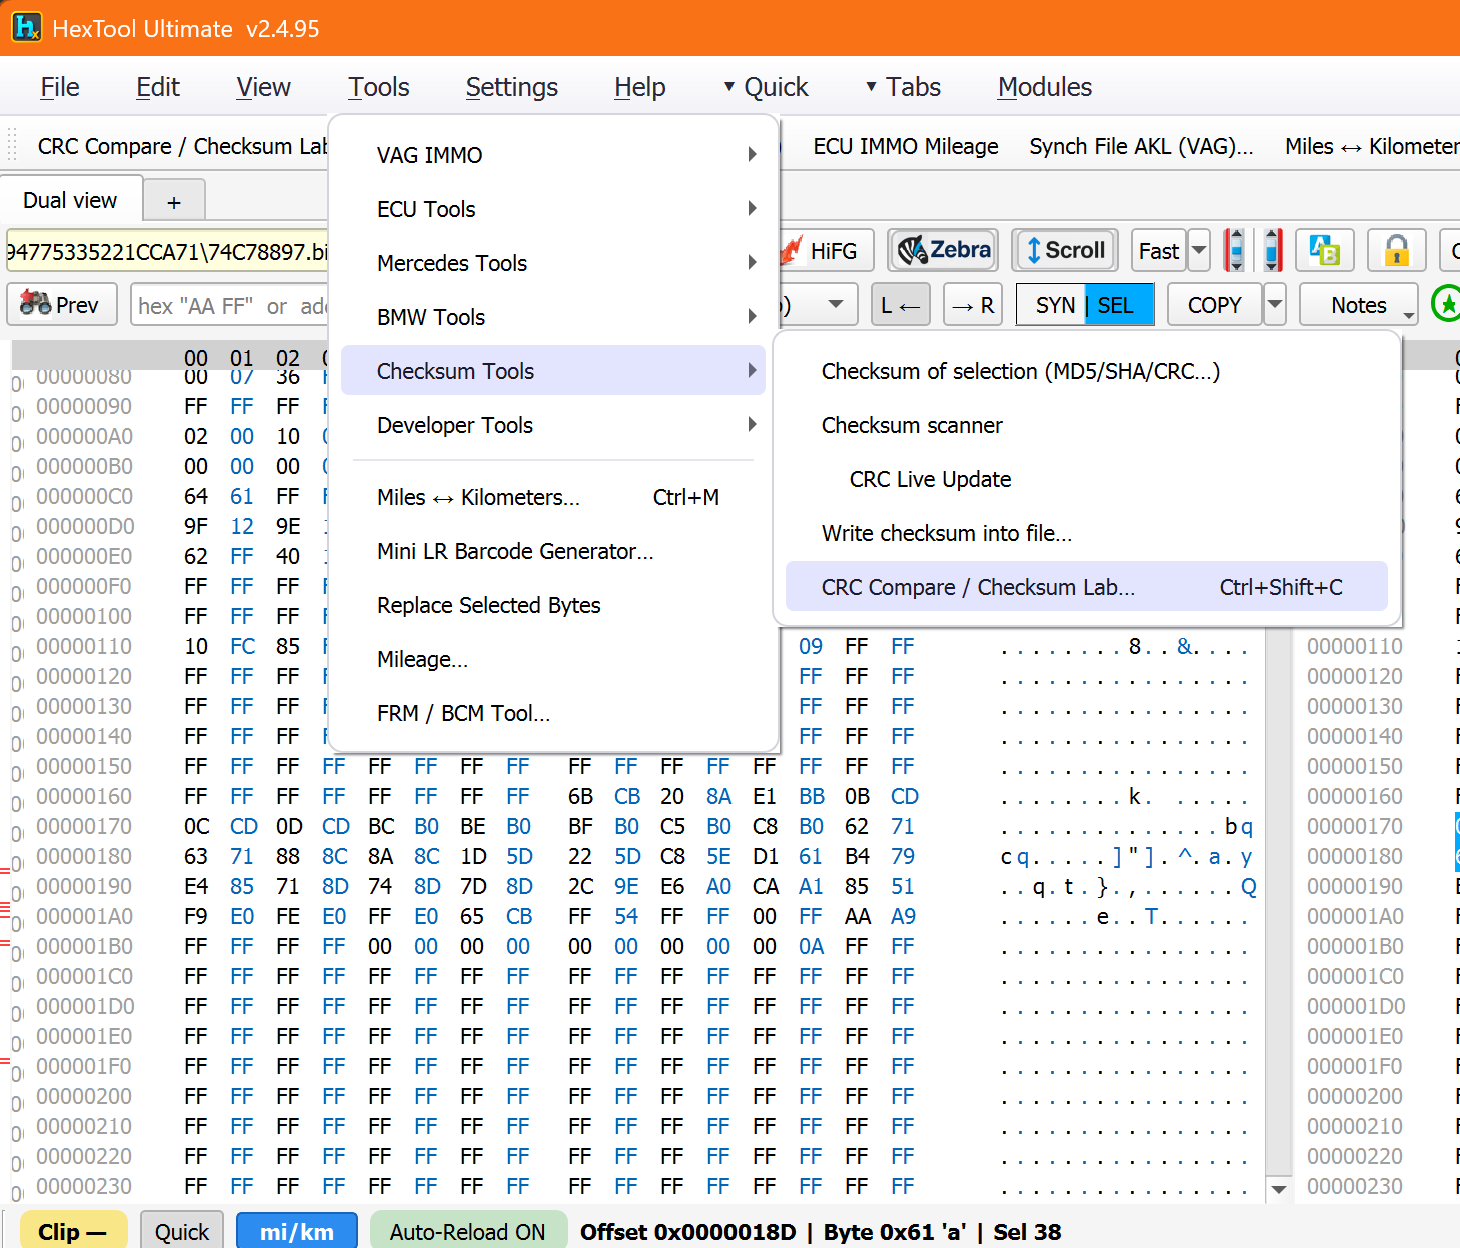
Tools → Checksum Tools → Checksum scanner.
Current Selection
Shows the live selection's raw info (Selection range, Bytes, ByteSum, WordSum LE) then buttons to tell the scanner what that selection is:
Use as checksum field — treat the current selection as the known checksum bytes themselves.
Use as coverage range — treat the current selection as the data range the checksum is supposed to cover.
Live coverage — keeps the coverage range following your selection live.
Refresh — re-reads the current selection info.
Scan actions
Capture baseline (original) / Clear baseline — stores an unmodified copy of the data so later scans can diff against it.
Scan — the main brute-force pass over standard checksum algorithms.
Show ALL computed values (brute force) + Target value (optional) — dump every computed value, optionally next to a target you're hunting for.
Solve tools
Solve Algorithm — tries to derive the exact algorithm from the current checksum field + coverage range.
Find Coverage (instant) — once you've picked an algorithm candidate, instantly figures out which byte range it must be covering.
Bruteforce CRC8 / Bruteforce CRC16 — exhaustively tries every poly/init/xor-out combination for that CRC width.
Cross-Verify — checks a selected candidate against a second location or file to confirm it isn't a coincidental match.
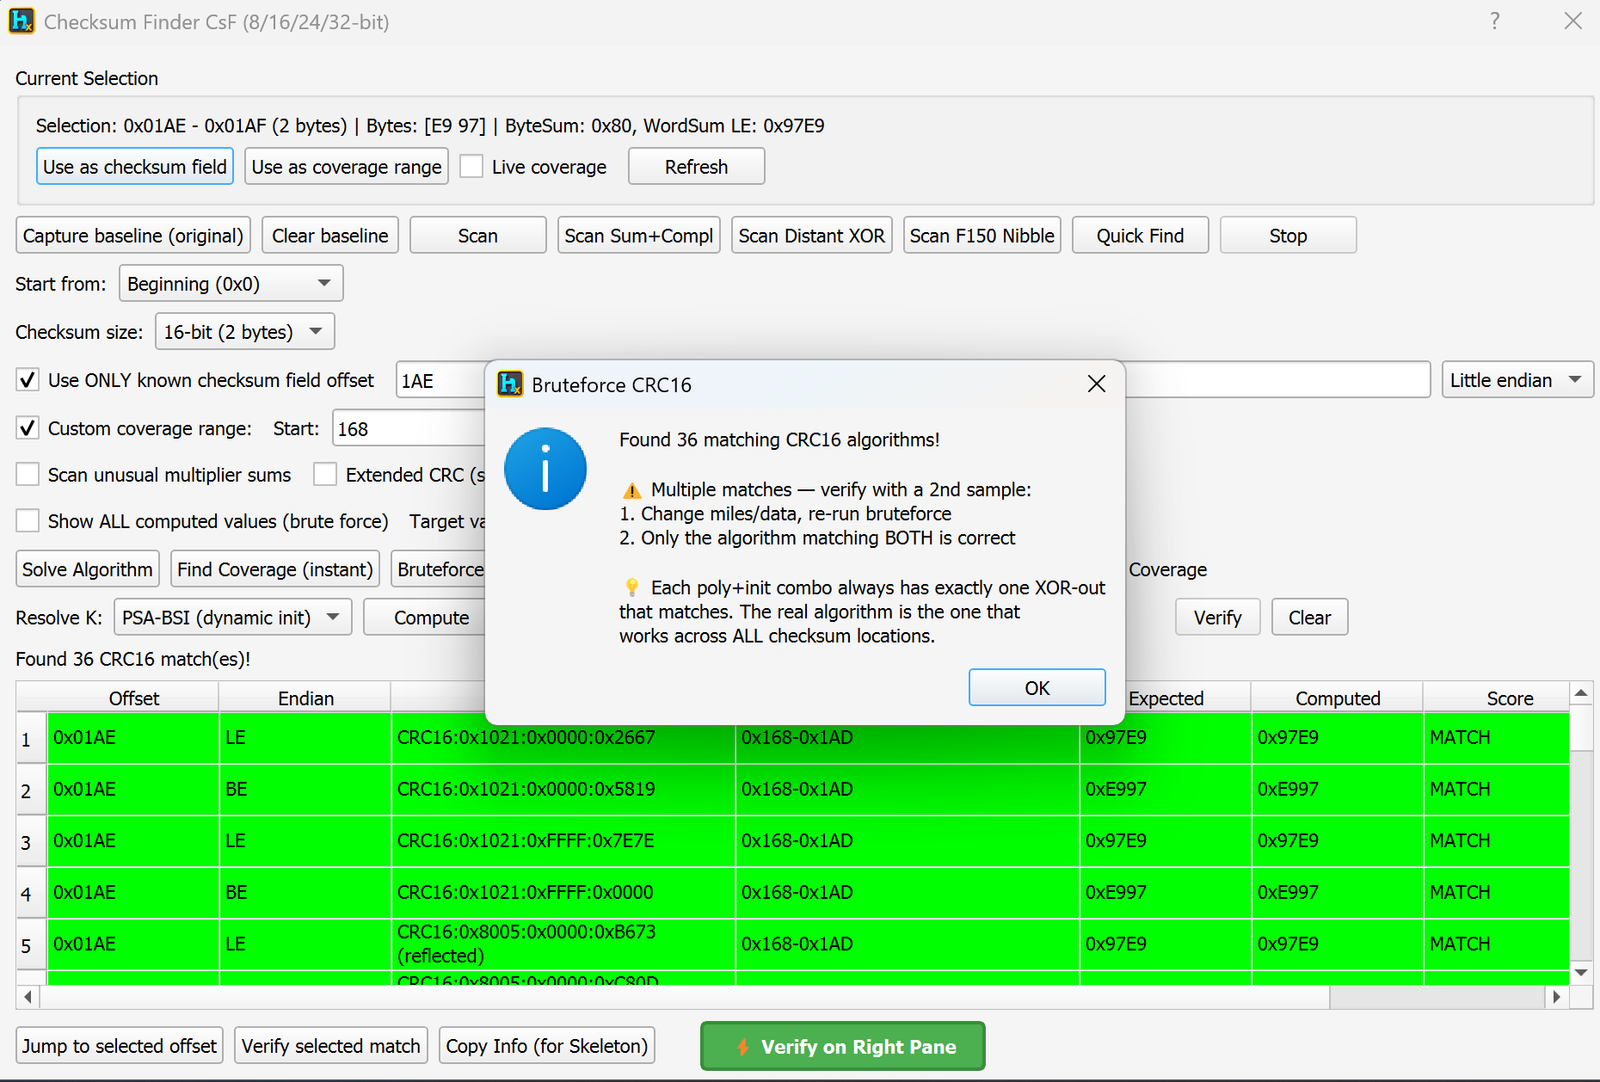
A brute-force CRC pass can easily turn up many matching poly/init/xor-out combinations for one checksum (here, 36). Each poly+init combo always has exactly one XOR-out that matches, so a wide hit count on one sample alone doesn't mean much — verify with a second sample (e.g. edit the mileage and re-run): only the algorithm that matches on both is the real one.
Resolve K
For checksums with a per-vehicle/per-module dynamic key component: the Resolve K dropdown picks the algorithm family (e.g. PSA-BSI (dynamic init)), Compute calculates K from the Raw bytes and Known expected checksum (with an LE toggle), =K applies it, and Verify / Clear confirm or reset.
Results table & cross-pane verify
Columns: Offset, Endian, Algo, Coverage, Expected, Computed, Score — each row a candidate, and whether it reproduced the known checksum (MATCH).
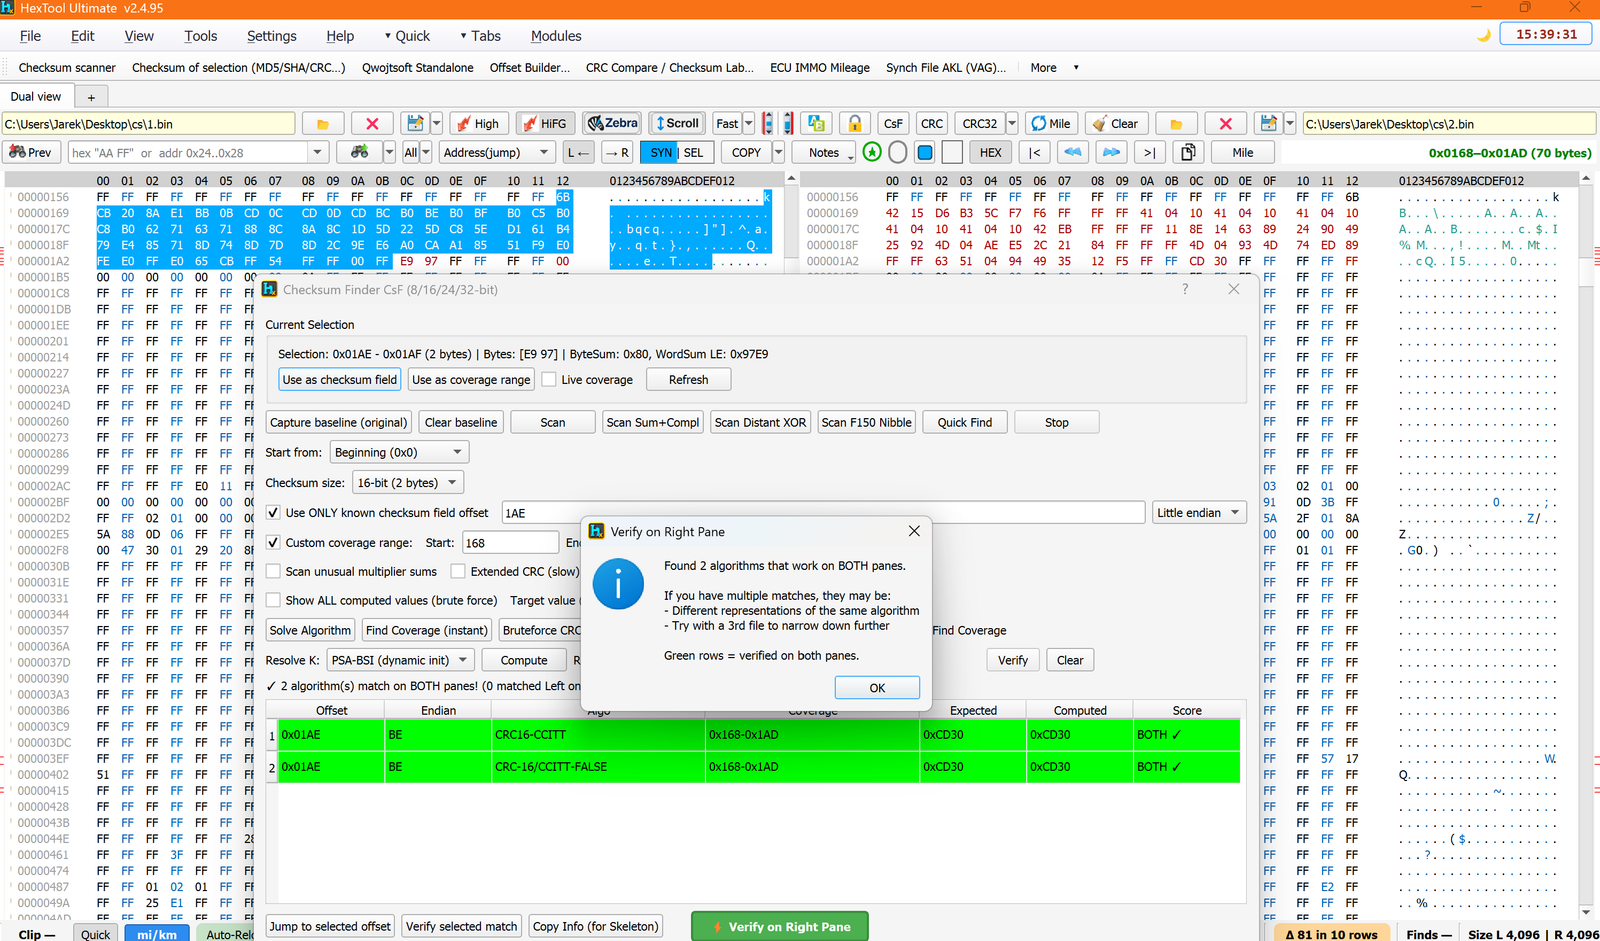
With two dumps open (Dual view), Verify on Right Pane re-runs the selected candidate(s) against the other pane and reports how many algorithms hold up on both (e.g. "Found 2 algorithms that work on BOTH panes."). Green rows = verified on both panes — the strongest confirmation the scanner can give. If multiple survive, they may be different notations of the same algorithm; try a third file to narrow further.
Bottom actions
Jump to selected offset — jumps the hex view to the selected result.
Verify selected match — re-checks the highlighted candidate.
Copy Info (for Skeleton) — copies a formatted summary of the confirmed algorithm/offsets, ready to paste into a codec skeleton for Qwojtsoft Standalone or the Offset Tool.
Typical use cases
Reverse-engineering an unknown checksum algorithm from scratch, when you only know the checksum bytes and roughly which data they cover.
Cutting down a huge list of brute-force CRC matches to the one real algorithm, using a second sample or a second open dump.
Producing a verified codec skeleton to hand off to the Offset Tool or Qwojtsoft Standalone once the algorithm is confirmed.
Requirements
A file loaded, with at least a rough idea of where the checksum lives.
Ultimate edition.
Developer Tools / Checksum of Selection
Checksum of Selection
Available in ProFullUltimate
Video walkthrough
What is this?
A "basic checksum scanner" — it computes a large batch of hash/checksum algorithms over the current selection at once, and can auto-scan through the file byte by byte while re-computing them, stopping the moment one matches a known target value you're looking for. This is the tool worth trying first before reaching for the more specialized Checksum Scanner.
How to open it
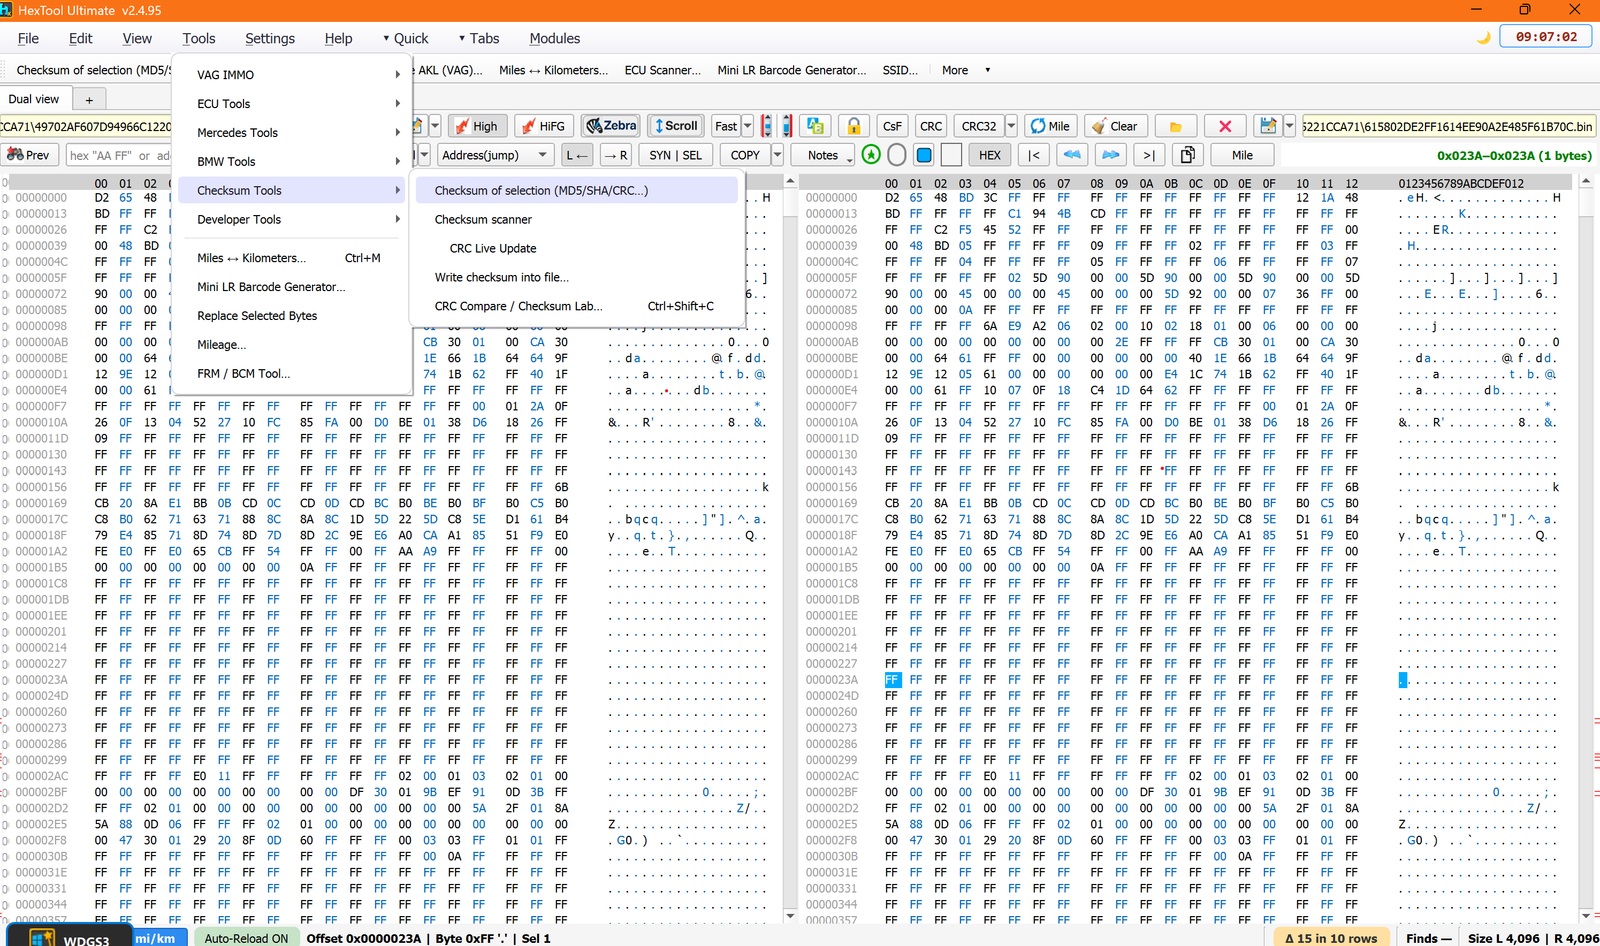
Tools → Checksum Tools → Checksum of selection (MD5/SHA/CRC…).
Target(s)
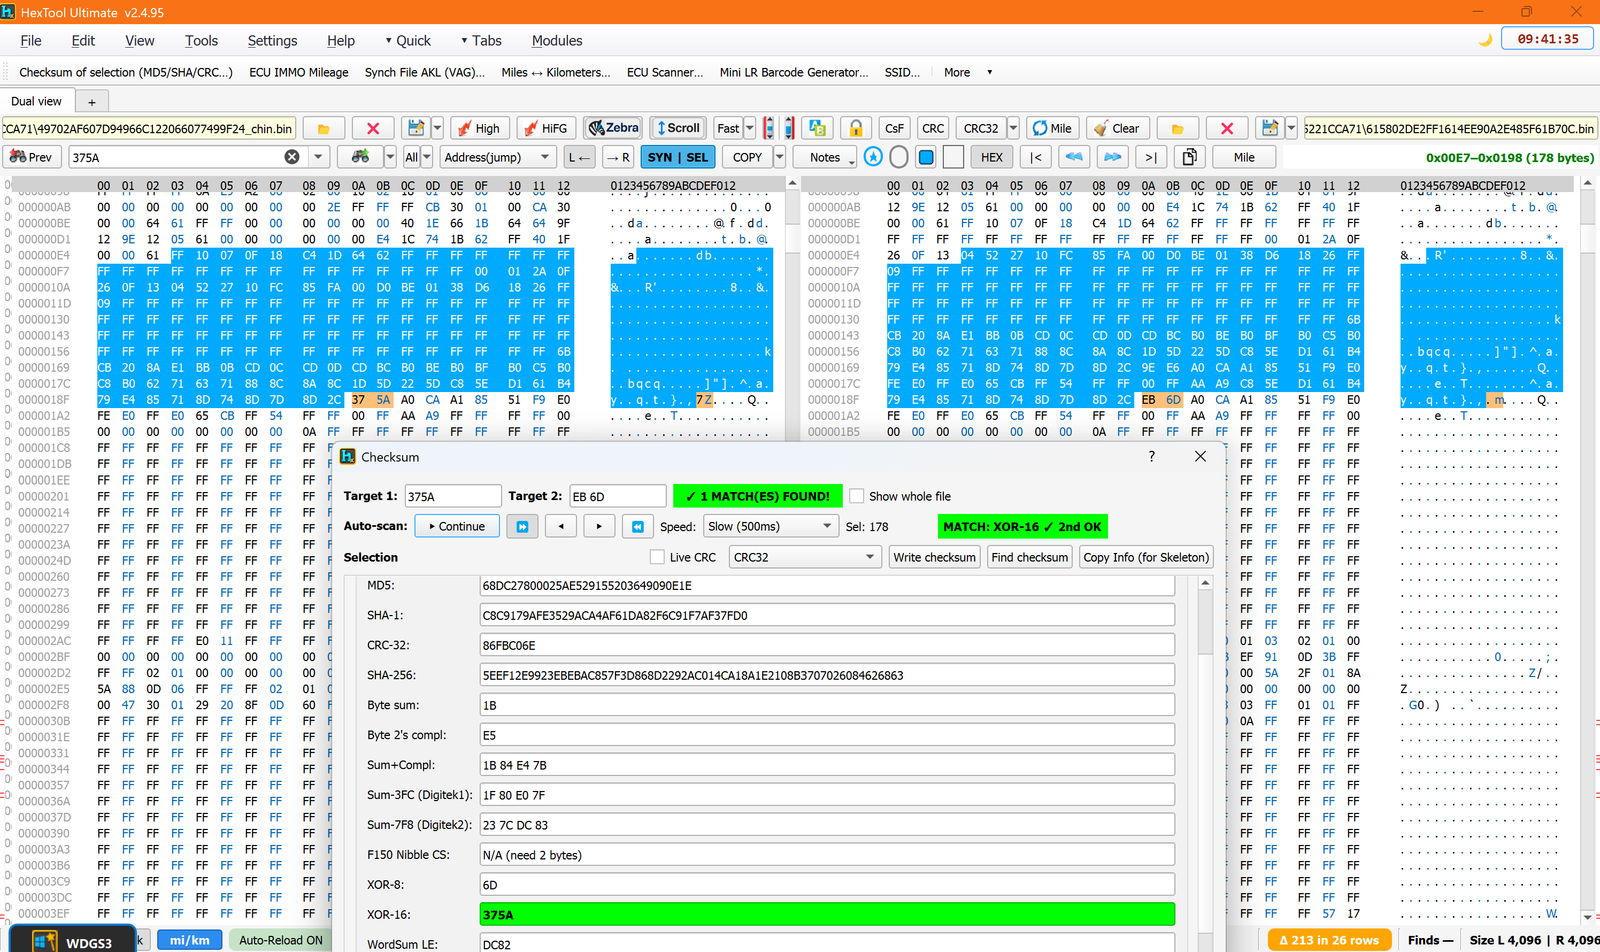
Target 1 / Target 2 — hex value(s) you're hunting for (e.g. a known checksum byte from the ECU). Target 2 is optional, for algorithms that produce two bytes (like XOR-16).
Show whole file — computes every value over the entire file instead of just the current selection.
Auto-Scan
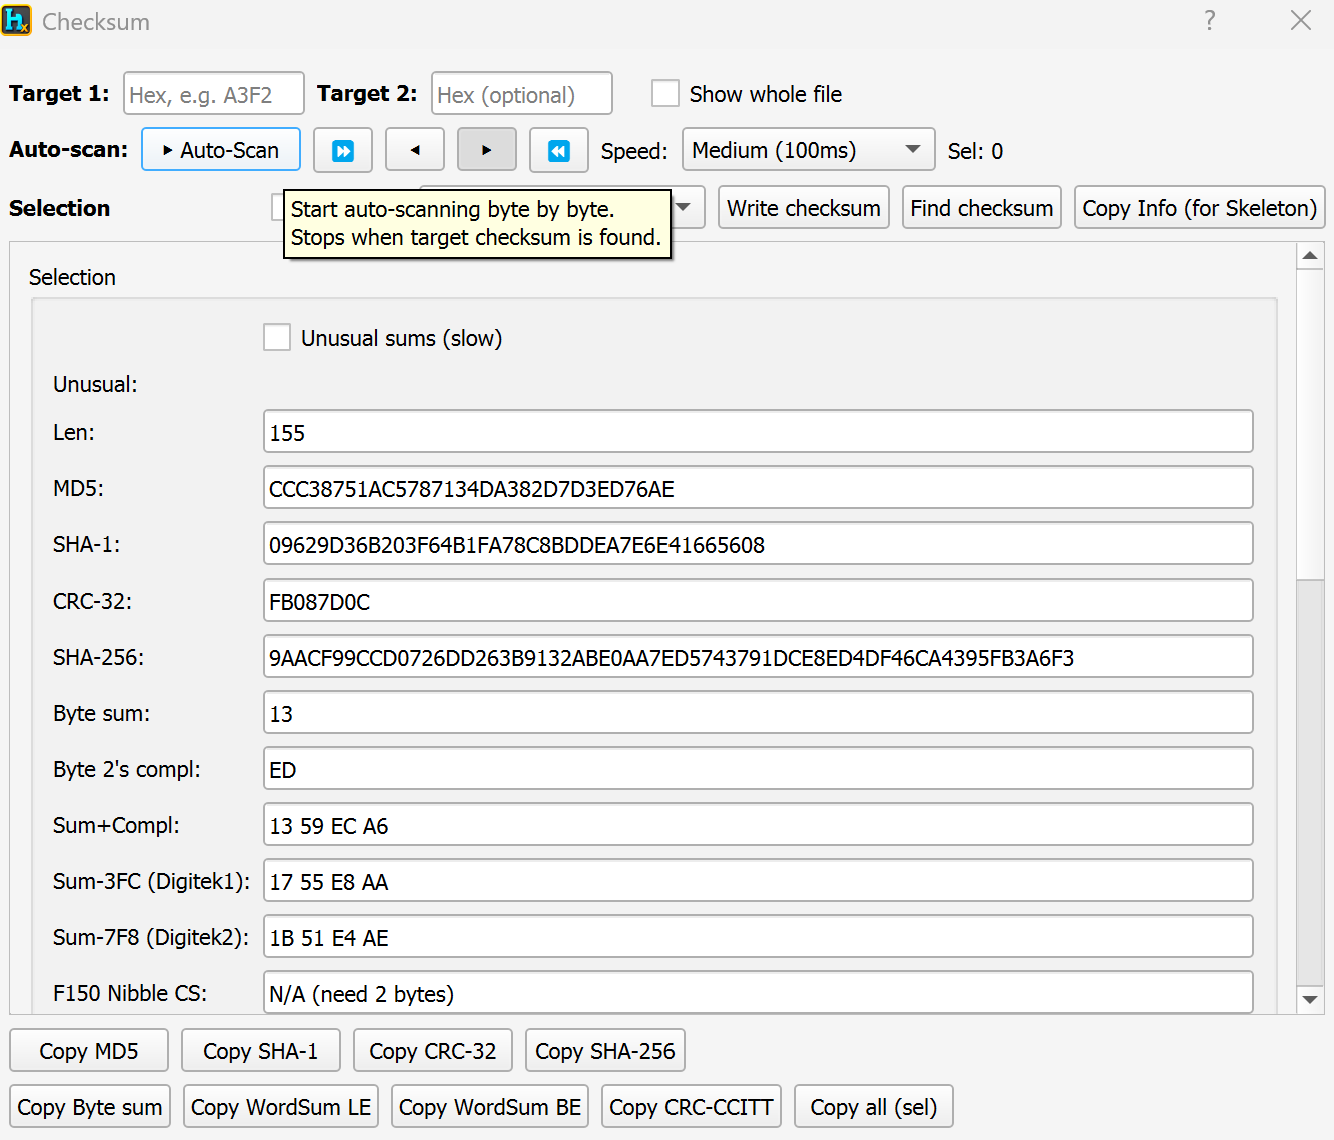
Instead of manually moving the selection and re-reading the values, Auto-Scan walks the selection through the file for you, byte by byte, checking every computed value against your target(s) as it goes:
▶ Auto-Scan — starts scanning forward; stops automatically as soon as the target checksum is found.
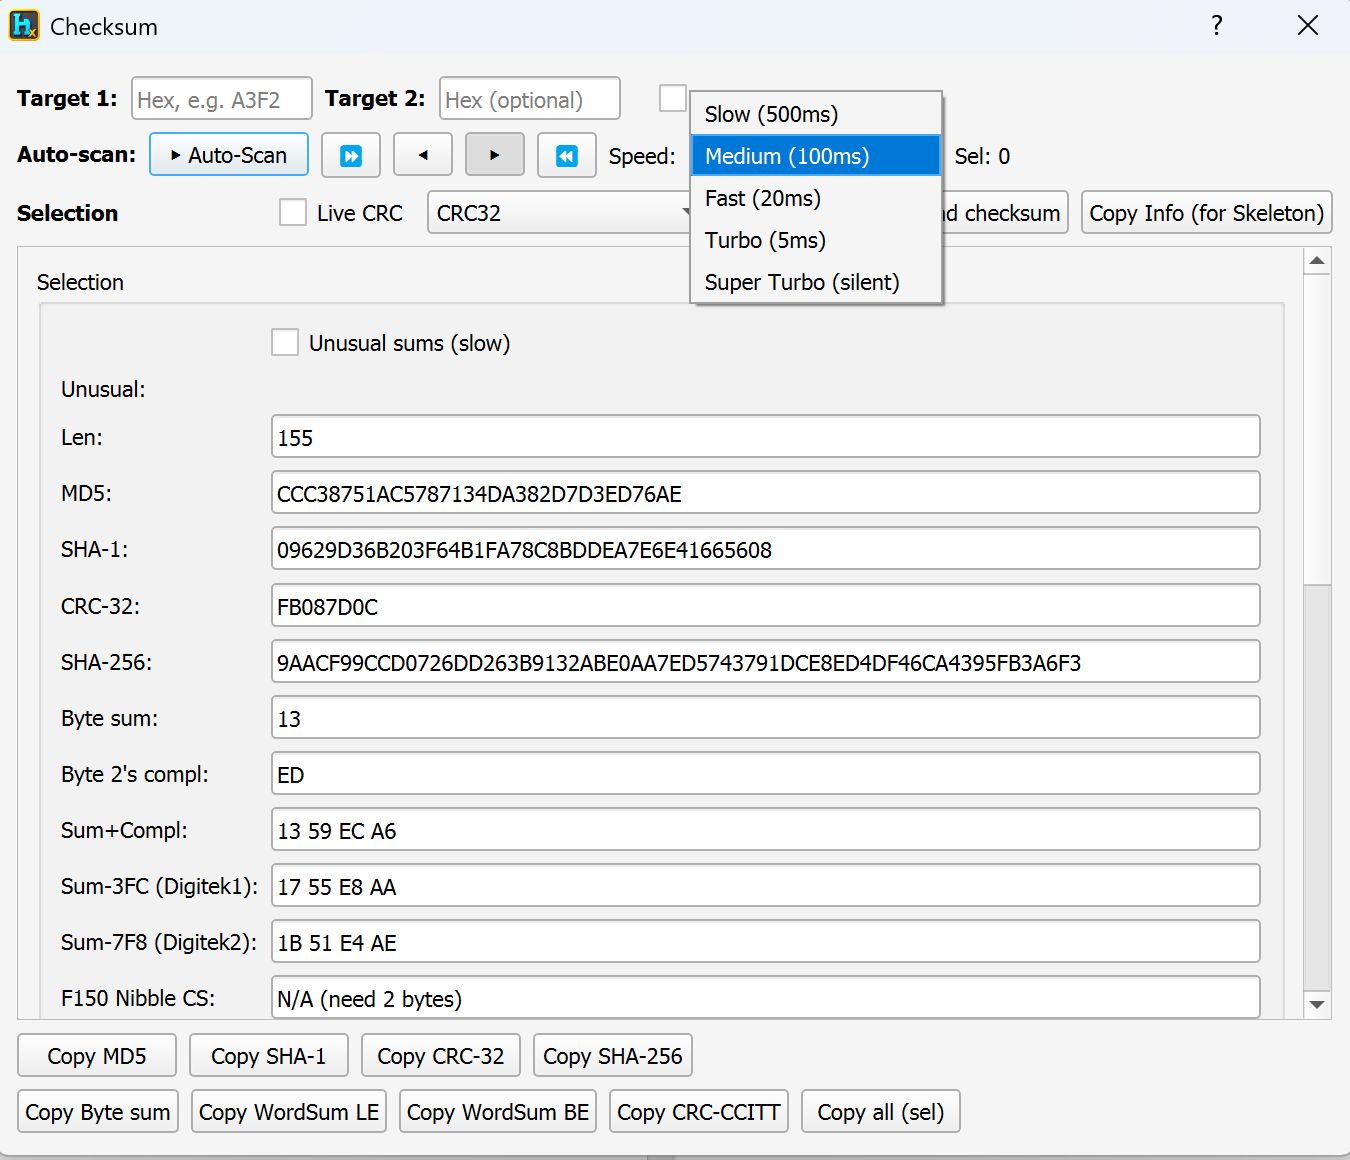
Speed — Slow (500ms), Medium (100ms), Fast (20ms), Turbo (5ms), Super Turbo (silent). Medium is the recommended speed to try first — slow enough to watch the values update, fast enough not to waste time on a big file.
When a match is found, the dialog highlights it clearly — e.g. scanning for 375A / EB 6D stopped with a green "✓ 1 MATCH(ES) FOUND!" banner and "MATCH: XOR-16 ✓ 2nd OK", and the button changes to Continue so you can keep scanning for further matches.
Computed values
The Selection panel lists dozens of values computed live from the current selection, including:
Len, MD5, SHA-1, CRC-32, SHA-256
Byte sum, Byte 2's compl, Sum+Compl
Sum-3FC (Digitek1), Sum-7F8 (Digitek2), F150 Nibble CS(needs at least 2 bytes selected)
Two checkboxes reveal slower/less common algorithms on demand — leave them off unless you specifically need them:
Unusual sums (slow) — extra rare checksum variants.
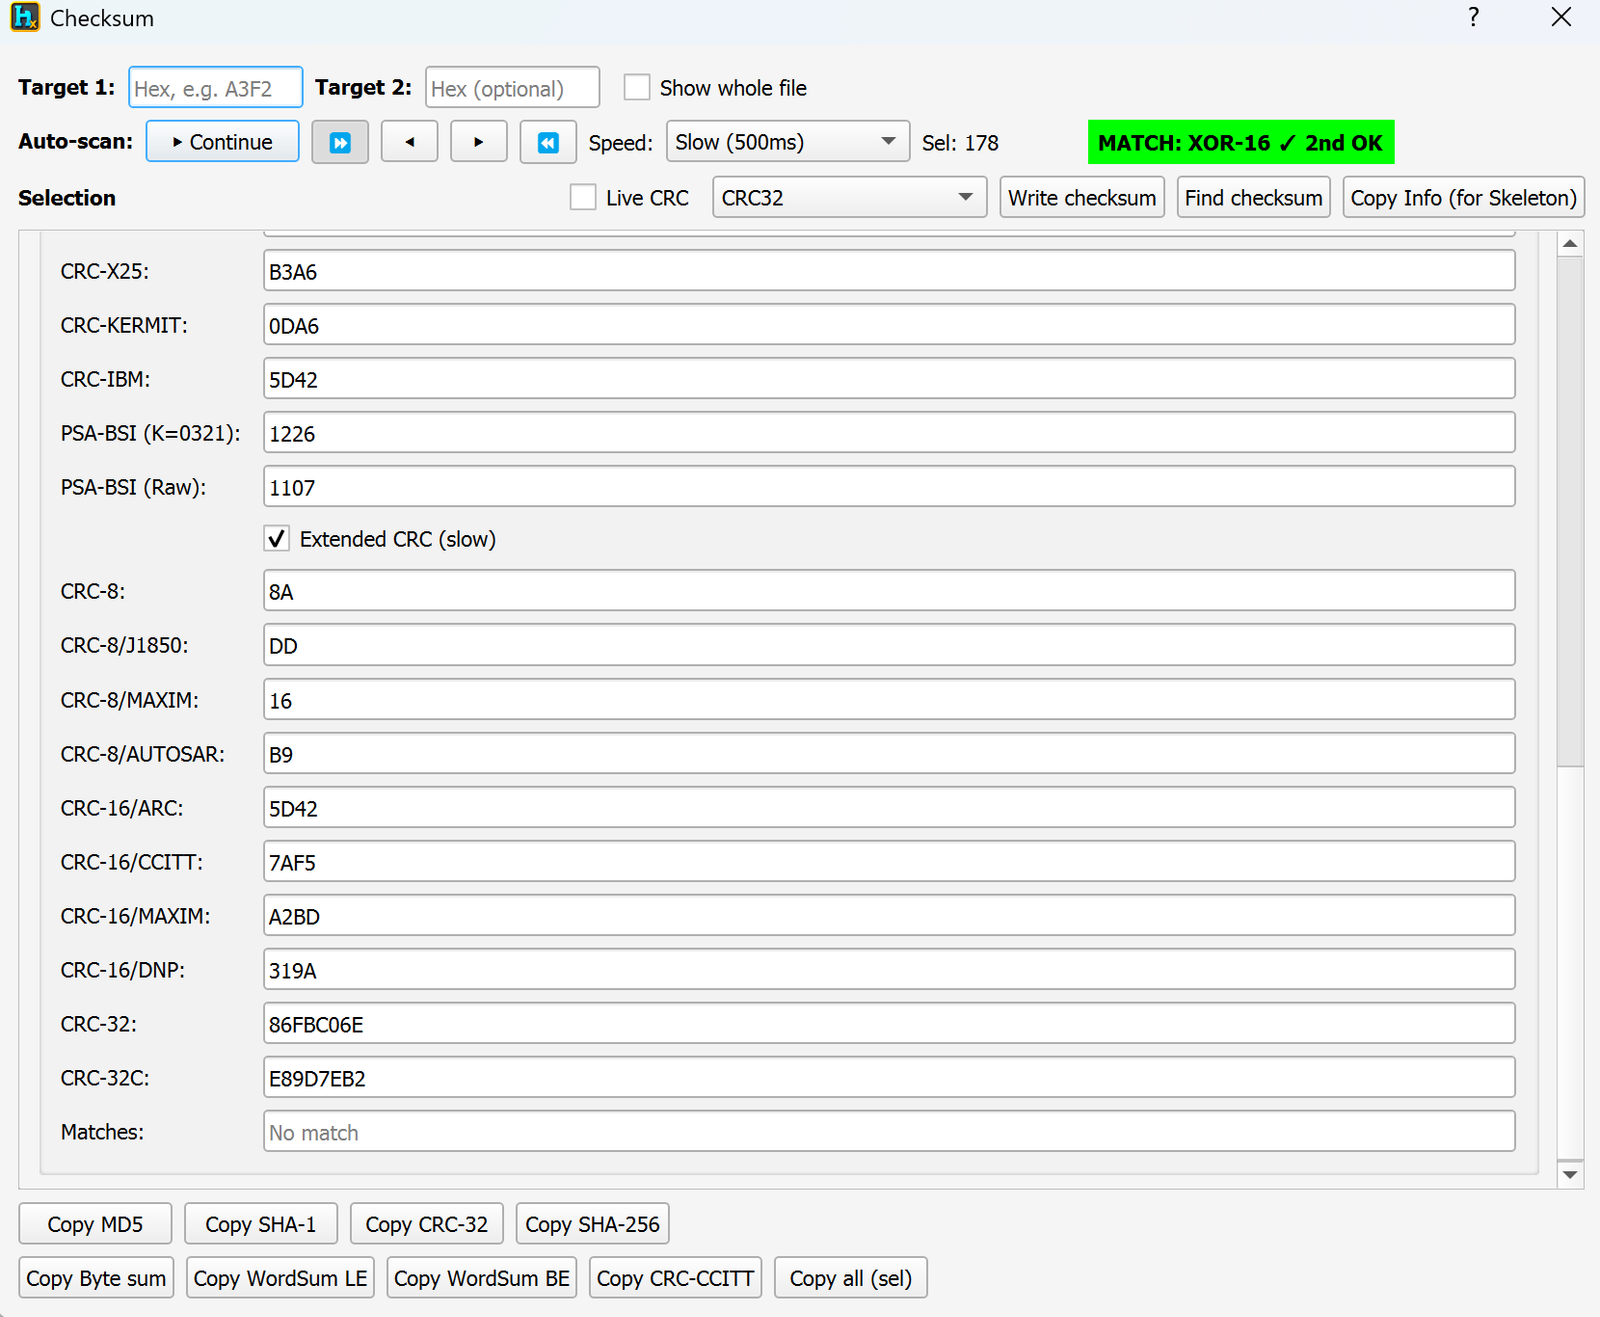
Extended CRC (slow) — adds CRC-8, CRC-8/J1850, CRC-8/MAXIM, CRC-8/AUTOSAR, CRC-16/ARC, CRC-16/CCITT, CRC-16/MAXIM, CRC-16/DNP, CRC-32C, plus a Matches field summarizing which of these hit the target.
Buttons
Write checksum — writes the currently-shown value back into the file at the selected location.
Find checksum — searches the file for a byte run matching the shown value.
Copy Info (for Skeleton) — copies a formatted summary, useful for pasting into a Logic Finder / offset skeleton.
Copy MD5 / SHA-1 / CRC-32 / SHA-256 / Byte sum / WordSum LE / WordSum BE / CRC-CCITT / all (sel) — quick clipboard shortcuts for each value.
Tip: turn off Copy on Selection first — Auto-Scan moves the selection on every step, and with Copy on Selection enabled that means every step also copies to the clipboard, slowing the scan noticeably (same tip as in Replace Selected Bytes and Copy Function). Try forward scanning first; if nothing turns up, scan backward from the end — some checksums sit before their data. Leave Unusual sums / Extended CRC off for the initial scan on slower machines.
Typical use cases
Finding an unknown checksum algorithm/offset by brute-force scanning a selection against a known target byte(s).
Quickly getting MD5/SHA/CRC of an arbitrary selection for comparison against another dump.
Requirements
A file loaded, with a selection made (or "Show whole file" checked).
Developer Tools / CRC Compare / Checksum Lab
CRC Compare / Checksum Lab
Available in Ultimate
What is this?
A built-in Logic Finder for checksums: instead of guessing which algorithm an ECU uses, you paste in two rows of hex (the same field from two different files/states, each with its own known checksum byte(s)) and Checksum Lab tries a whole library of sum/XOR/CRC strategies and windows against both rows at once — reporting exactly which strategy actually reproduces the real checksum on both, not just one, which filters out coincidental matches.
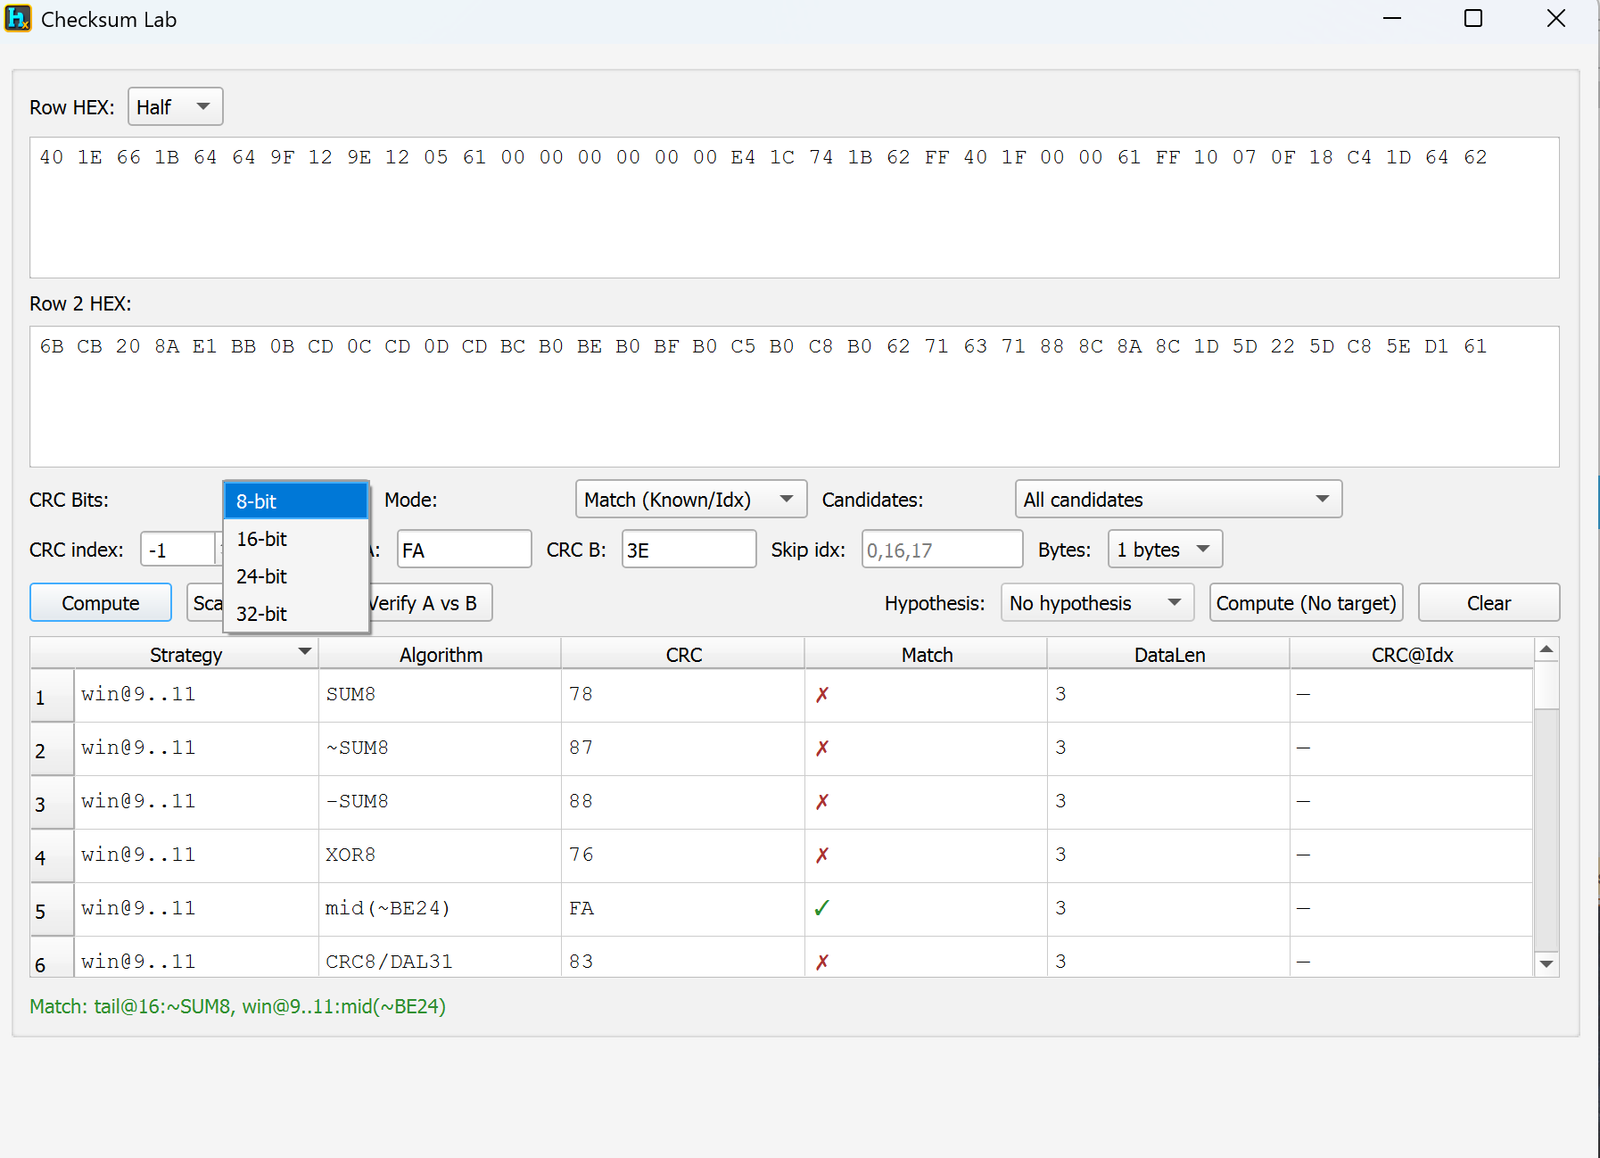
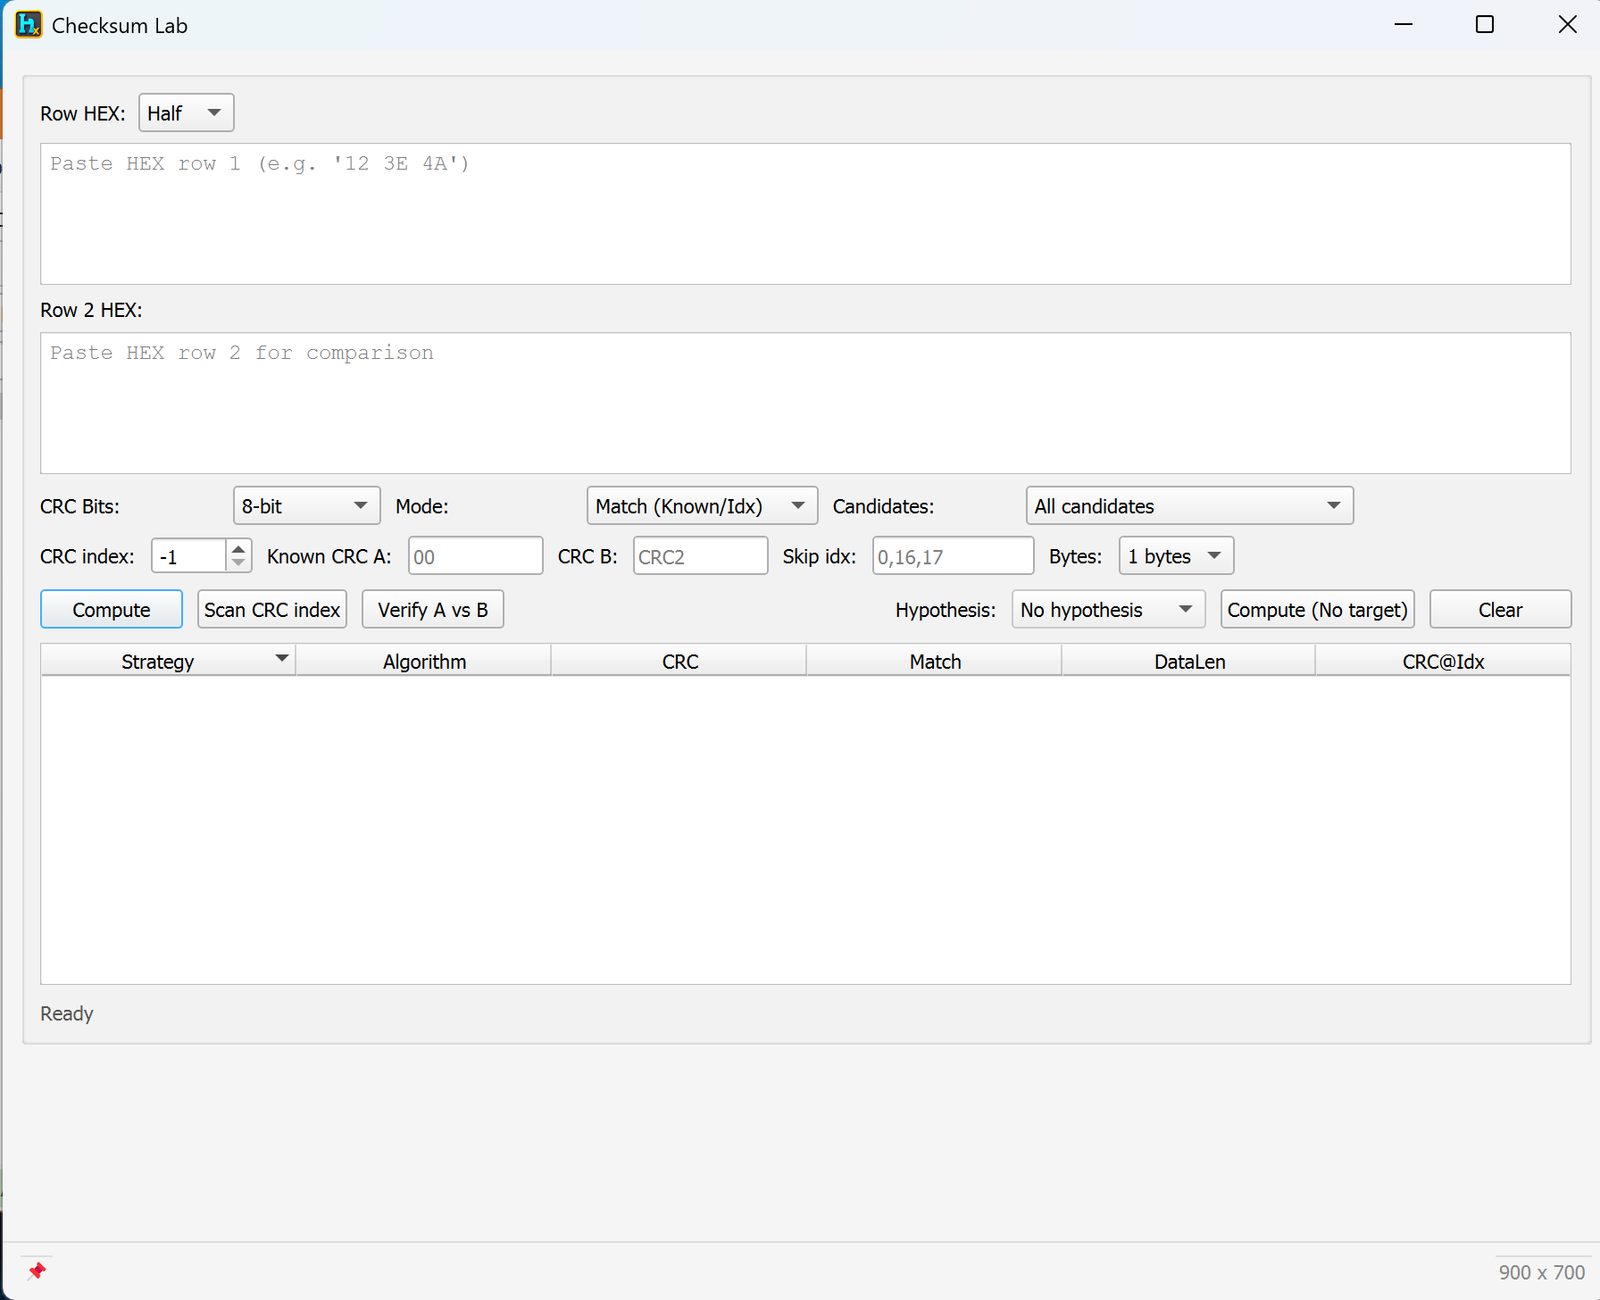
Row HEX (Half/Full) — how much of the pasted row to treat as the working range.
Row 1 HEX / Row 2 HEX — paste the hex bytes for each of the two samples you're comparing.
CRC Bits — 8-bit, 16-bit, 24-bit or 32-bit, matching the size of the checksum you're chasing.
Mode — Match (Known/Idx): tests every strategy against a known checksum value and/or index instead of just listing raw results.
Candidates — All candidates runs every strategy; the dropdown also isolates one, e.g. Only: SUM8, ~SUM8, -SUM8, XOR8, mid(~BE24), CRC8/DAL31, CRC8/ATM07, CRC8/ITU, CRC8/ROHC, CRC8/SAE, etc.
CRC index — the byte offset (within the row) where the checksum itself lives; -1 = unknown/let it scan.
Known CRC A / CRC B — the actual checksum byte(s) you read out of Row 1 / Row 2, for the tool to match candidates against.
Skip idx — comma-separated offsets to exclude from the data range (e.g. 0,16,17 to skip the checksum byte's own position(s)).
Bytes — checksum width in bytes.
Buttons
Compute — runs all (or the selected) candidate strategies against both rows and fills the results table.
Scan CRC index — instead of a fixed CRC index, searches every plausible position for where the checksum byte(s) sit.
Verify A vs B — cross-checks that a strategy which matches Row 1 also reproduces Row 2's known checksum, not just one of the two.
Hypothesis / Compute (No target) — run without a known target, just to see what every strategy produces.
Clear — resets both rows and the results table.
Reading the results
The table lists, per candidate: Strategy (the byte window/anchor, e.g. win@9..11 = a 3-byte window starting at offset 9), Algorithm (SUM8, ~SUM8, -SUM8, XOR8, mid(~BE24), CRC8/DAL31…), CRC (the value produced), Match (✓/✗ vs the known checksum), DataLen, and CRC@Idx.
In the example, out of SUM8/~SUM8/-SUM8/XOR8/CRC8-DAL31 etc., only win@9..11 → mid(~BE24) produced a ✓ match (value FA), and the status line confirms it: "Match: tail@16:~SUM8, win@9..11:mid(~BE24)" — meaning two different strategies each correctly reproduce their respective known checksum, telling you exactly which algorithm+window combination is the real one instead of a coincidence.
Typical use cases
Reverse-engineering an unknown ECU checksum by comparing two dumps that each have a valid, known checksum for the same field.
Confirming a checksum guess from Checksum of Selection actually holds up across more than one sample before relying on it.
Narrowing down both the algorithm and the byte window/anchor at the same time.
Requirements
Two known-good hex rows, each with its own already-known checksum value.
Ultimate edition.
Developer Tools / Offset Builder
Offset Builder
Available in ProFullUltimate
What is this?
A helper for building lists of offsets from a pattern (start + stride + count) instead of typing each one out by hand — it helps you understand the spacing logic behind a repeating structure (e.g. a table of same-size records every N bytes) and speeds up producing the offset list you need, in a ready-to-paste text format.
How to open it
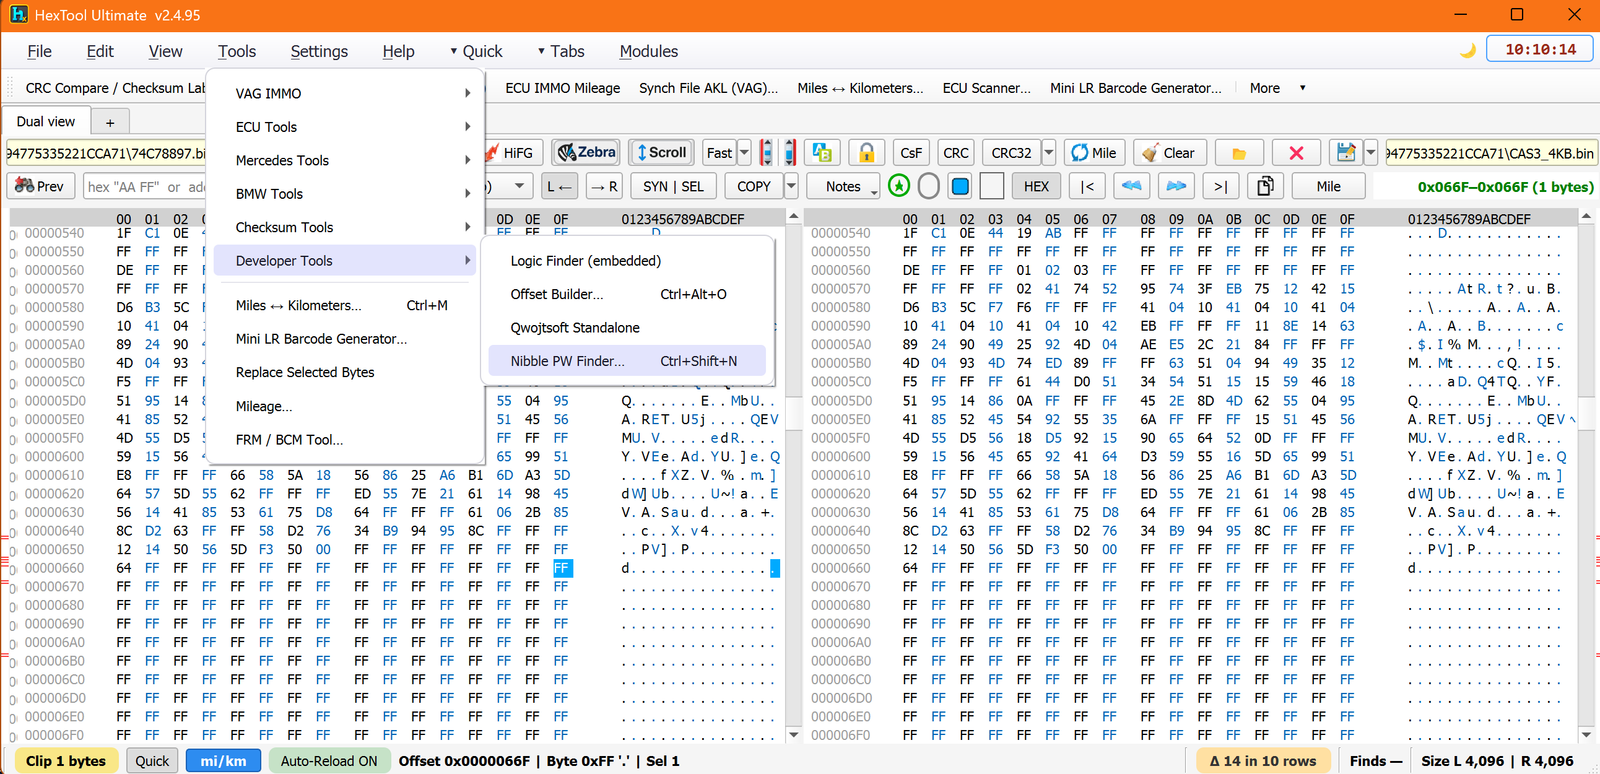
Tools → Developer Tools → Offset Builder…
Paste / Range
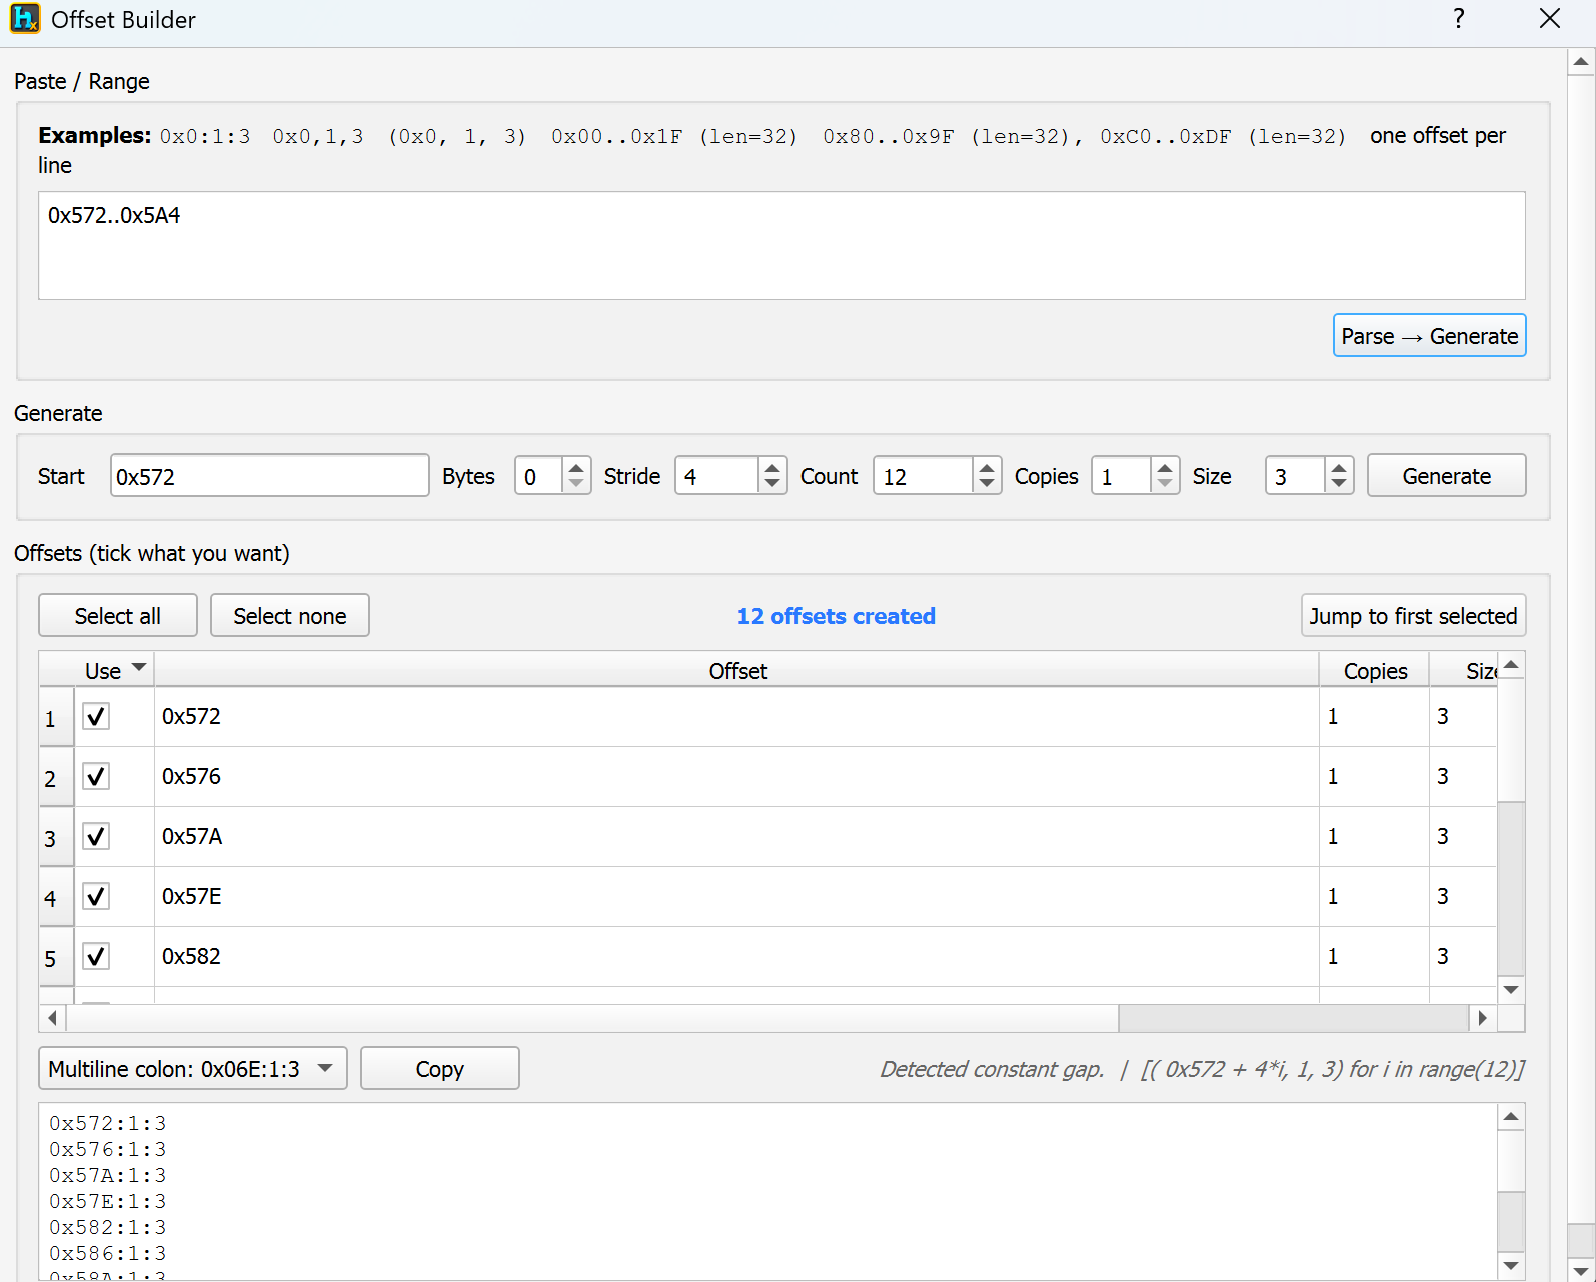
Type or paste a range/list directly, using any of the accepted shorthand formats:
0x0:1:3 — offset:copies:size
0x0,1,3 — same, comma-separated
(0x0, 1, 3) — tuple form
0x00..0x1F (len=32) — a plain range with an explicit length
One offset per line for multiple entries at once
Press Parse → Generate to turn typed/pasted text into the offset table below.
Generate (pattern-based)
Instead of typing a range, describe the repeating pattern and let it calculate the offsets:
Start — first offset (hex).
Bytes — extra byte padding, if needed.
Stride — gap between each repeat.
Count — how many offsets to generate.
Copies / Size — copies and byte-size to tag onto each generated offset.
Offsets table & output
Select all / Select none — bulk-tick the Use column; Jump to first selected moves the hex view to the first ticked offset.
Each row shows Offset, Copies, Size — untick any you don't want; the count above ("12 offsets created") confirms how many were generated.
Pick an output format (e.g. Multiline colon: 0x06E:1:3) and press Copy. A hint above ("Detected constant gap. | [(0x572 + 4*i, 1, 3) for i in range(12)]") confirms the detected stride so you can sanity-check before copying.
Typical use cases
Quickly building the offset list for a table of same-size fields spaced at a constant stride (e.g. 12 records, 3 bytes each, every 4 bytes).
Turning a hand-picked range into a properly formatted offset list, without doing the arithmetic yourself.
Requirements
None — works from typed/pasted input, doesn't require a file loaded.
See also: the Offset Tool (Ultimate) — a more advanced version with named variables, multiple code-export formats, and direct Apply-to-Logic-Finder integration.
Developer Tools / Offset Tool
Offset Tool (EEPROM Offset Generator)
Available in Ultimate
Video walkthrough
What is this?
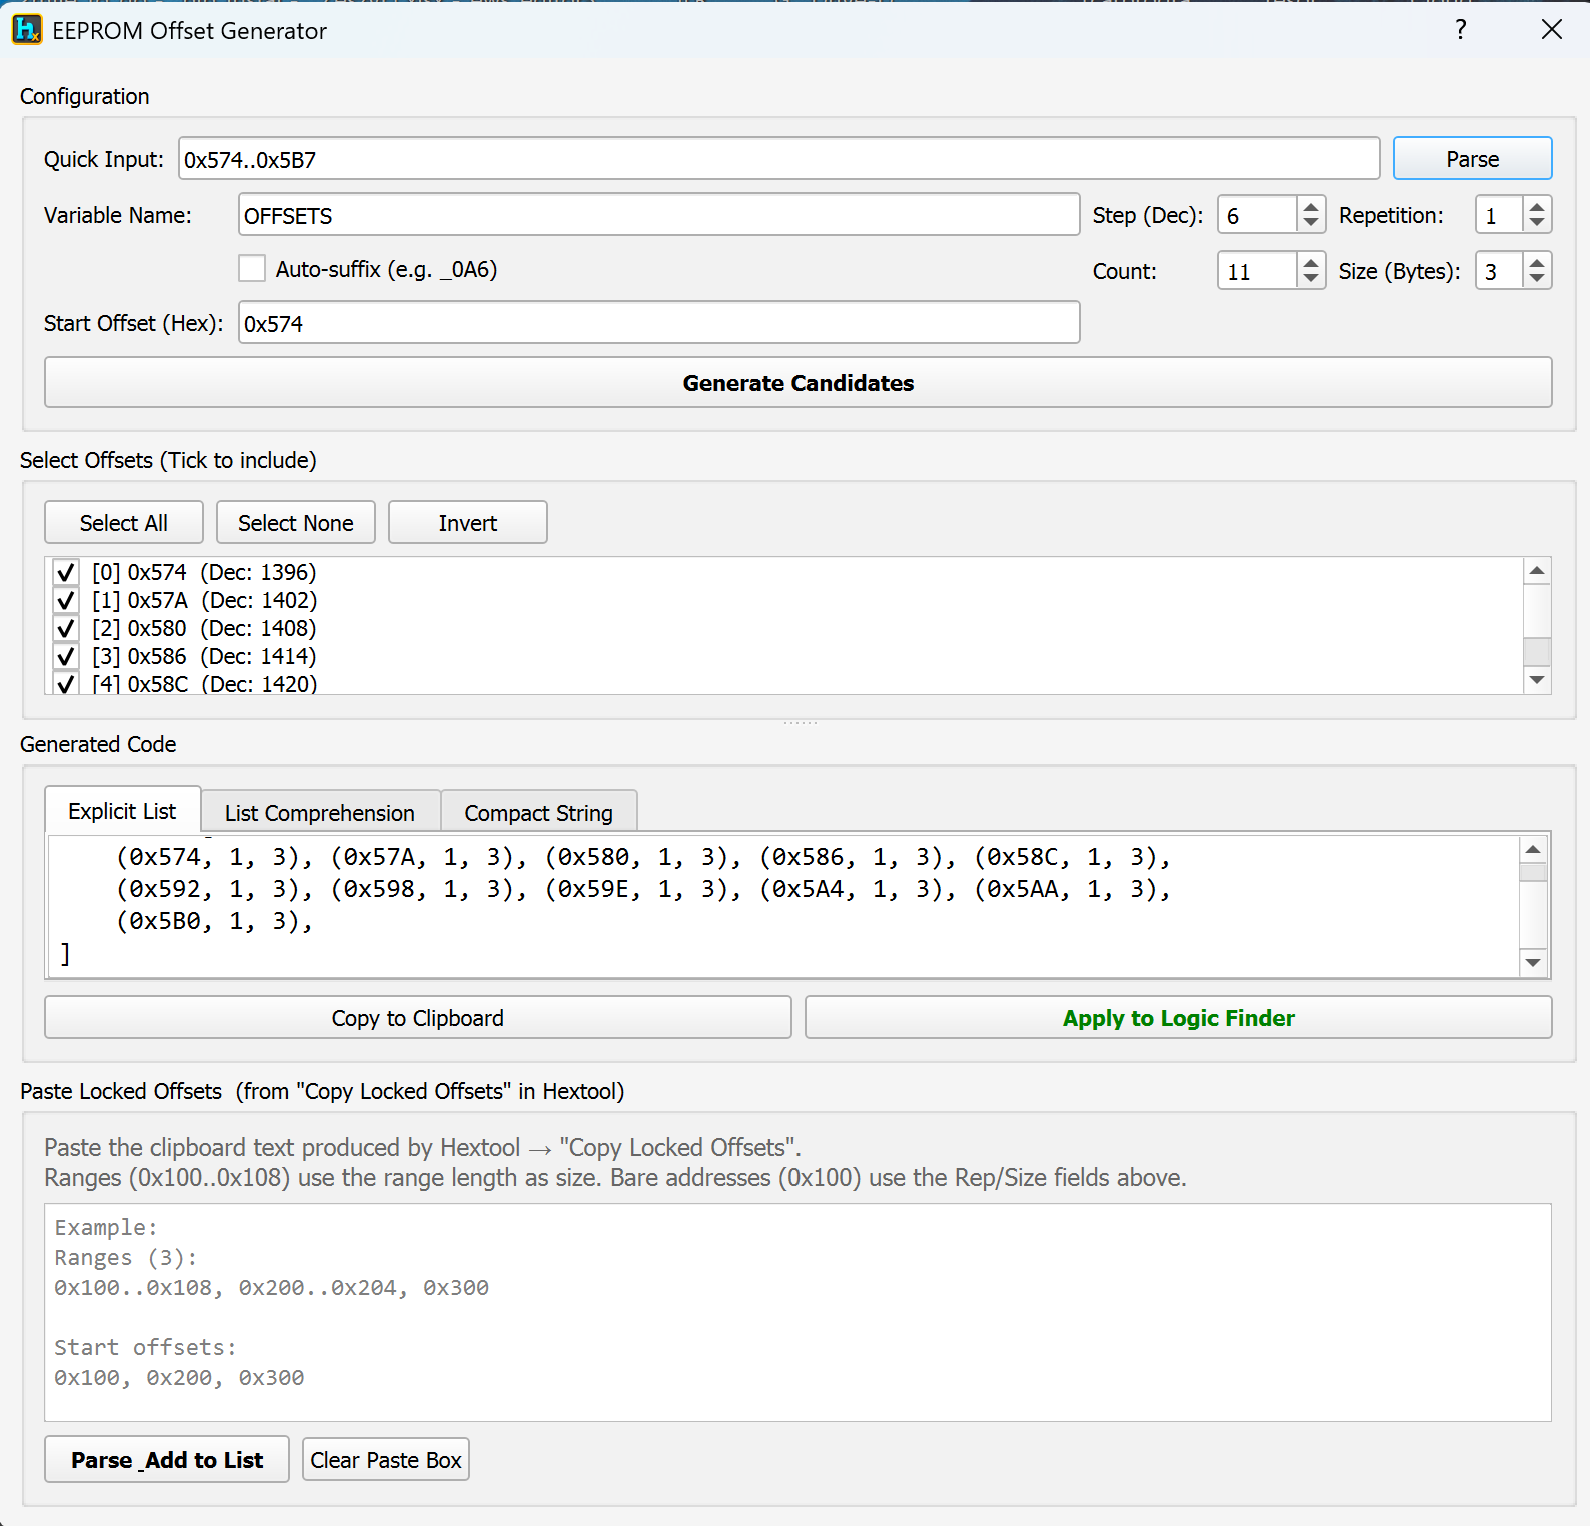
A more advanced version of the Offset Builder for generating offset lists from a repeating pattern — but built to feed straight into code/scripts and into HexTool's own built-in Logic Finder, and able to parse directly from offsets you've already selected and copied in the hex view, instead of typing the pattern out again.
How to open it
Tools → Developer Tools → Offset Builder… (Ultimate builds show the advanced EEPROM Offset Generator version documented here).
Configuration
Quick Input — paste a range shorthand (e.g. 0x574..0x5B7) and press Parse to pre-fill Start/Count from it.
Variable Name — the name used for the exported variable (default OFFSETS); Auto-suffix appends the start offset to the name (e.g. _0A6) so multiple exports don't collide.
Start Offset (Hex) — first offset to generate from.
Step (Dec) — stride between each generated offset, in decimal.
Repetition — how many bytes/copies each offset represents.
Count — how many offsets to generate.
Size (Bytes) — byte size tagged to each generated offset.
Generate Candidates — builds the offset list below from these settings.
Select Offsets
Select All / Select None / Invert — bulk-manage which generated offsets are ticked for export.
Each entry shows its index, hex offset, and decimal equivalent (e.g. [0] 0x574 (Dec: 1396)).
Generated Code
Three export formats, each in its own tab:
Explicit List — a plain Python-style list of (offset, copies, size) tuples, e.g. (0x574, 1, 3), (0x57A, 1, 3), ….
List Comprehension — the same offsets expressed as a generator expression instead of a literal list.
Compact String — a condensed single-line/string representation.
Copy to Clipboard — copies whichever tab is currently shown.
Apply to Logic Finder — sends the generated offset list straight into HexTool's built-in Logic Finder, so you can go directly from "here's my offset pattern" to testing logic against it.
Paste Locked Offsets
This is the part that lets you build the list from a selection you already made in the hex view, instead of describing the pattern by hand:
In the hex view, use Lock All Finds (see the Search Engine guide) or otherwise lock the offsets you want, then use HexTool's Copy Locked Offsets action to put them on the clipboard.
Paste that clipboard text into the Paste Locked Offsets box. It accepts either ranges (e.g. 0x100..0x108, 0x200..0x204, 0x300 — the range's own length is used as the size) or bare start addresses (e.g. 0x100, 0x200, 0x300 — these fall back to the Repetition/Size fields above).
Parse_Add to List — adds the parsed offsets into the working list.
Clear Paste Box — empties the paste box without adding anything.
Typical use cases
Turning a hand-picked set of offsets you found and locked while searching the hex view directly into a ready-to-use code list, without retyping.
Feeding a generated or pasted offset pattern straight into the Logic Finder to test checksum/value logic across all of them at once.
Exporting an offset table in whichever code format (list, comprehension, compact string) fits the script/tool you're building.
Requirements
Ultimate edition.
For the Paste Locked Offsets flow: a set of offsets already locked and copied from the hex view.
Developer Tools / Nibble PW Finder
Nibble PW Finder
Available in Ultimate
What is this?
A scanner for finding a known password/PIN/key value that's been split apart nibble-by-nibble and scattered across the dump, instead of stored as one contiguous run of bytes. Some ECUs spread a PIN/seed's individual hex digits (nibbles) across memory at a regular spacing (a "stride"), sometimes only using every other nibble of each byte. This tool takes the value you already know and searches for where and how it's been scattered, rather than doing a plain byte search (which would find nothing, because the bytes are never actually adjacent).
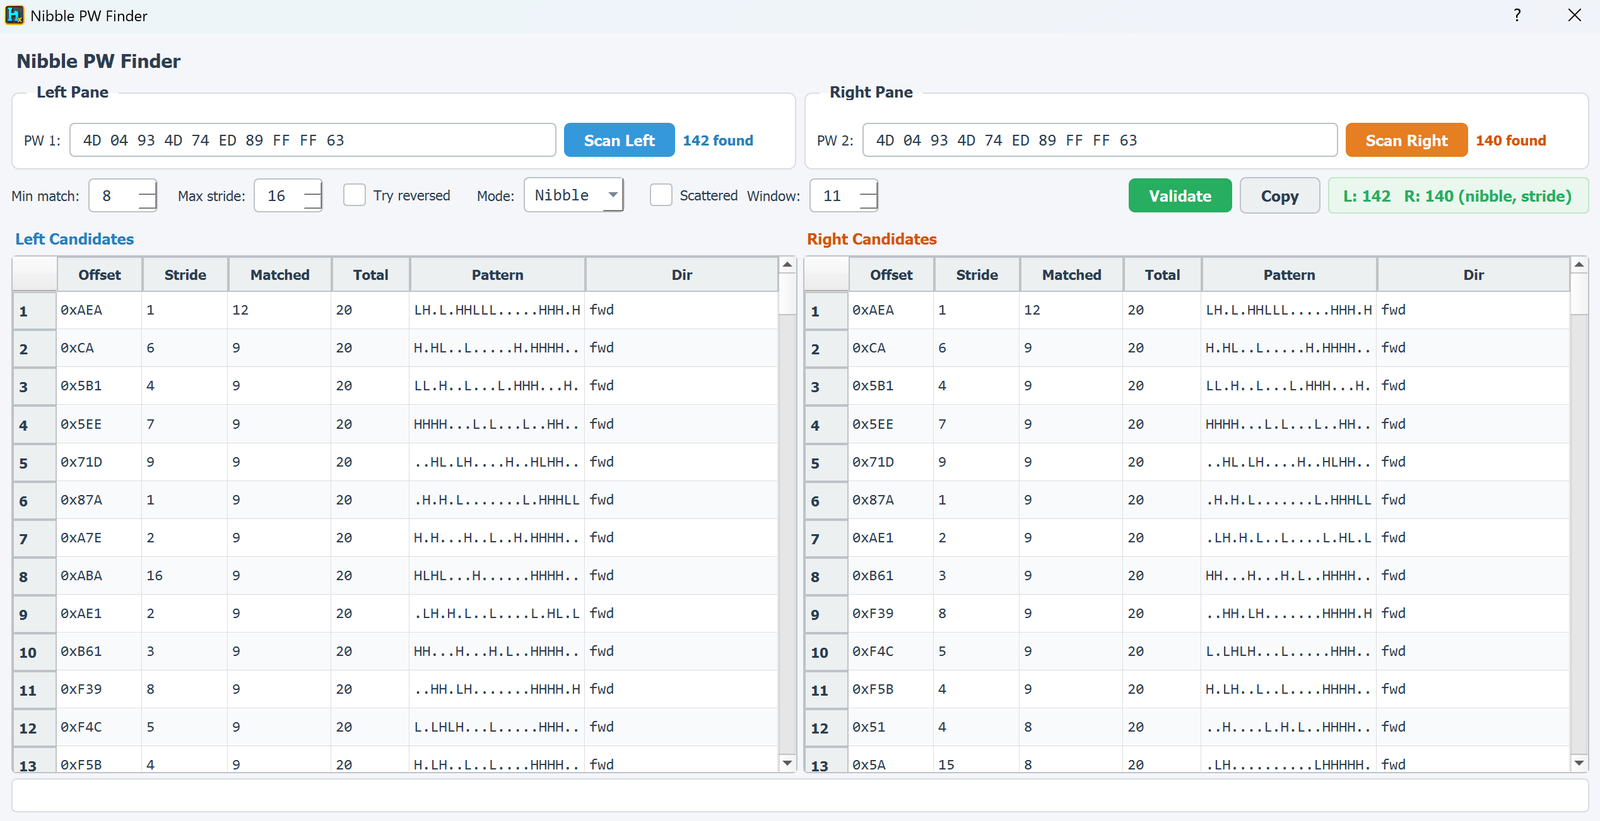
PW 1 / PW 2 — the known hex value to search for, one per pane (Left / Right) — usually the same known PIN, so a hit found independently in both files confirms it's the real storage pattern and not a coincidence.
Scan Left / Scan Right — run the search on each pane; the found count is shown next to each button (e.g. "142 found" / "140 found").
Min match — minimum number of nibbles that must match before a candidate counts as a hit (lower = more, noisier candidates).
Max stride — largest nibble-to-nibble spacing to test (e.g. 16 tries every spacing from 1 up to 16 nibbles apart).
Try reversed — also test the value's nibbles in reverse order.
Mode → Nibble — scans at the nibble level (half-byte); matches the scattered-storage scenario this tool is built for.
Scattered — allow matched nibbles to skip around within the window instead of following the stride perfectly every time.
Window — how many nibble positions ahead to look for the next digit of the value.
Validate — cross-checks the Left and Right candidate lists and confirms which offset/stride combinations genuinely hold up on both sides.
Copy — copies the candidate list to the clipboard.
Reading the results
Each candidate row shows: Offset (where the match starts), Stride (the nibble spacing between each digit), Matched / Total (how many nibbles matched out of how many were checked), Pattern (a per-nibble map using H = high nibble matched, L = low nibble matched, . = no match — e.g. LH.L.HHLLL.....HHH.H), and Dir (fwd or bwd).
The status line ("L: 142 R: 140 (nibble, stride)") gives the total candidate count on each side — the same top candidate (0xAEA, stride 1) showing up identically on both Left and Right is the strongest sign that's the real one.
Typical use cases
Locating an immobilizer PIN/seed you already extracted (e.g. from a dealer tool or another decode) inside a raw EEPROM/flash dump, when it's stored nibble-scattered rather than as consecutive bytes.
Confirming a scattered-storage hypothesis by requiring the same offset/stride to show up independently in two different dumps.
Requirements
The known password/PIN/key value in hex, to search for.
Ultimate edition.
Developer Tools / Qwojtsoft Standalone
Qwojtsoft Standalone (Calibrator)
Available in Ultimate
What is this?
A way to test a generated codec (the offset/value logic you worked out with Logic Finder, Offset Builder/Offset Tool, or Checksum Lab) against a real dump — and once it's confirmed correct, package it into a single standalone app that can be handed off and used on its own (no HexTool needed) to read or write that specific value, e.g. reset a mileage field or read out a PIN code.
How to open it
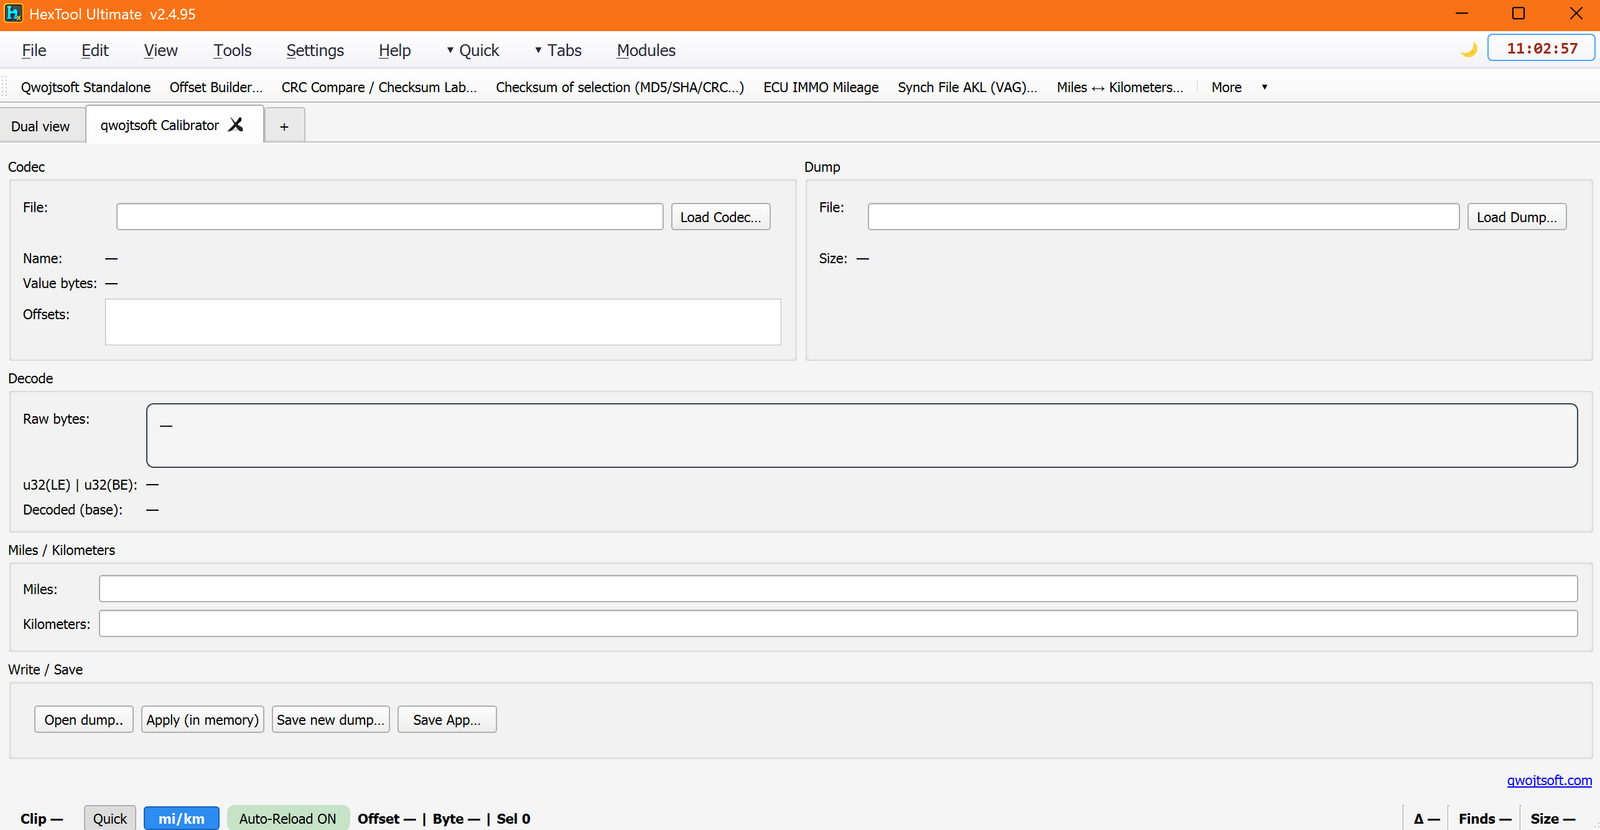
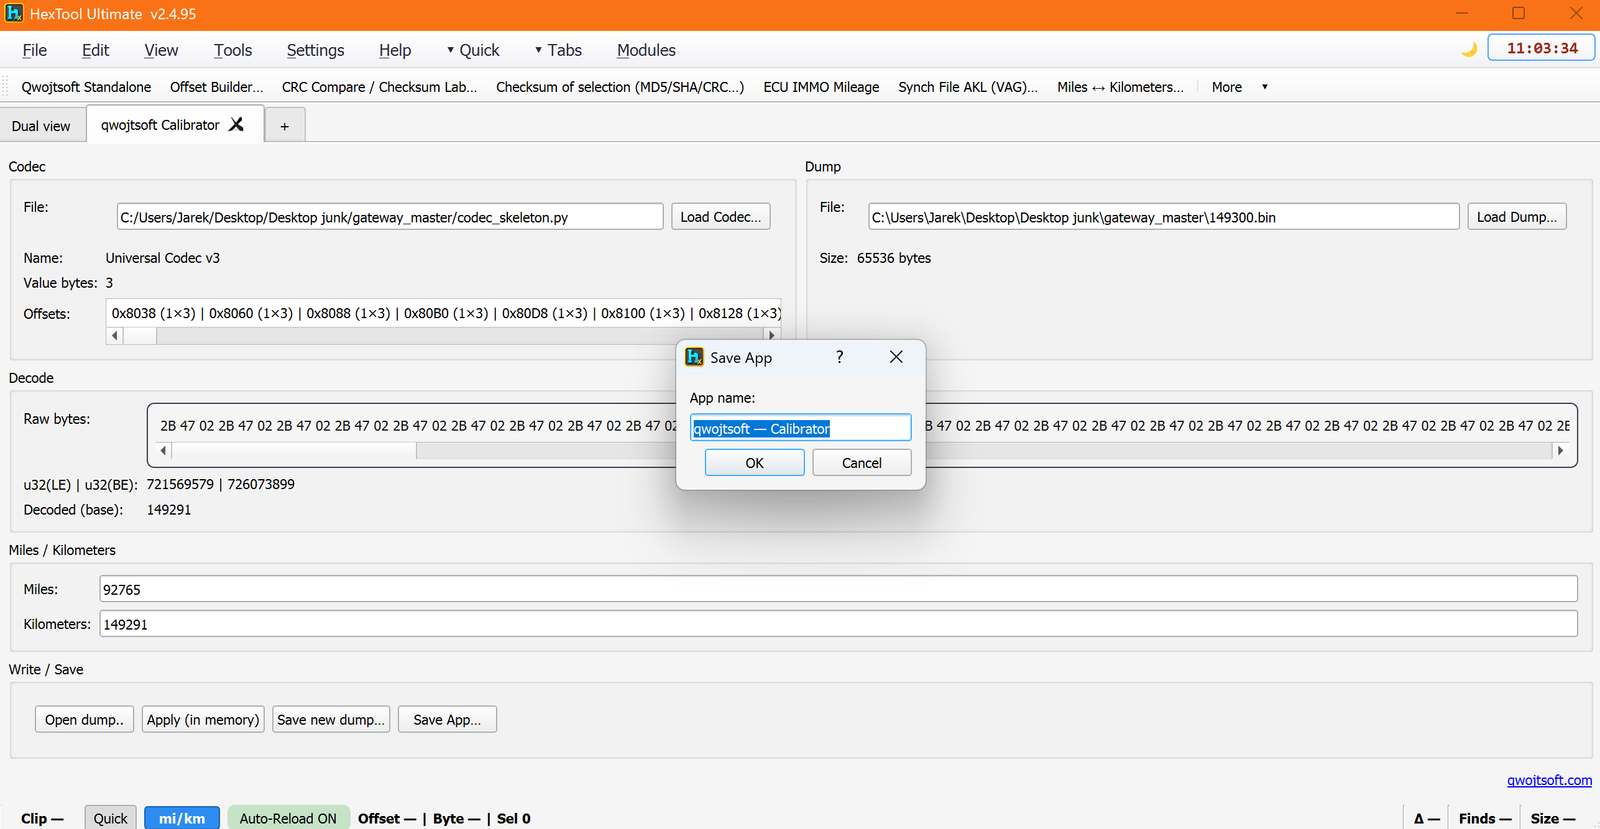
Tools → Developer Tools → Qwojtsoft Standalone… — opens as its own tab, qwojtsoft Calibrator.
Codec
File / Load Codec… — load a codec skeleton file (a small Python file describing a value's offsets, byte size, and decode logic — the kind produced elsewhere in the Developer Tools, e.g. Checksum Lab's skeleton export or an Offset Tool export applied to Logic Finder).
Once loaded, it shows the codec's Name (e.g. "Universal Codec v3"), Value bytes (e.g. 3), and the Offsets it reads/writes (e.g. 0x8038 (1×3) | 0x8060 (1×3) | … — multiple offsets because the same value is often duplicated/mirrored at several locations).
Dump & decode
File / Load Dump… — load the actual binary dump to test the codec against; shows its Size.
Raw bytes — the actual bytes read at the codec's offset(s).
u32(LE) | u32(BE) — the raw bytes as a 32-bit integer both endian directions, so you can spot which the codec should use.
Decoded (base) — the final value after the codec's decode logic is applied (e.g. 149291).
Miles / Kilometers — if the value is a mileage, it's shown converted both ways, and either field is editable to set a new value before writing.
Write / Save / Build the app
Apply (in memory) — writes the edited value back into the loaded dump buffer using the codec's logic, without saving to disk yet.
Save new dump… — saves the modified dump out to a new file.
Save App… — packages the loaded codec + logic into a single standalone application, prompting for an App name. The resulting app is self-contained: it only knows how to work with that one codec — hand it to someone and they can open a matching dump and read/reset that specific value (mileage, PIN, etc.) without HexTool installed at all.
Typical use cases
Verifying a codec you built from Logic Finder/Checksum Lab actually decodes correctly across a real dump before trusting it.
Reading out a value (like a PIN) stored at several mirrored offsets, to confirm they all agree.
Building a lightweight, purpose-built standalone app for a single task (e.g. mileage reset for one specific ECU) to use repeatedly, or give to someone, without exposing the rest of HexTool.
Requirements
A codec file describing the offsets/decode logic, and a dump to test it against.
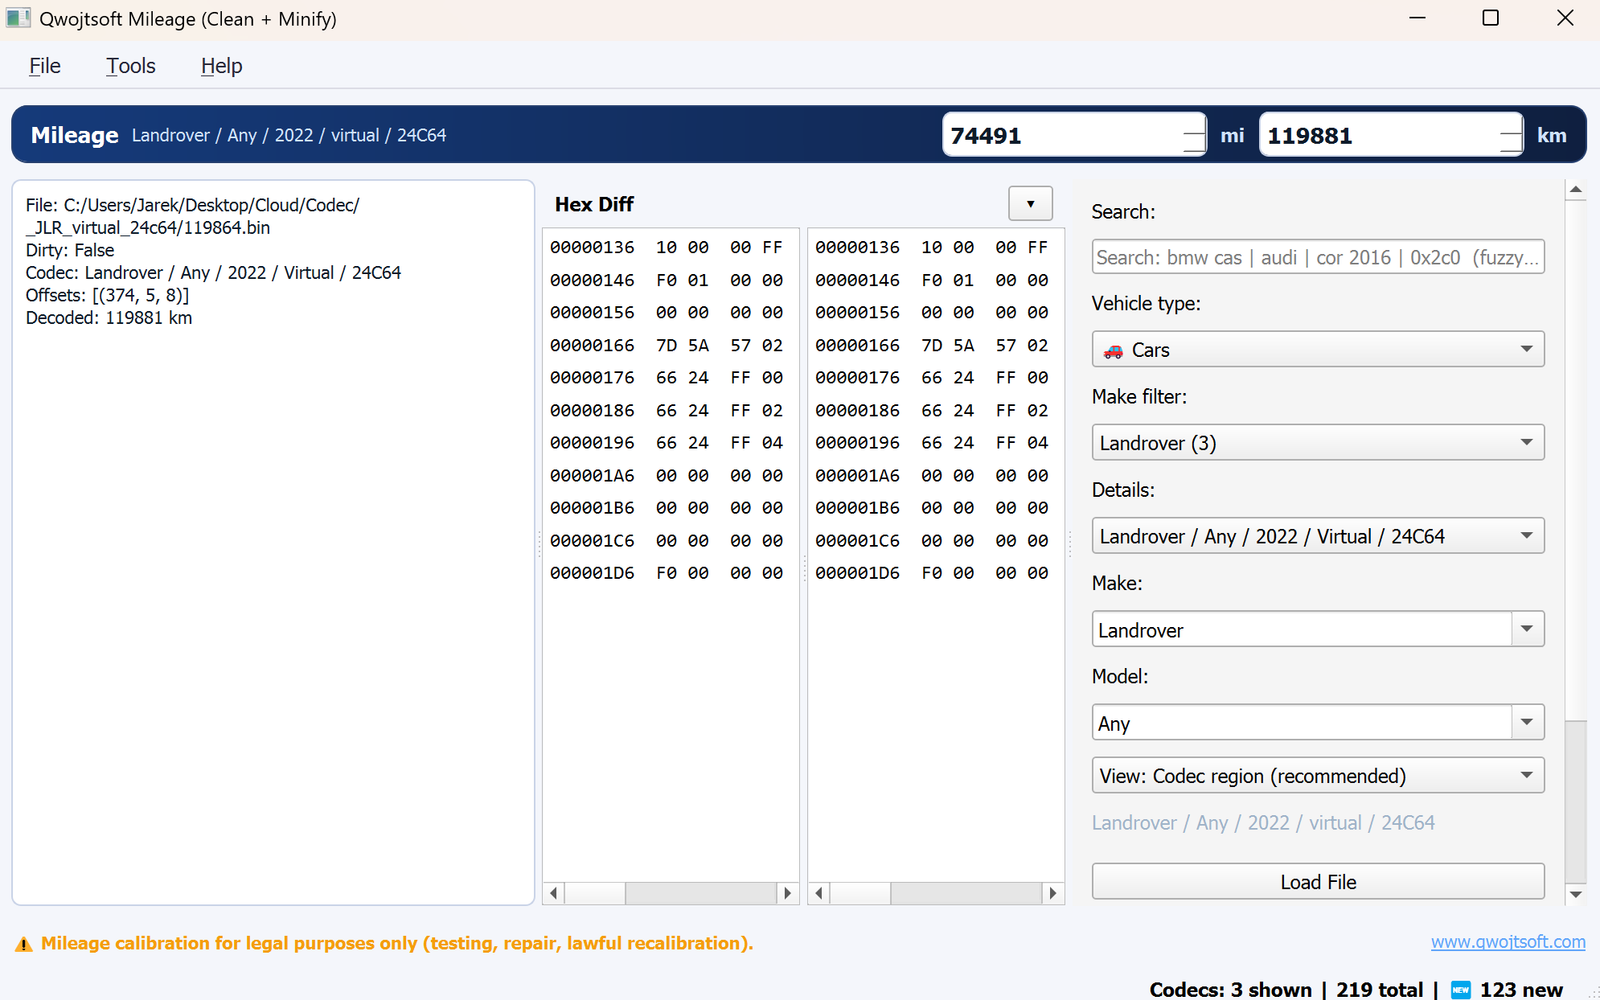
A ready-to-use mileage calibrator with a built-in registry of codecs — 219 total at last count, spanning dozens of makes — so instead of building and testing one codec at a time (as with Logic Finder and Qwojtsoft Standalone), you just pick the vehicle from the list and calibrate directly. This is the "production" front-end for all the codecs that get built and registered with the Mini Codec Generator.
How to open it
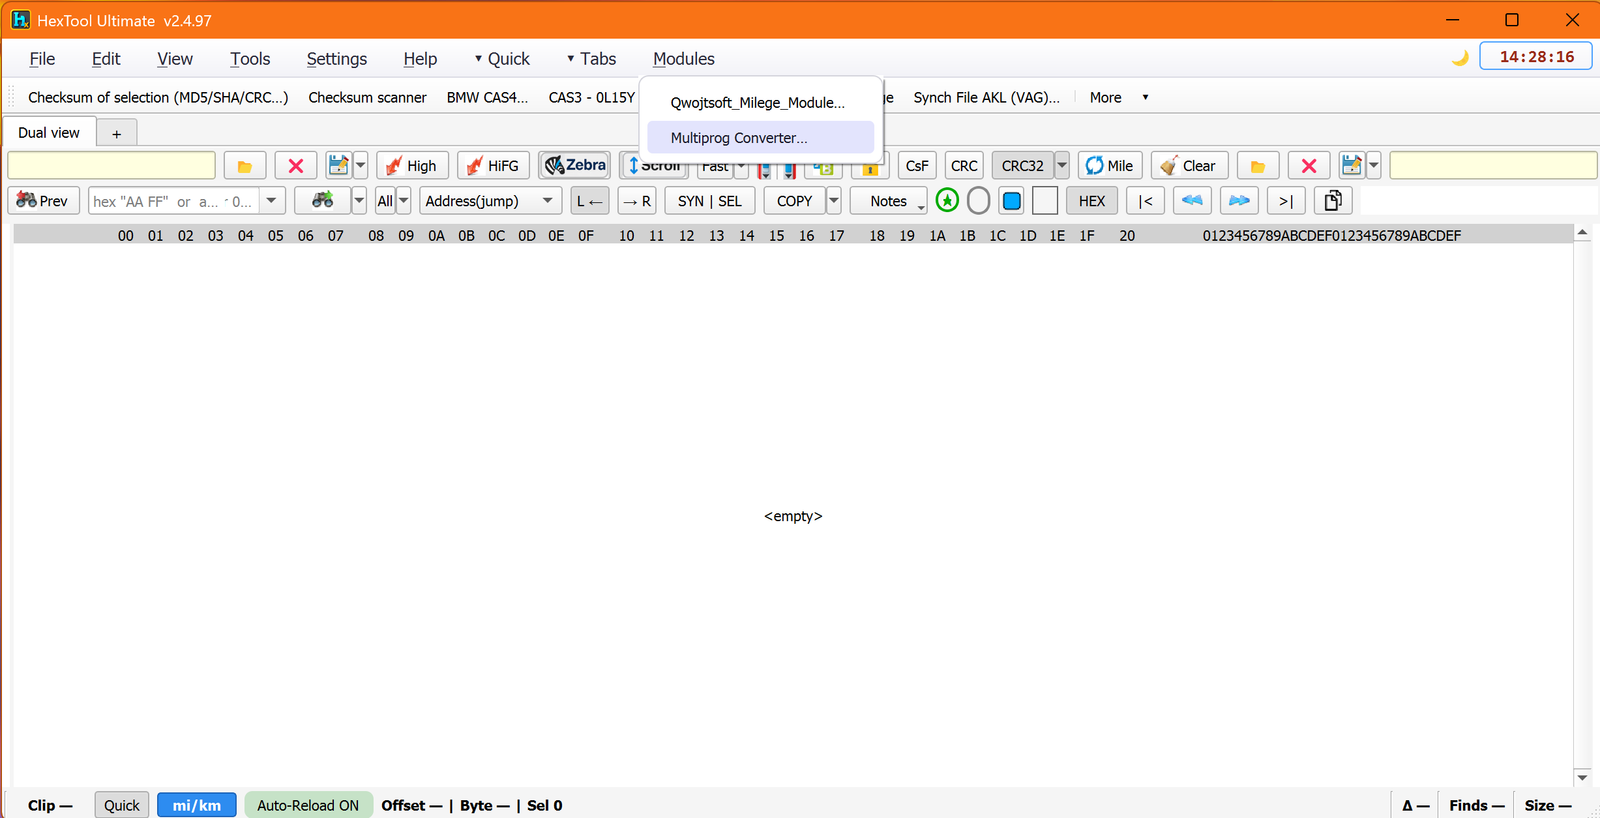
Modules → Qwojtsoft_Mileage_Module…
Finding the right codec
The right-hand panel is a filtered search over the codec registry:
Search — fuzzy search box, accepts things like bmw cas, audi, cor 2016, or a raw offset like 0x2c0.
Vehicle type — e.g. 🚗 Cars.
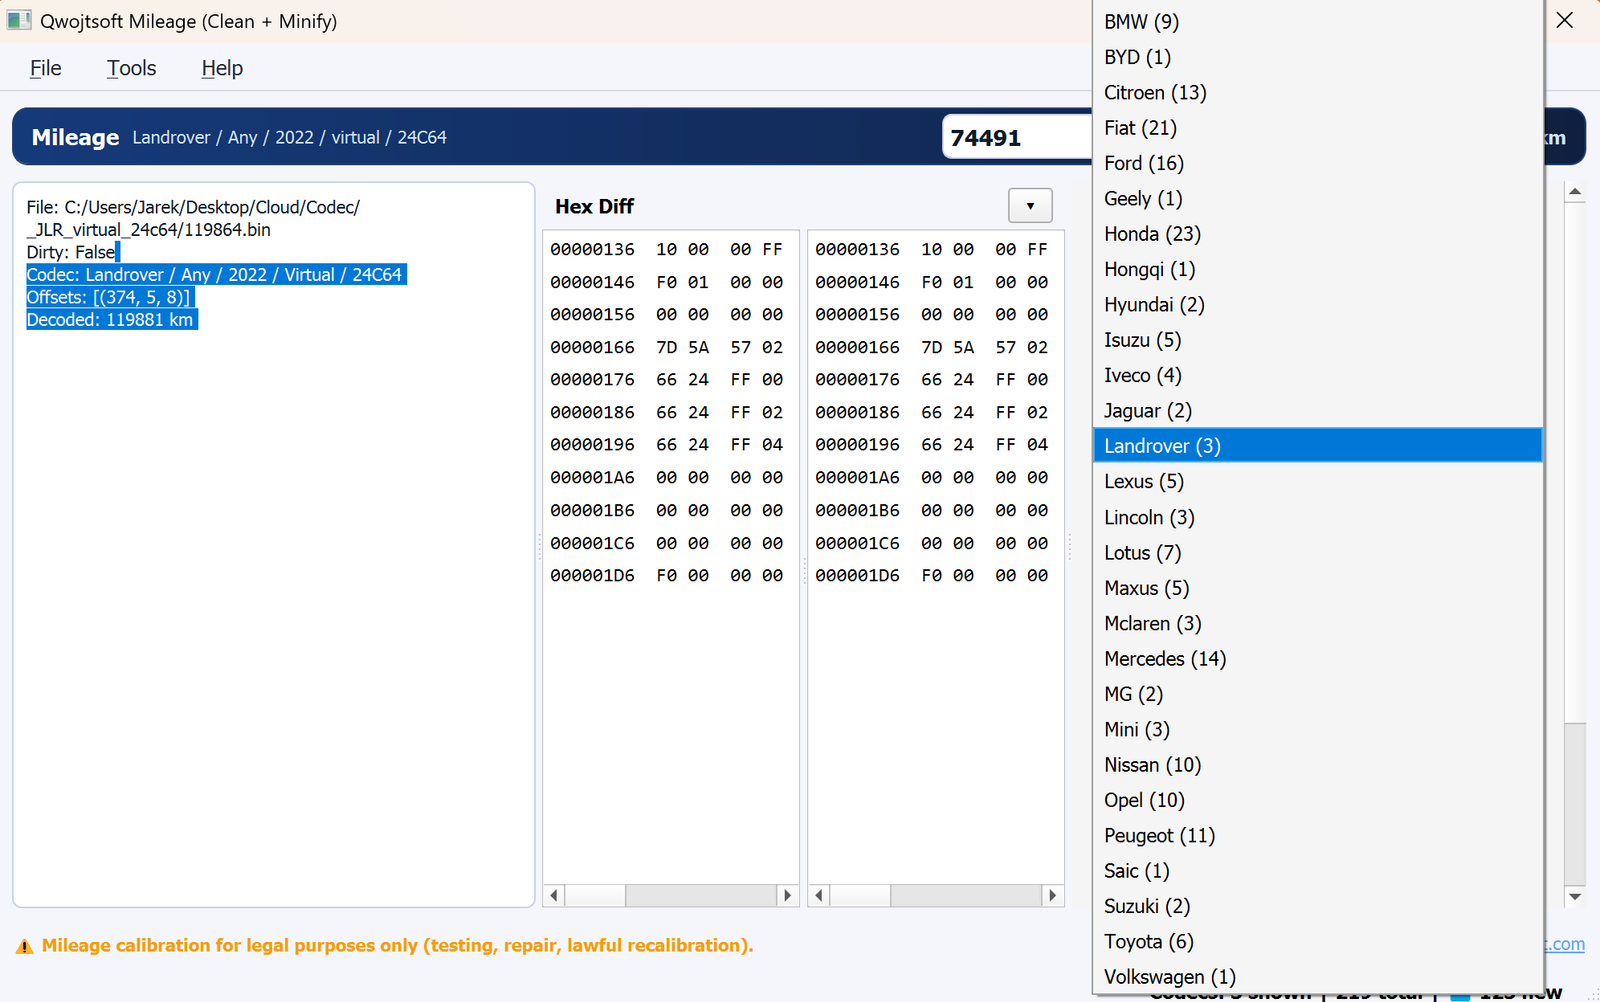
Make filter — a dropdown of every make with a codec count next to it (e.g. BMW (9), Honda (23), Landrover (3)), so you can see coverage at a glance before picking one.
Details — the specific codec variant once narrowed down (e.g. Landrover / Any / 2022 / Virtual / 24C64).
Make / Model — plain dropdowns for stepping through the registry manually instead of searching.
View — Codec region (recommended) shows only the bytes the codec actually touches; other views show more context.
Load File — loads your dump against the selected codec.
Calibrating
The blue header bar shows the active codec (Mileage — Landrover / Any / 2022 / virtual / 24C64) and the current value in both mi and km — editing either field converts and updates the other live.
The left panel shows file/codec status: File (path loaded), Dirty (unsaved changes?), Codec (which one is active), Offsets (where in the file it writes, e.g. [(374, 5, 8)]), and Decoded (the current value, e.g. 119881 km).
Hex Diff — a live two-column byte comparison so you can see exactly which bytes the new mileage value will change before you commit anything.
Typical use cases
Recalibrating an odometer field on a supported module without needing to work out the encoding logic yourself — the registry already has it.
Quickly checking coverage for a given make/model before deciding whether you need to build a new codec from scratch in Logic Finder.
Verifying exactly which bytes will change via the Hex Diff before writing anything to a real dump.
Important: mileage calibration is provided for legal purposes only (testing, repair, lawful recalibration) — the app itself displays this warning.
Requirements
A dump matching one of the registered codecs.
Pro or Ultimate edition.
See also: to convert a codec produced here (or anywhere else in HexTool) into a script usable on Xhorse Multiprog hardware, see the Multiprog Converter.
Developer Tools / Multiprog Converter
Multiprog Converter
Available in Ultimate
Video walkthrough
What is this?
Converts the Python codecs that HexTool generates (via Logic Finder's Build Skeleton, or any other HexTool codec .py file) into JavaScript scripts compatible with Xhorse Multiprog — so once you've reverse-engineered how a value is stored, you can actually run that logic on the Multiprog programmer itself, instead of only inside HexTool.
How to open it
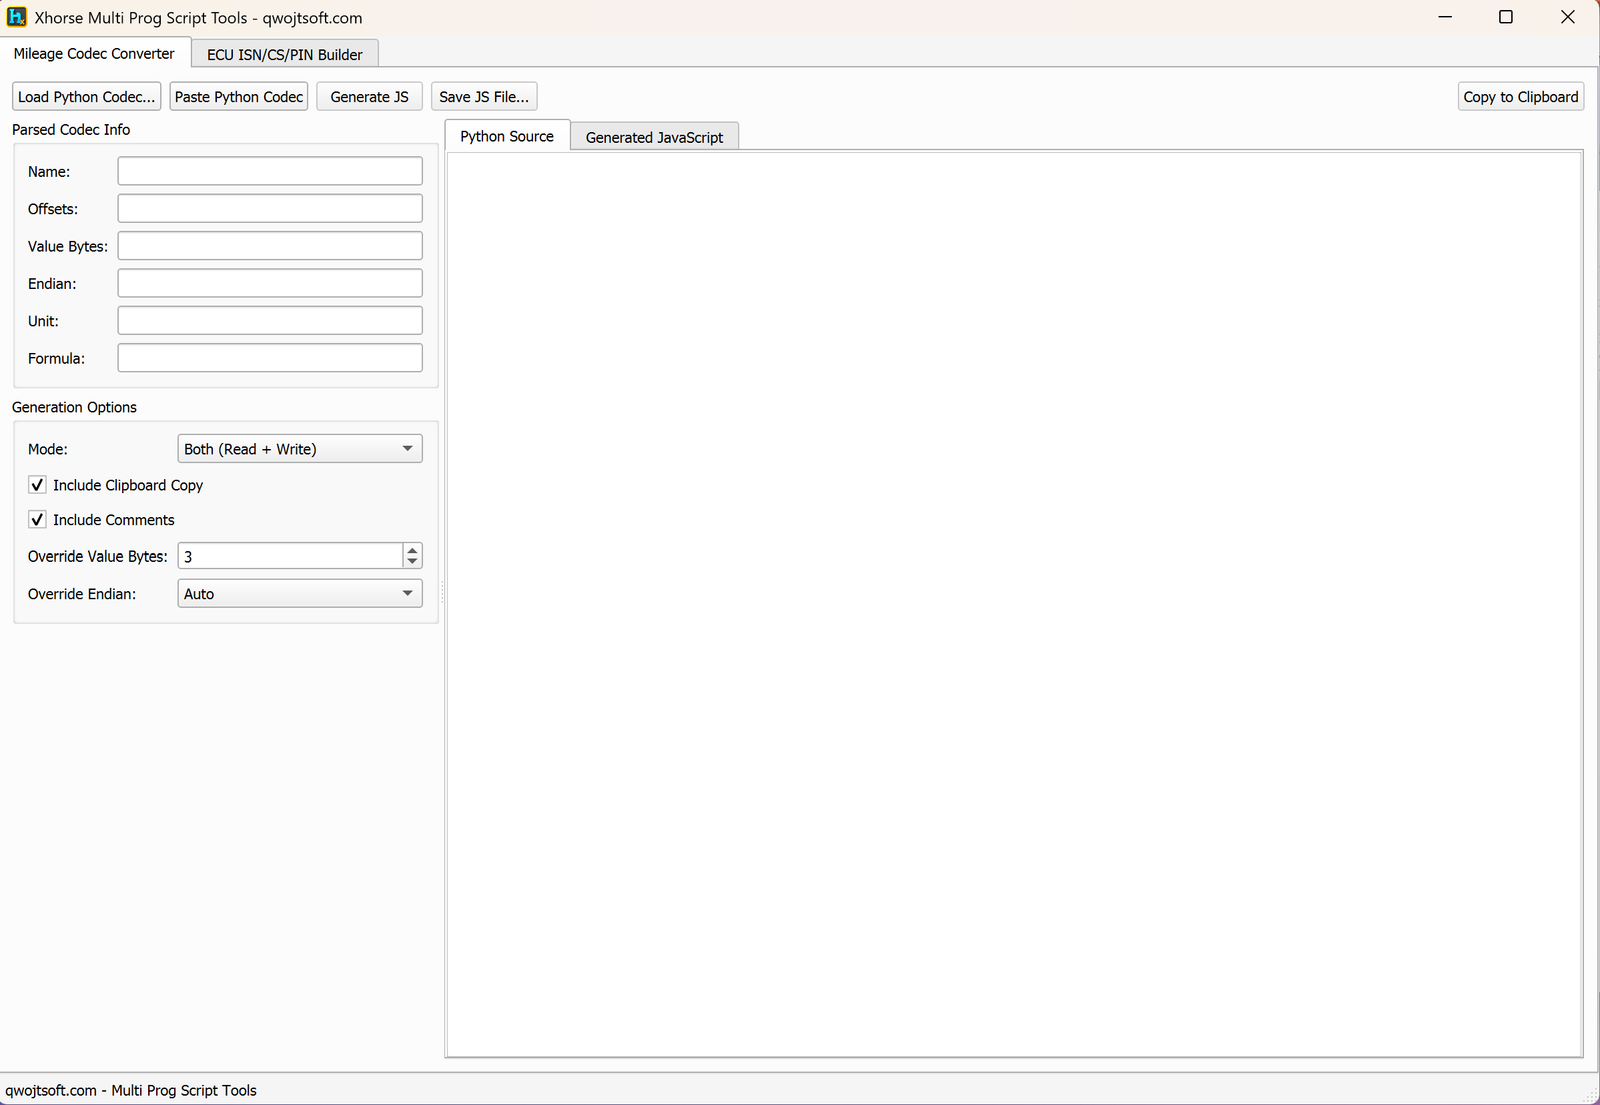
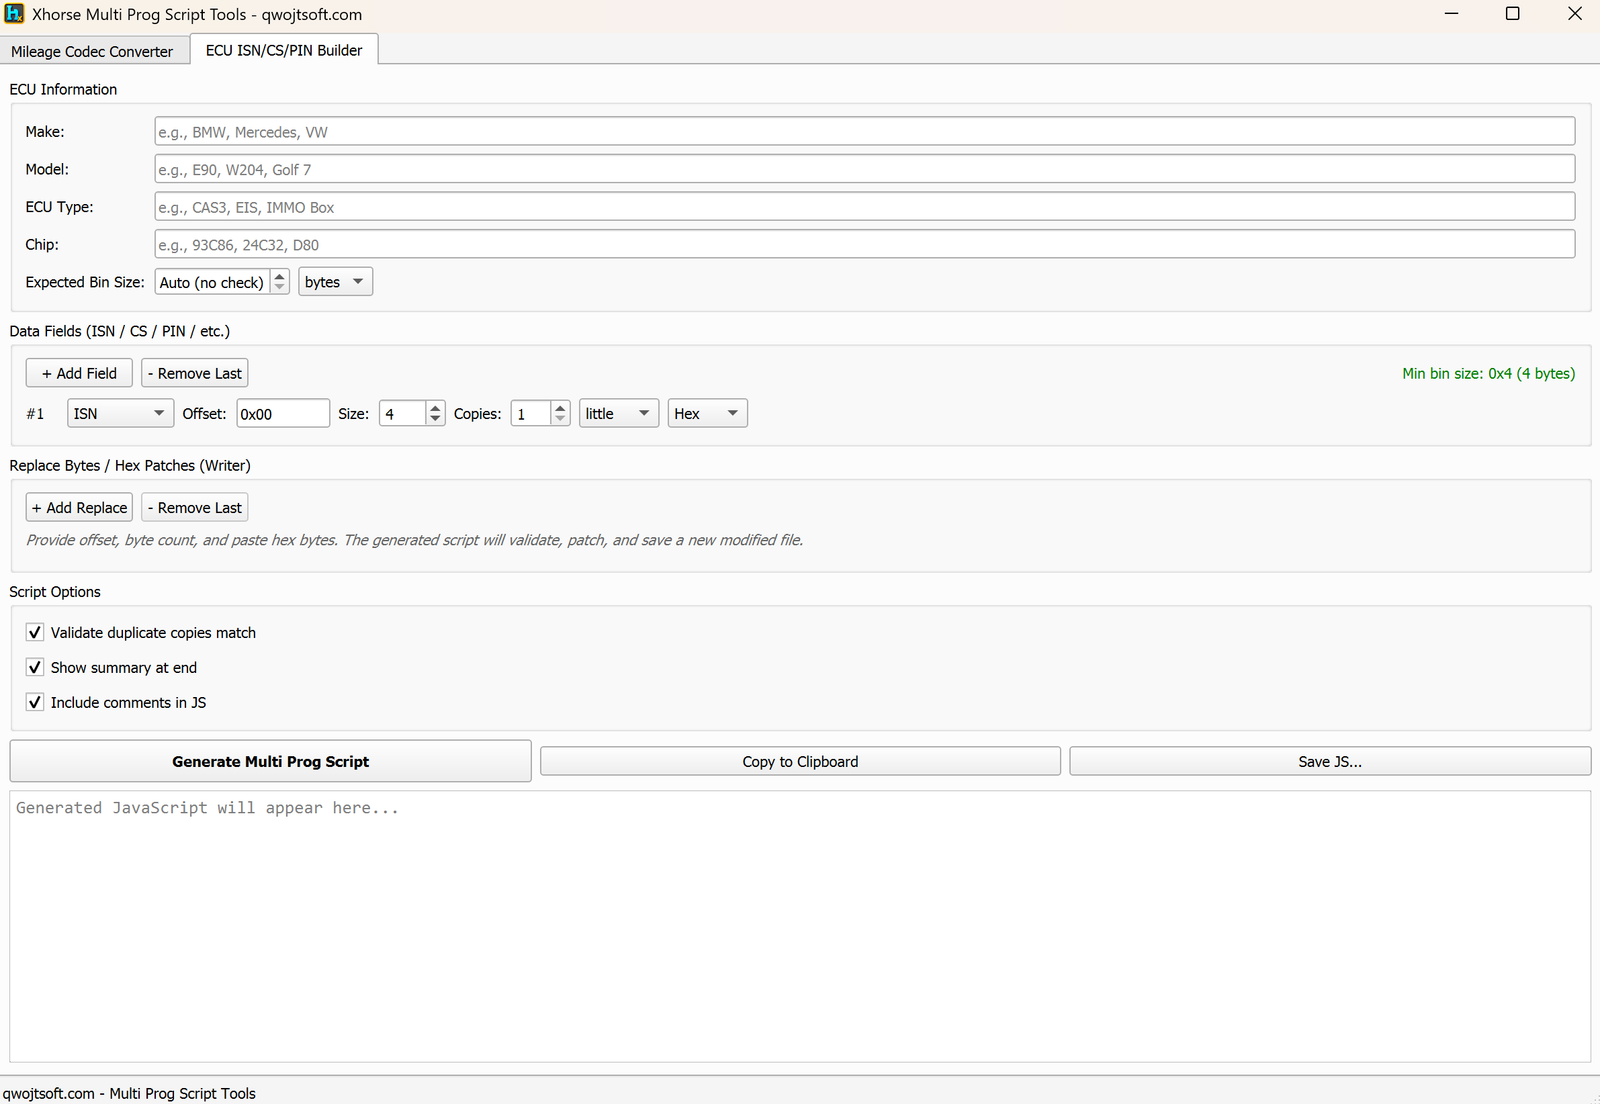
Modules → Multiprog Converter… — opens "Xhorse Multi Prog Script Tools", with two tabs.
Mileage Codec Converter tab
This is the core conversion flow the tool is named for:
Load Python Codec… (or Paste Python Codec) — load a .py codec file produced by HexTool (Logic Finder's Build Skeleton, Calibration Wizard, or a Mini Codec entry).
The Parsed Codec Info panel fills in automatically: Name, Offsets, Value Bytes, Endian, Unit, Formula — confirming HexTool's codec was read correctly before converting.
Generation Options control the output:
Mode — Both (Read + Write), or read-only/write-only.
Include Clipboard Copy — adds clipboard-copy support to the generated script.
Include Comments — keeps the script human-readable.
Override Value Bytes / Override Endian — force a different size/endianness than the codec reported, if needed.
Generate JS — produces the Multiprog-compatible JavaScript, shown in the Generated JavaScript tab (next to Python Source, so you can compare the two side by side).
Save JS File… / Copy to Clipboard — export the finished script to load into Multiprog.
ECU ISN/CS/PIN Builder tab
A second way to produce a Multiprog script — built directly from field definitions instead of converting an existing HexTool codec, aimed at reading/writing ISN, checksum, and PIN fields:
ECU Information — Make, Model, ECU Type, Chip, and an Expected Bin Size check (or Auto (no check)).
Data Fields (ISN / CS / PIN / etc.) — + Add Field / - Remove Last to define each field's type (e.g. ISN), Offset, Size, Copies, endianness, and format (Hex, etc.). The panel tracks the Min bin size needed to fit everything.
Replace Bytes / Hex Patches (Writer) — + Add Replace / - Remove Last to define offset + byte-count + hex patch entries; the generated script validates, patches, and saves a new modified file.
Script Options — Validate duplicate copies match (cross-checks mirrored fields agree), Show summary at end, Include comments in JS.
Generate Multi Prog Script / Copy to Clipboard / Save JS… — produce the finished script.
Typical use cases
Taking a mileage codec you solved in Logic Finder and turning it into a script that runs directly on Xhorse Multiprog hardware, instead of only inside HexTool.
Building a standalone Multiprog script for reading/writing an ECU's ISN, checksum, and PIN fields from scratch, without needing an existing HexTool codec at all.
Requirements
For the Mileage Codec Converter tab: a HexTool-generated .py codec file.
Ultimate edition.
🛠️
Coming soon
This guide is being written and will be published here soon. Check back shortly — documentation is added regularly.