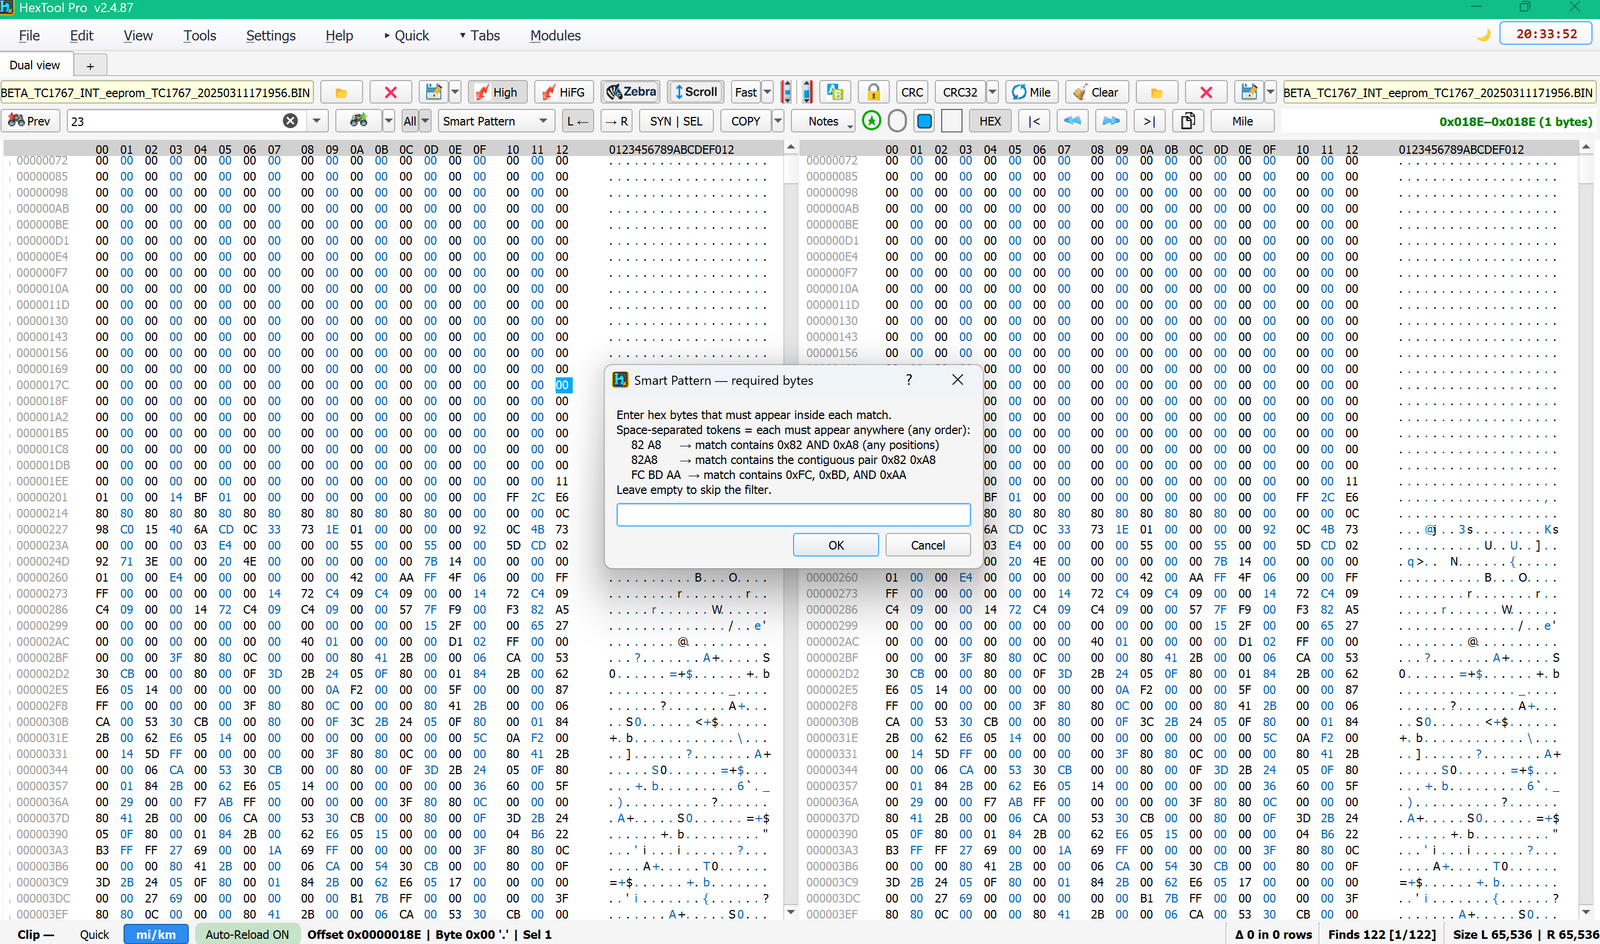
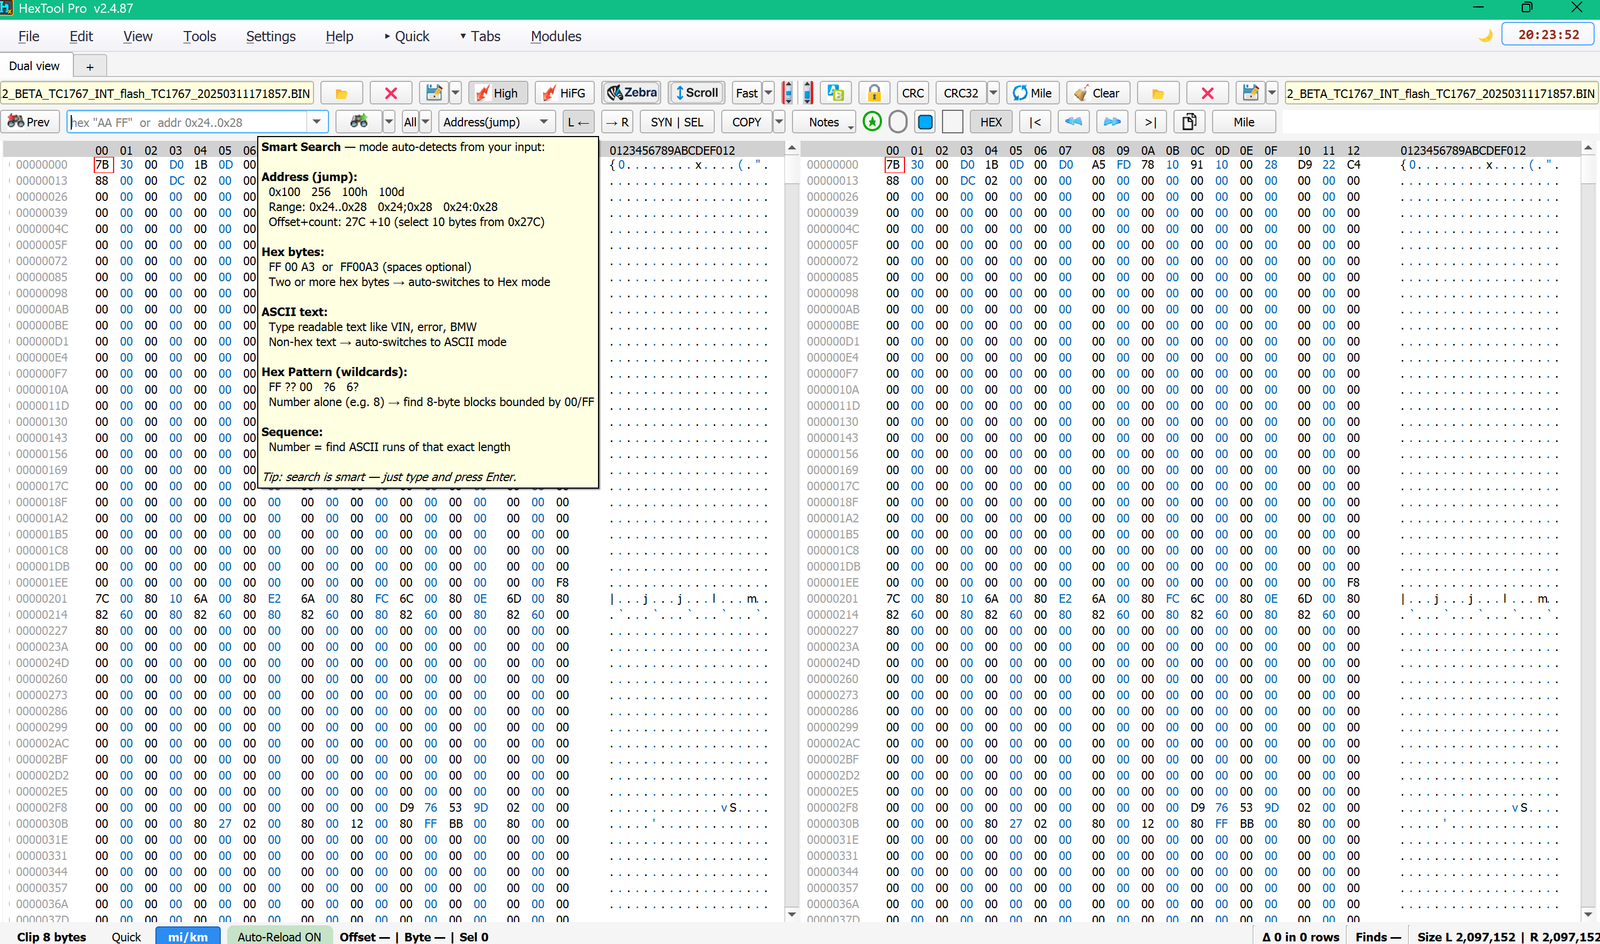
The search bar above each pane — far more than a plain hex/text find. It auto-detects what you typed, offers dedicated pattern/wildcard modes, and can even match bytes that are common between the two open panes.
Search modes
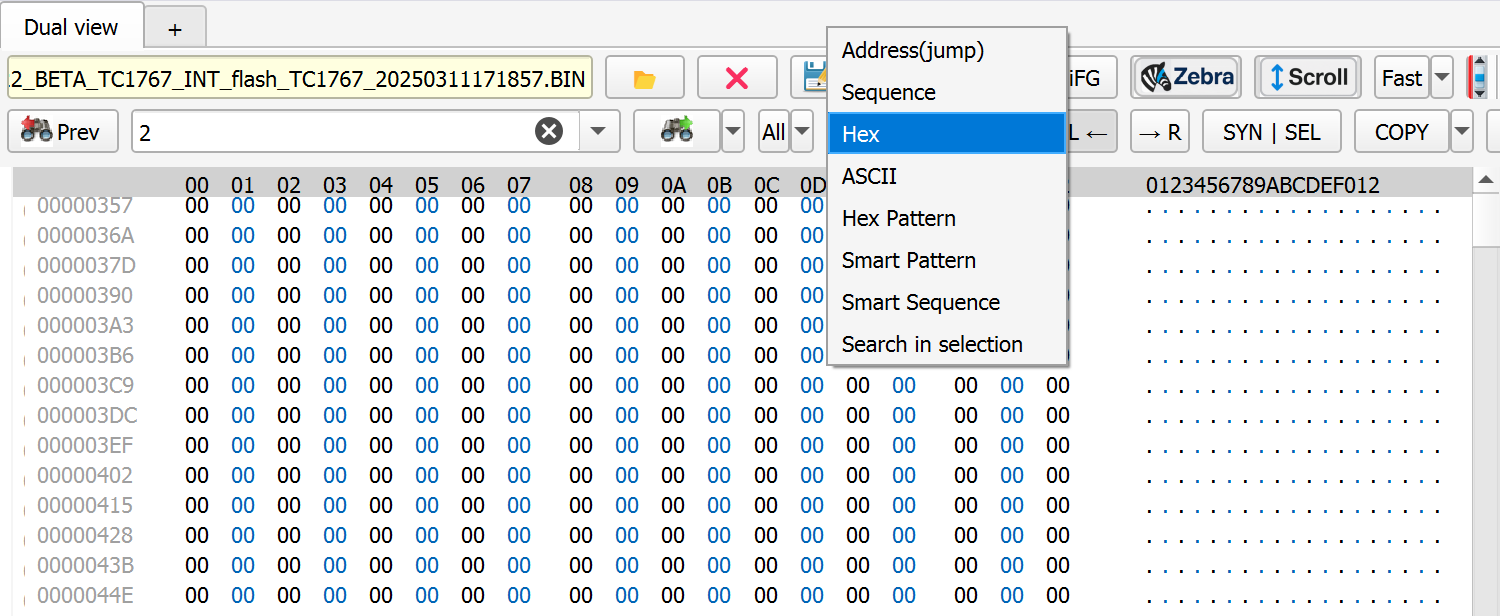
Click the mode dropdown (defaults to Address(jump)) to pick explicitly, or just type and let Smart Search guess:
Address(jump) — jump straight to an offset: 0x100, 256, 100h, 100d, a range (0x24..0x28 / 0x24;0x28 / 0x24:0x28), or offset+count (27C+10 selects 10 bytes from 0x27C).
Sequence — a number alone finds ASCII runs of that exact length.
Hex — hex bytes, spaces optional (FF 00 A3 or FF00A3); typing two or more hex bytes auto-switches Smart Search into this mode.
ASCII — readable text (VIN, error codes, "BMW", etc.); typing non-hex text auto-switches into this mode.
Hex Pattern — wildcards: FF ?? 00 ?6 6?; a lone number (e.g. 8) finds 8-byte blocks bounded by 00/FF.
Smart Pattern — see below.
Smart Sequence — sequence search combined with Smart Search's auto-detection.
Search in selection — restricts any of the above to the current selection instead of the whole file.
Smart Pattern — required bytes
An extra filter on top of a pattern search: enter hex bytes that must appear somewhere inside each match.
Space-separated tokens (82 A8) — each byte must appear anywhere, in any order.
Bytes with no space (82A8) — must appear as that exact contiguous pair.
Three or more tokens (FC BD AA) — match must contain all three, anywhere.
Leave empty to skip the filter entirely.
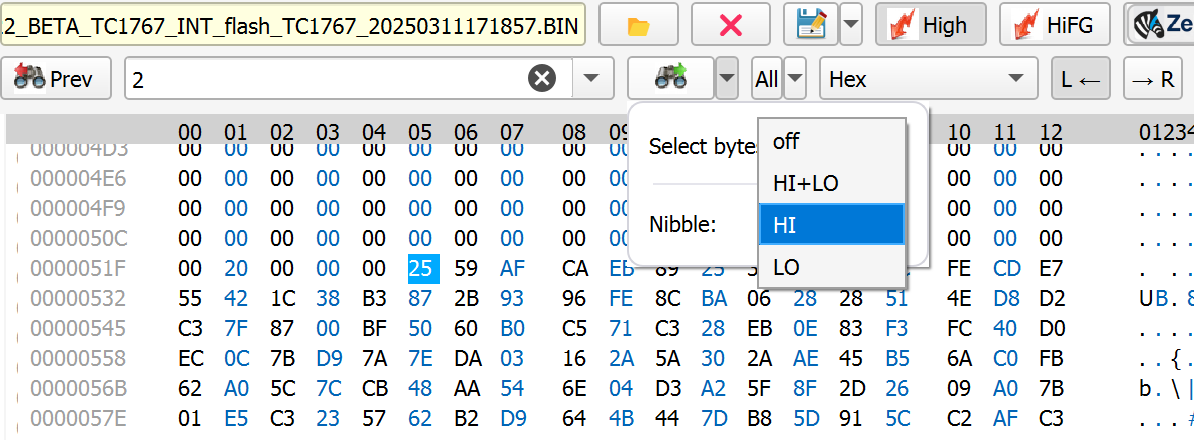
Nibble search
Next to the search-mode picker, Select byte has a Nibble option: off, HI+LO, HI, or LO — restricts hex matching to only the high nibble, only the low nibble, or both, of each byte. Useful when you know part of a byte (e.g. a fixed high nibble with a variable low nibble) and don't want unrelated matches on the other half.
Cross-Pane Match
Finds bytes that are common between the left and right pane (e.g. two different dumps) instead of just one file:
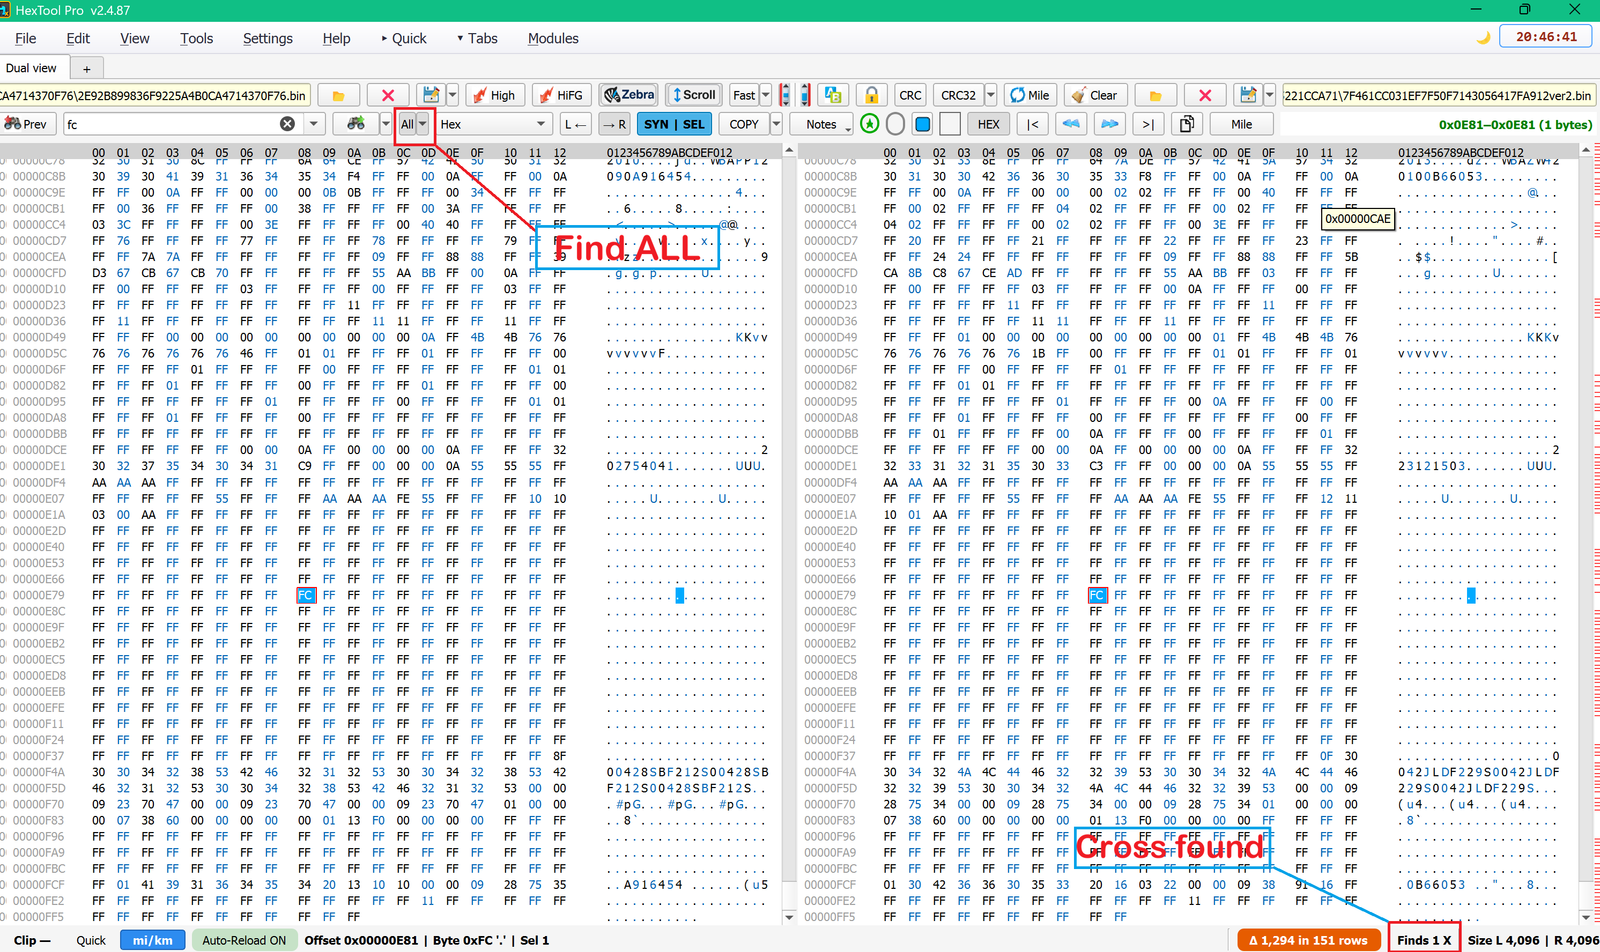
Search a value, then Find All in the left pane.
Lock All Finds on that pane.
Switch to the other pane, search the same value, Find All there too.
Run Cross-Pane Match — it prints how many matching offsets both panes share (shown as "Cross found" with Finds 1 X in the status bar).
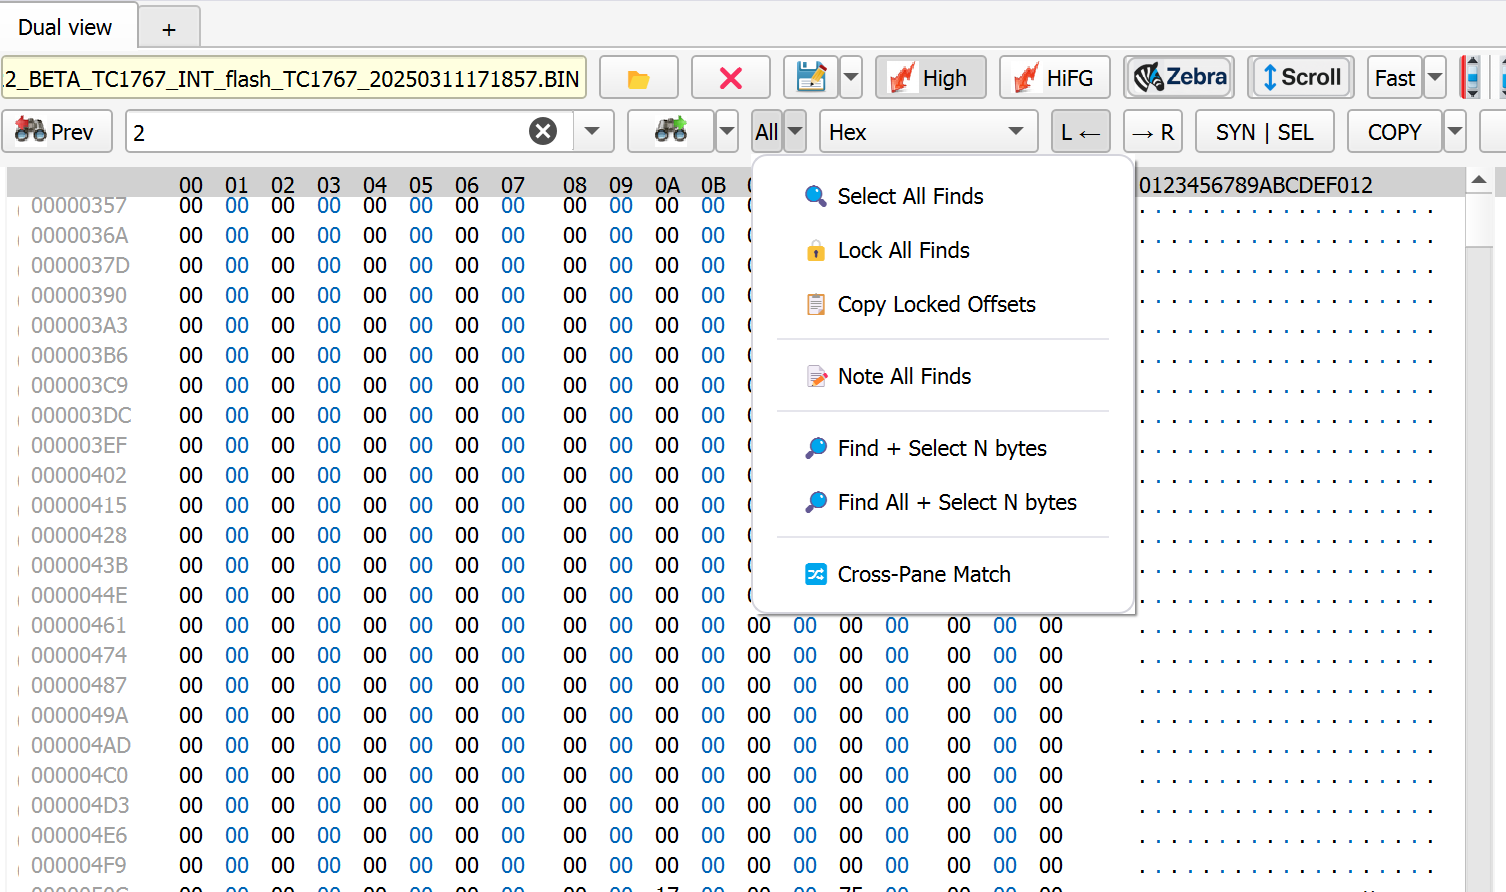
Finds menu (Finds dropdown)
Select All Finds — selects every match at once.
Lock All Finds — pins the current find set (needed before Cross-Pane Match, and before switching search terms without losing this result set).
Copy Locked Offsets — copies the locked matches' offsets to the clipboard.
Note All Finds — same as the Notes menu's "Create note from all finds" (see the Notes guide) — labels every match at once.
Find + Select N bytes / Find All + Select N bytes — extends the match to also select N bytes around/from it, instead of just the matched bytes.
Cross-Pane Match — same action described above.
Tips
Pasting a string with spaces into the search box automatically strips the spaces for you.
Double-clicking the search box reverses (byte-swaps) the pasted value.
The search box remembers history — clear it all at once, or remove a single entry with its individual ×.
Pressing Find All prints the total match count on the right side of the status bar (e.g. "Finds 122 [1/122]").
Typical use cases
Jumping to a known offset instantly instead of scrolling.
Locating a VIN, error string, or known byte sequence inside a dump.
Finding all bytes matching a wildcard pattern (e.g. a checksum block bounded by FF/00).
Comparing two dumps to find a shared, unchanged region (immo data, VIN area) via Cross-Pane Match.
Requirements
A file loaded in the pane(s) you're searching.
Hex Functions / Copy Function
Copy Function
What is this?
The COPY toolbar button (and its dropdown) controls how selecting bytes in the hex view gets copied to the clipboard — so you can tune copying to match what you're doing instead of always getting the same format.
How to open it
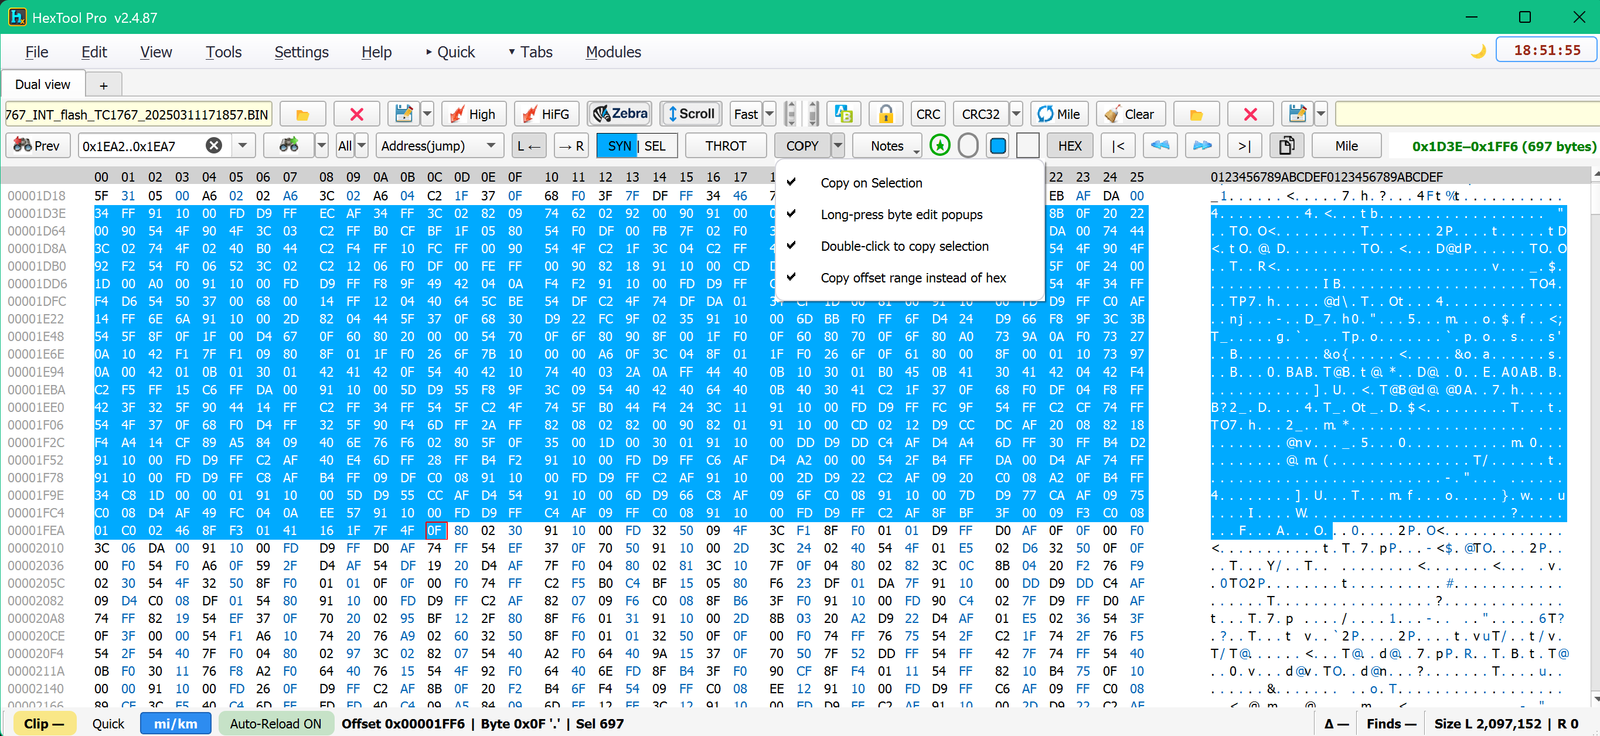
Click the small arrow next to the COPY button in the toolbar to open the options dropdown. Each entry is a toggle (checkmark = on):
Copy on Selection — automatically copies the selected bytes to the clipboard the moment you make a selection, with no extra click needed.
Long-press byte edit popups — the same toggle documented in the Hex Editing Basics guide; it lives here too since it's closely tied to how selections behave.
Double-click to copy selection — double-clicking a byte selects and copies it (and its run) in one action, instead of needing a separate copy step.
Copy offset range instead of hex — when on, copying puts the offset range (e.g. 0x1D3E-0x1FF6) on the clipboard instead of the actual hex bytes — useful when you want to paste a range reference into a note or into another dialog's Start/End fields rather than the data itself.
Double-click to copy
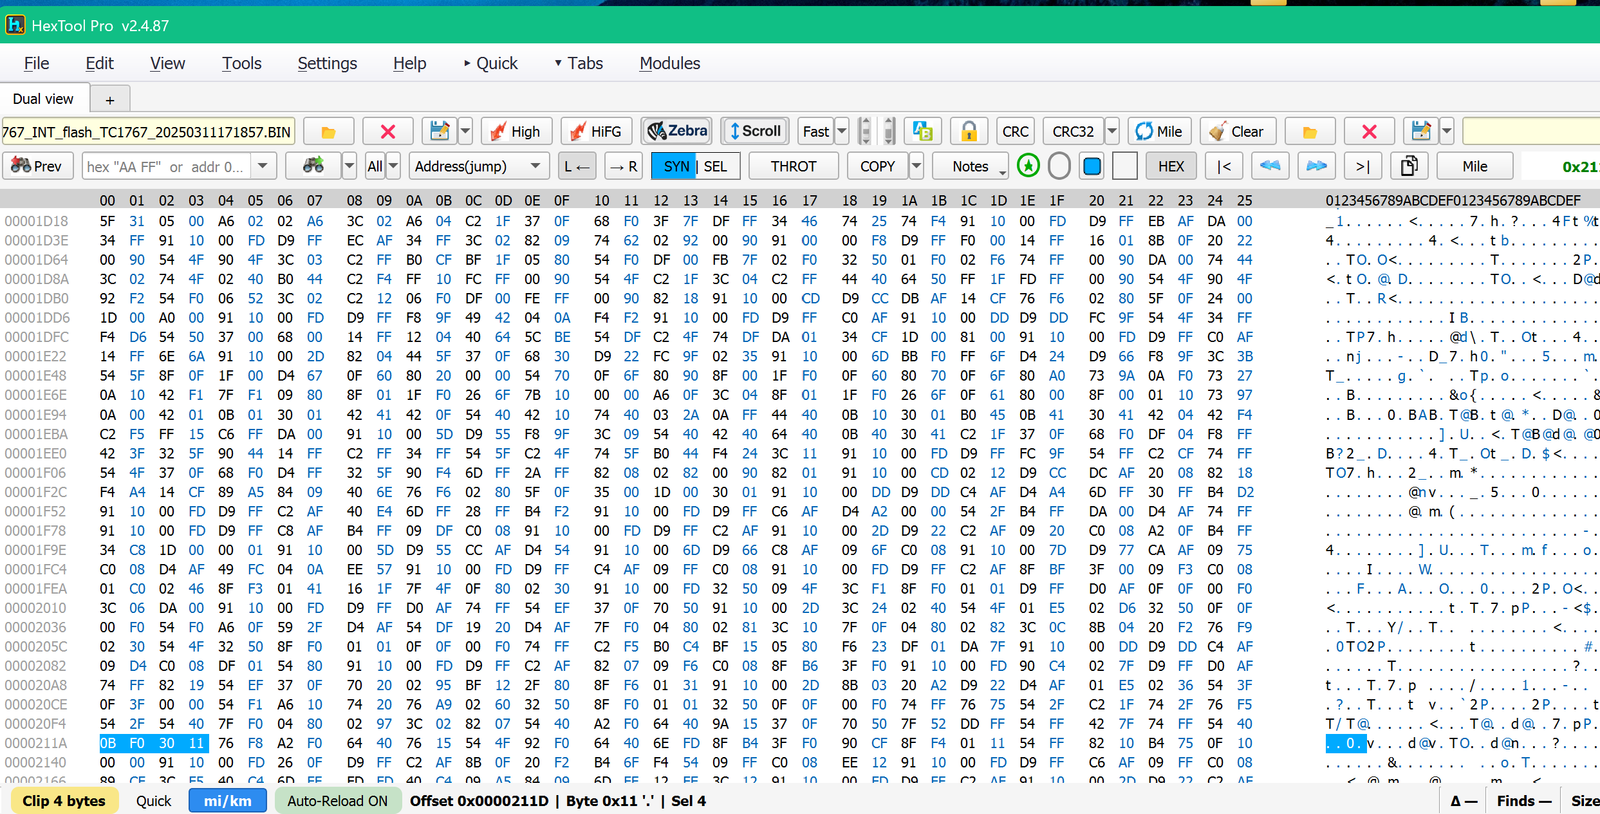
With Double-click to copy selection (and Copy on Selection) enabled, double-clicking a byte selects it together with adjacent bytes and copies that selection straight to the clipboard — shown here selecting and copying a 4-byte run (0B F0 30 11) at offset 0x211A with a single double-click.
Typical use cases
Turning Copy on Selection off before working with large selections (see the tip in Replace Selected Bytes) to avoid lag from copying huge ranges on every selection change.
Turning Copy offset range instead of hex on when you're filling in Start/End offsets elsewhere (e.g. Replace Selected Bytes' Adjust Offsets) and just need the range, not the bytes.
Using double-click as a fast one-step select-and-copy for small runs.
Requirements
A file loaded in either pane.
Hex Functions / Hex Editing Basics
Hex Editing Basics
What is this?
The core editing behavior of the hex view itself — typing bytes directly, undoing edits, and the "hold down a selection" smart-edit popups that adapt to how many bytes you've selected.
Typing bytes directly
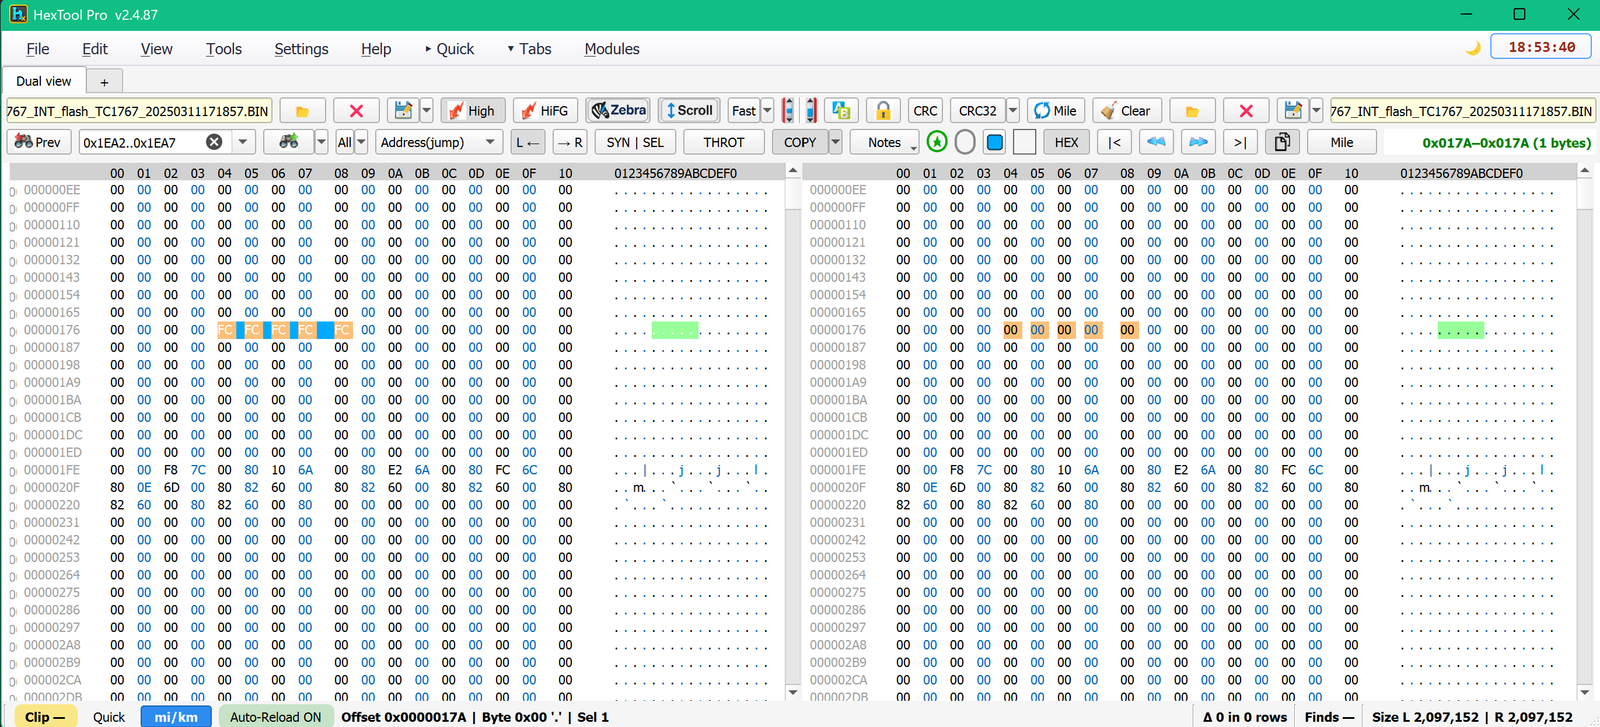
Click a byte cell and type a hex digit — the value updates live as you type, one nibble at a time, and the caret advances to the next byte automatically. The status bar always shows the current offset, byte value/ASCII, and selection size (e.g. "Offset 0x0000017A | Byte 0x00 '.' | Sel 1") so you can confirm exactly what you're about to overwrite before committing it.
Undo
Ctrl+Z undoes the last edit (byte typed, paste, fill, etc.) — the usual safety net while editing live, so you don't need to reload the file after a mistaken keystroke.
Hold-down smart edit (long-press a selection)
Selecting a range and holding the mouse down on it pops up a different tool depending on how many bytes are selected (the full tier table is in the Settings Menu guide). In short:
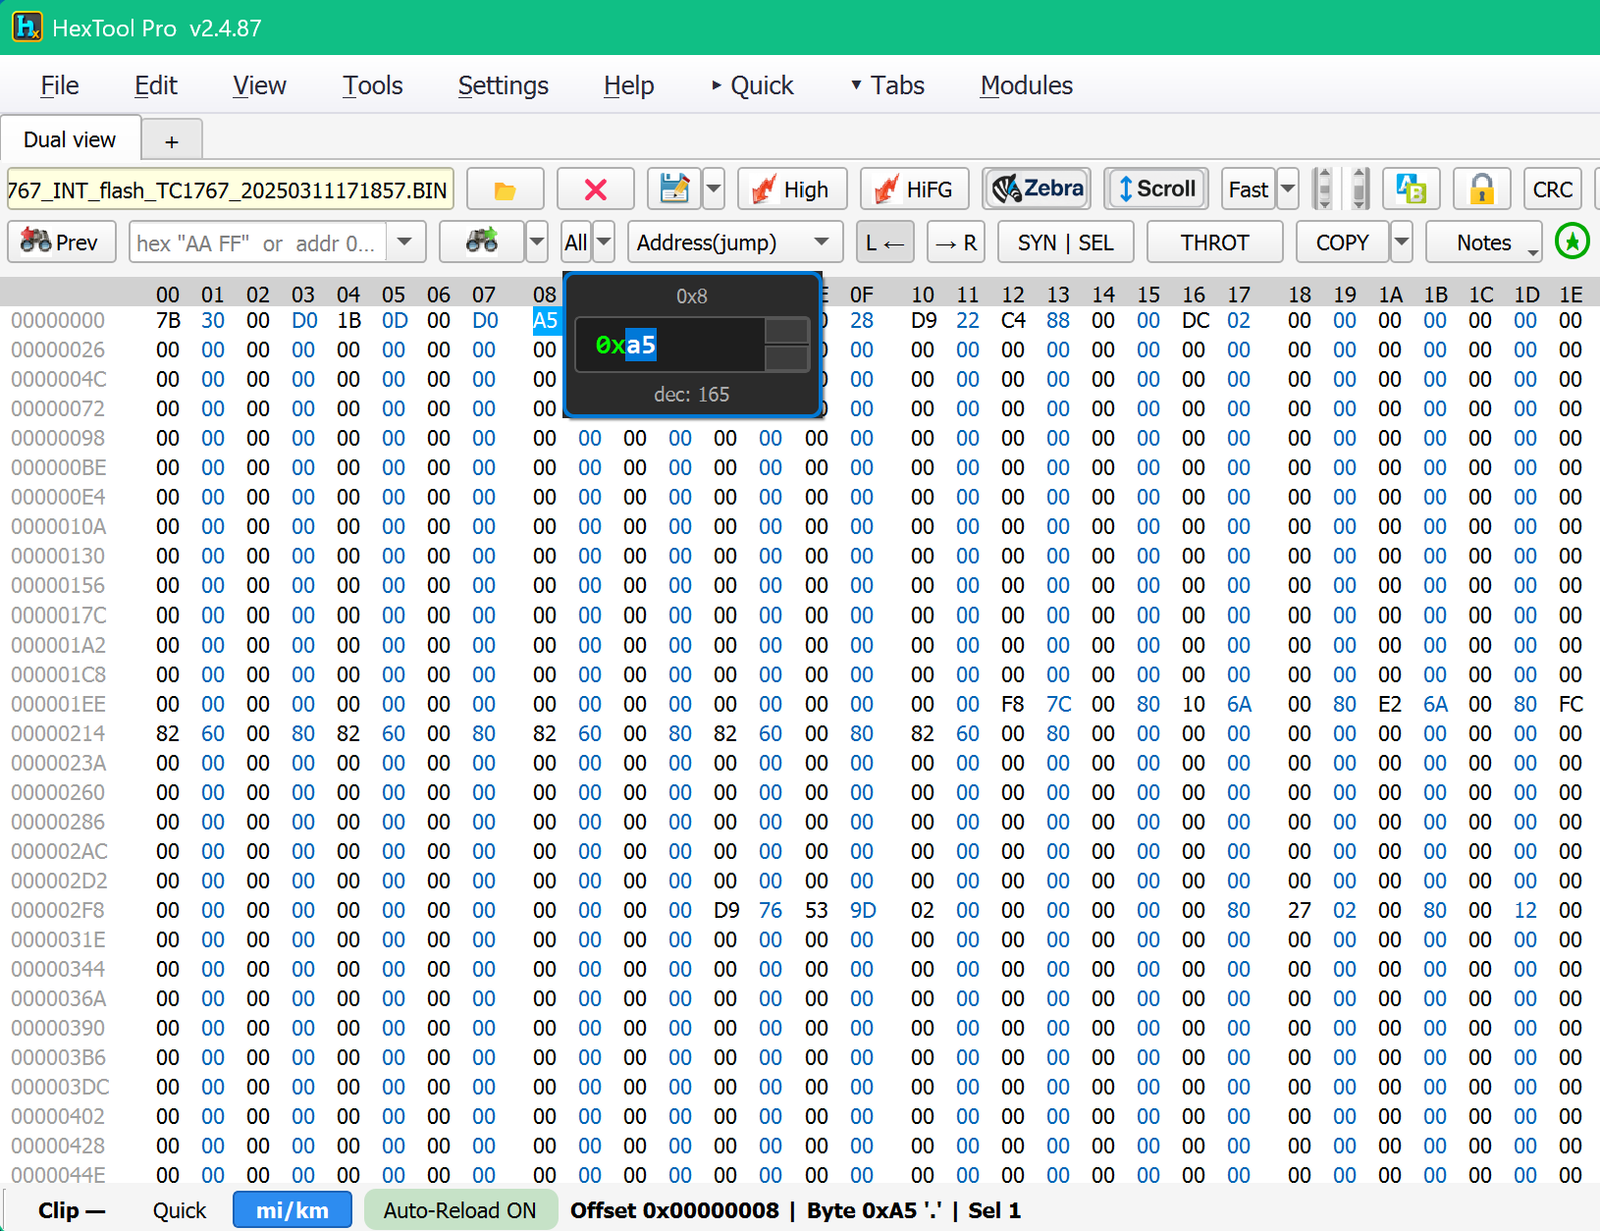
1 byte held down → a tiny inline spinbox next to the cursor, showing the offset, current hex value and decimal equivalent, for quick nudging up or down without opening any dialog.
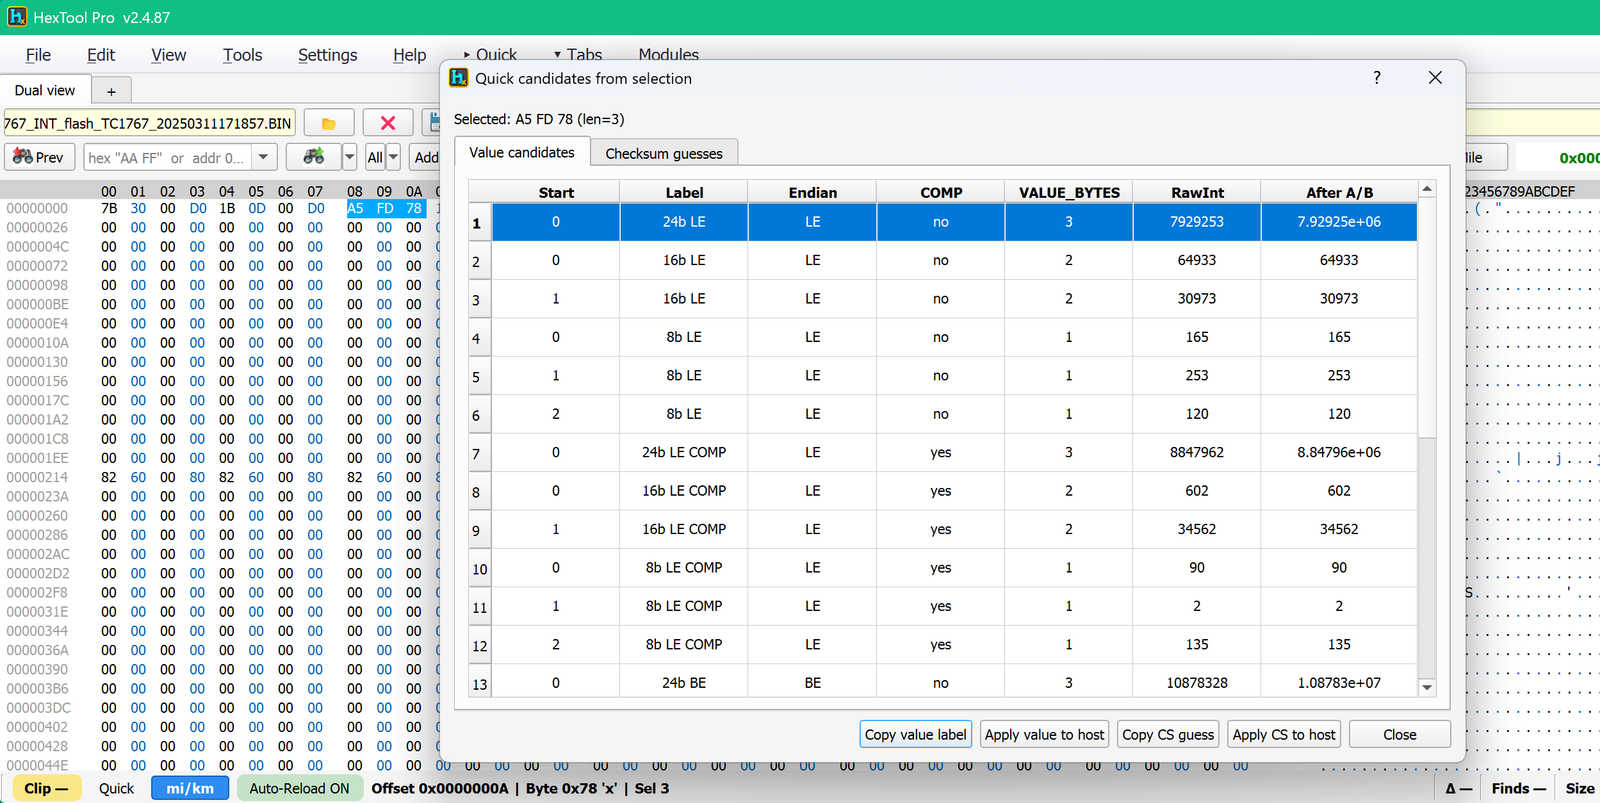
A few bytes held down (2–4) → Quick candidates from selection, interpreting those bytes as possible values (8/16/24-bit, LE/BE, with/without complement) under Value candidates, plus a Checksum guesses tab — the same "suggest logic" idea as the context-menu action, just triggered by holding the selection instead of right-clicking.
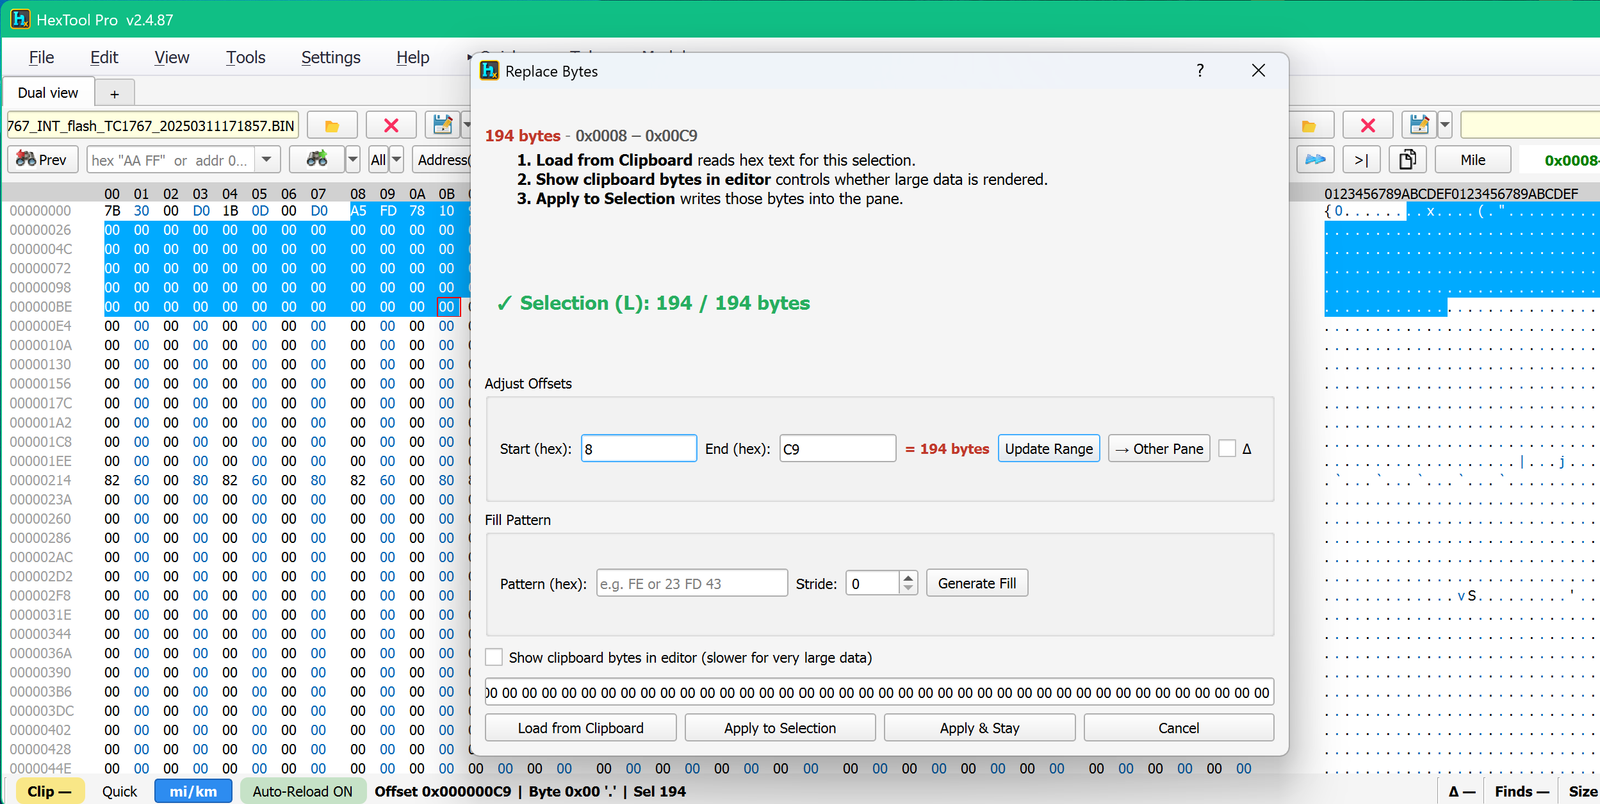
A large selection held down → Replace Bytes opens directly (the same dialog documented in Replace Selected Bytes), pre-filled with the selection's start/end offsets, ready for a clipboard paste or fill pattern.
Typical use cases
Editing a byte or two by eye without leaving the hex view.
Quickly checking what a short byte run could mean (mileage, checksum, 16/24-bit value) just by holding the selection instead of opening the context menu.
Jumping straight into Replace Bytes for a big block without hunting for it in the Tools menu.
Requirements
A file loaded, with a selection made in either pane.
Hex Functions / Replace Selected Bytes
Replace Selected Bytes (RSB)
Video walkthrough
What is this?
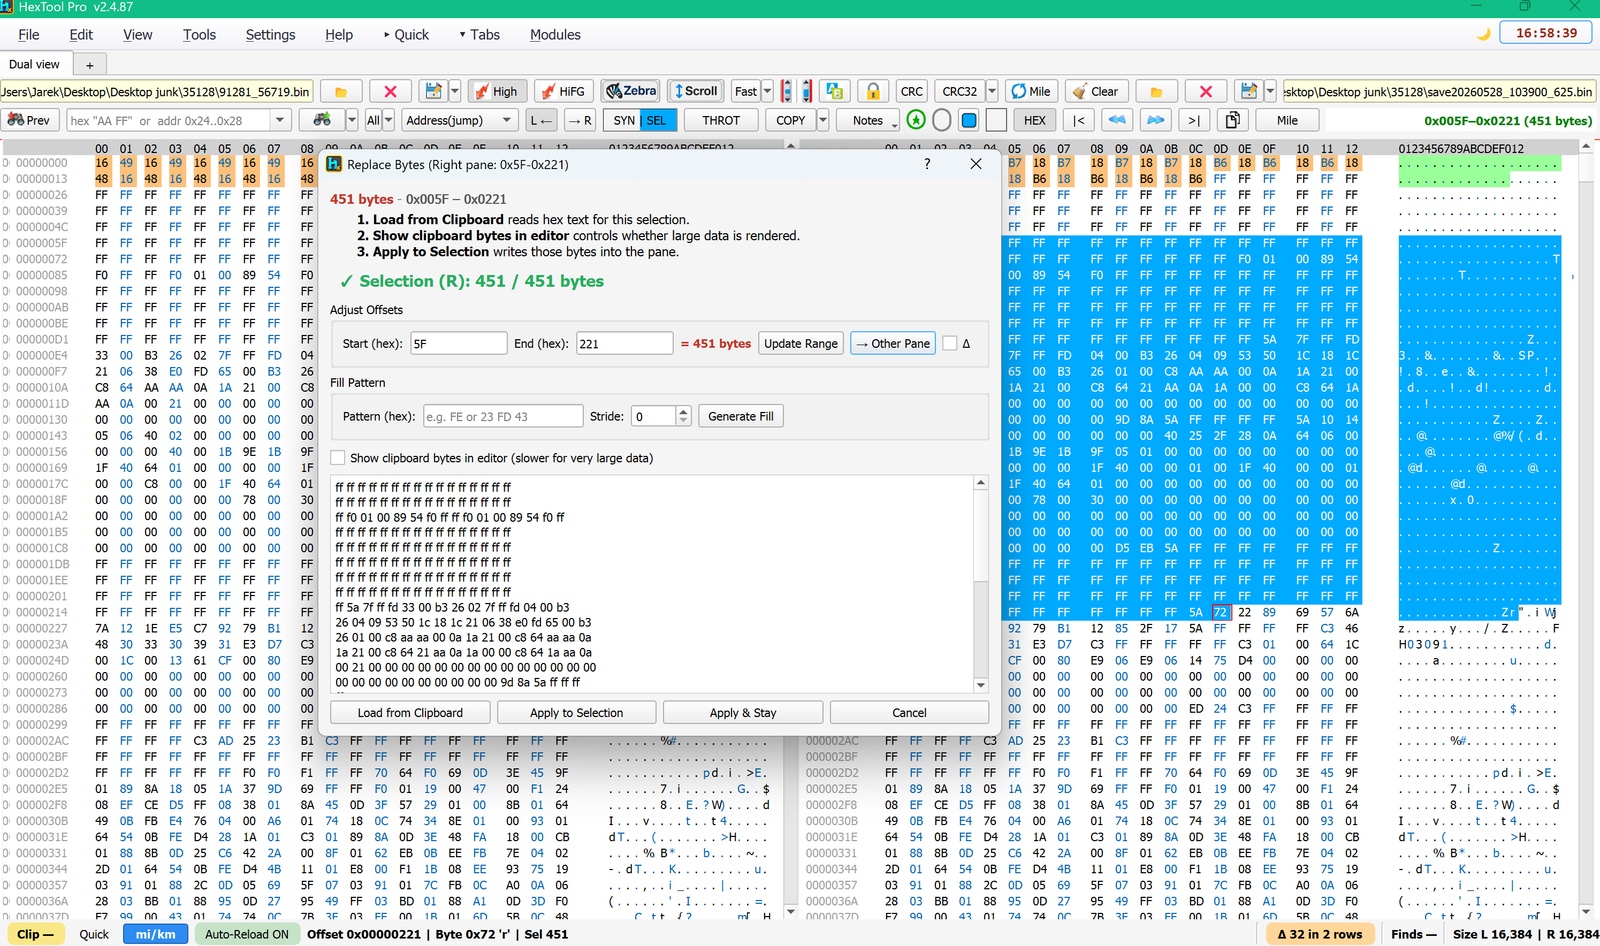
A dialog for overwriting a selected range of bytes — either by pasting hex from the clipboard or by generating a repeating fill pattern — instead of typing every byte by hand in the hex view.
How to open it
Select a range in either pane, then Tools → Replace Selected Bytes, or right-click the selection.
How it works
The dialog always shows the current selection's size and range (e.g. "451 bytes - 0x005F – 0x0221"), and three steps:
Load from Clipboard — reads hex text from your clipboard for this selection.
Show clipboard bytes in editor — controls whether the loaded bytes are rendered in the preview box (off by default for large data, since rendering is slower).
Apply to Selection — writes those bytes into the pane.
Adjust Offsets
Start (hex) / End (hex) — fine-tune the exact range before applying; Update Range recalculates the byte count.
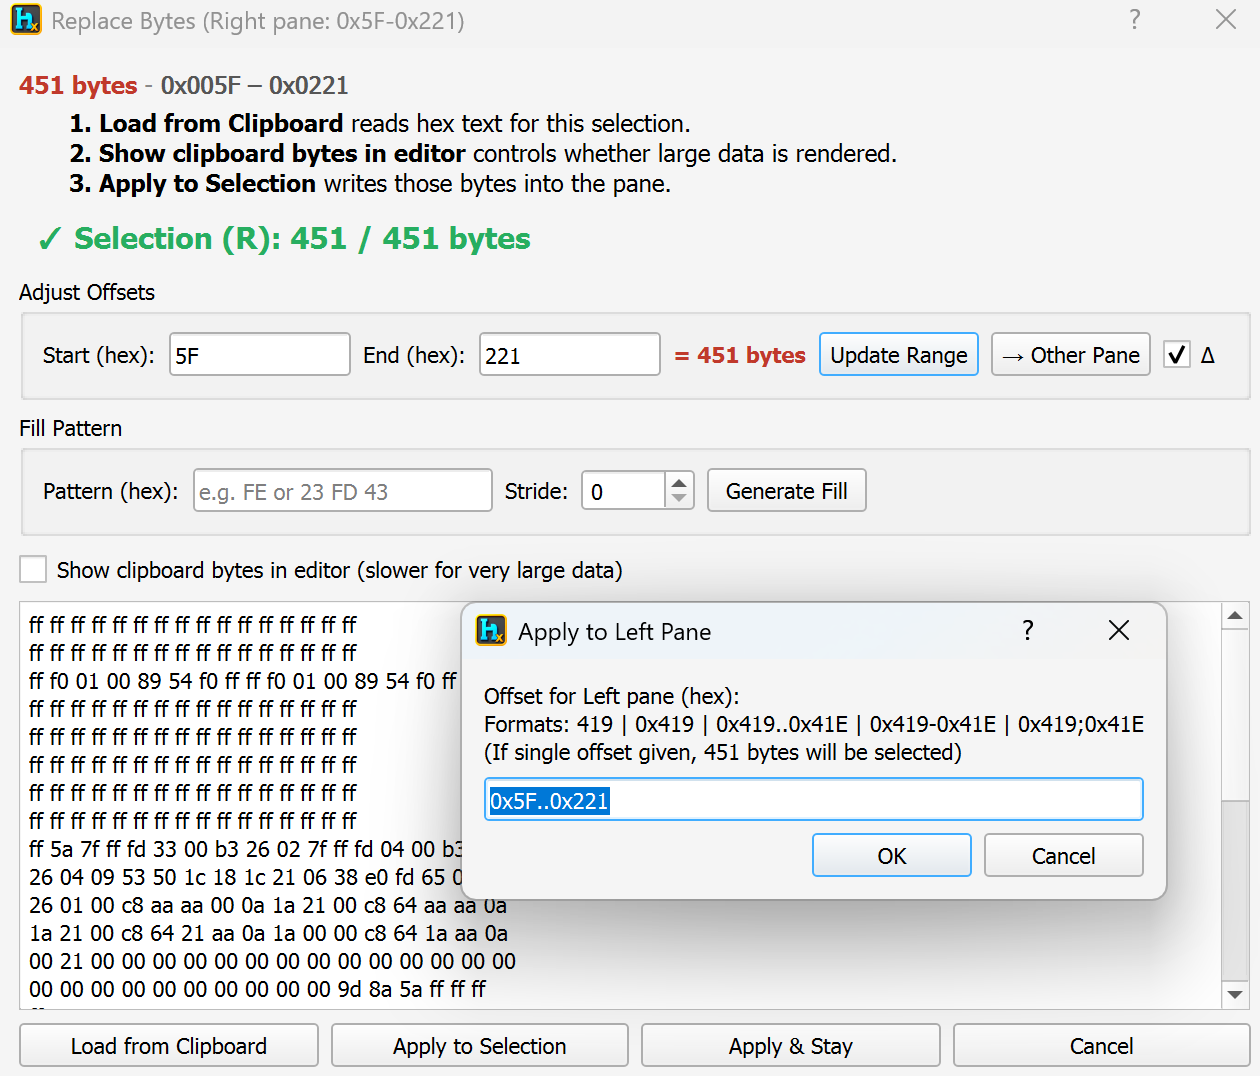
→ Other Pane — apply the same offset range to the other pane instead. A follow-up dialog lets you type/confirm the offset for that pane (formats accepted: 419 | 0x419 | 0x419..0x41E | 0x419-0x41E | 0x419;0x41E — a single offset auto-selects the same byte count from there).
Fill Pattern
Instead of pasting bytes, you can generate a repeating pattern directly:
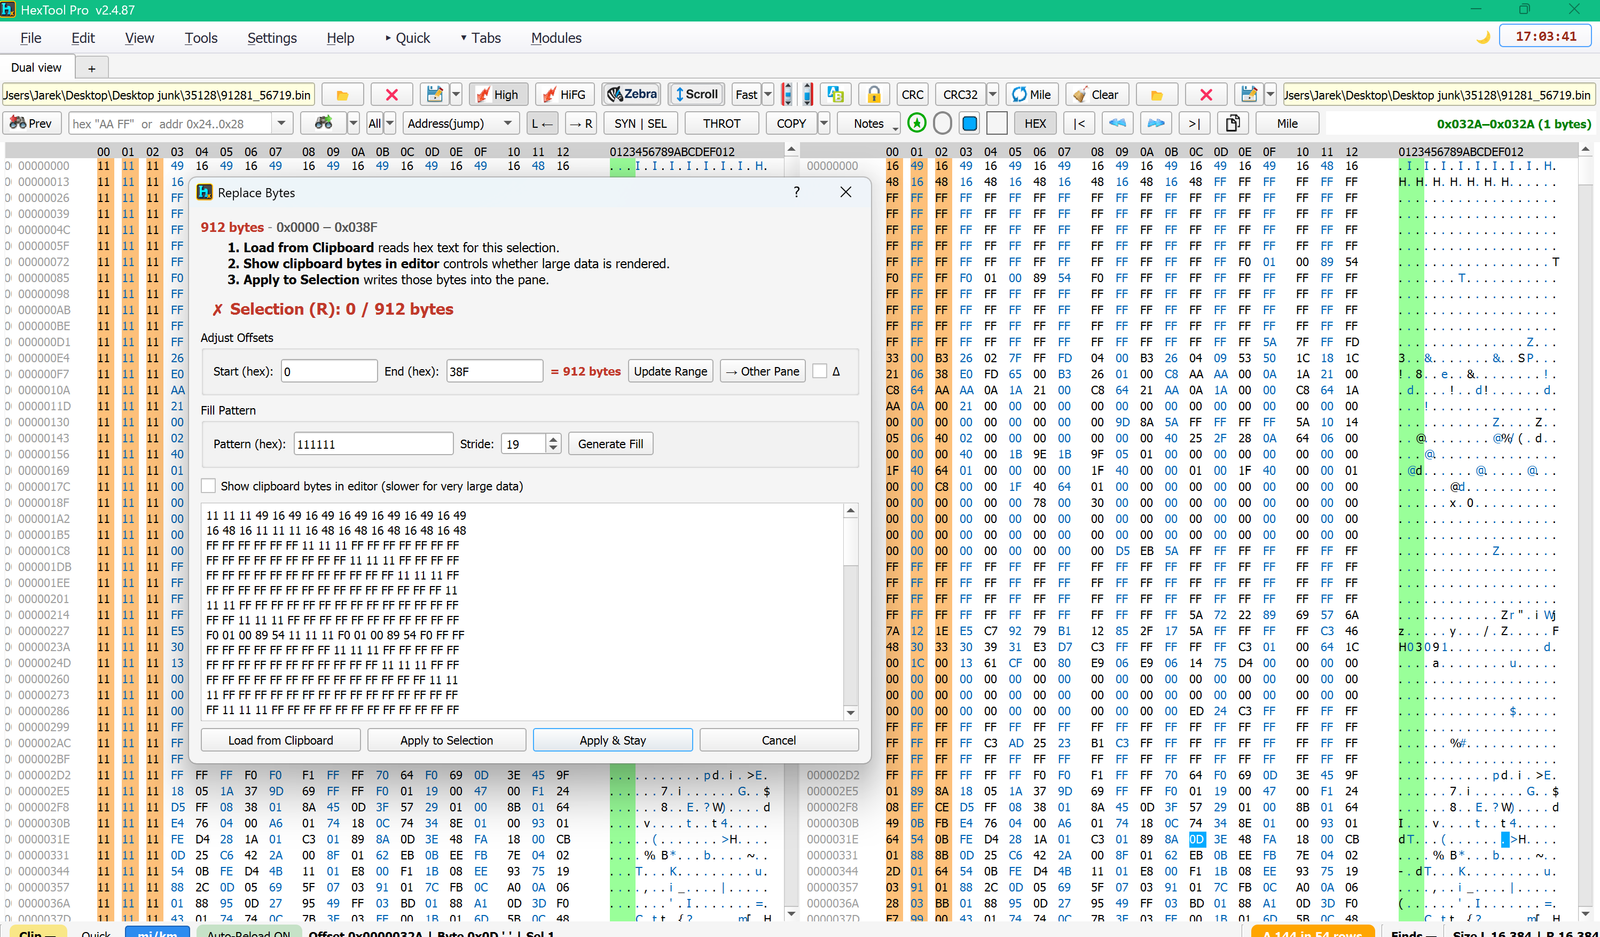
Pattern (hex) — e.g. FE or 23 FD 43.
Stride — gap between repeats (0 = fill the entire selection back-to-back; a stride > 0 writes the pattern every N bytes and leaves the rest untouched).
Generate Fill — builds the pattern into the preview box, ready to apply.
Large selections
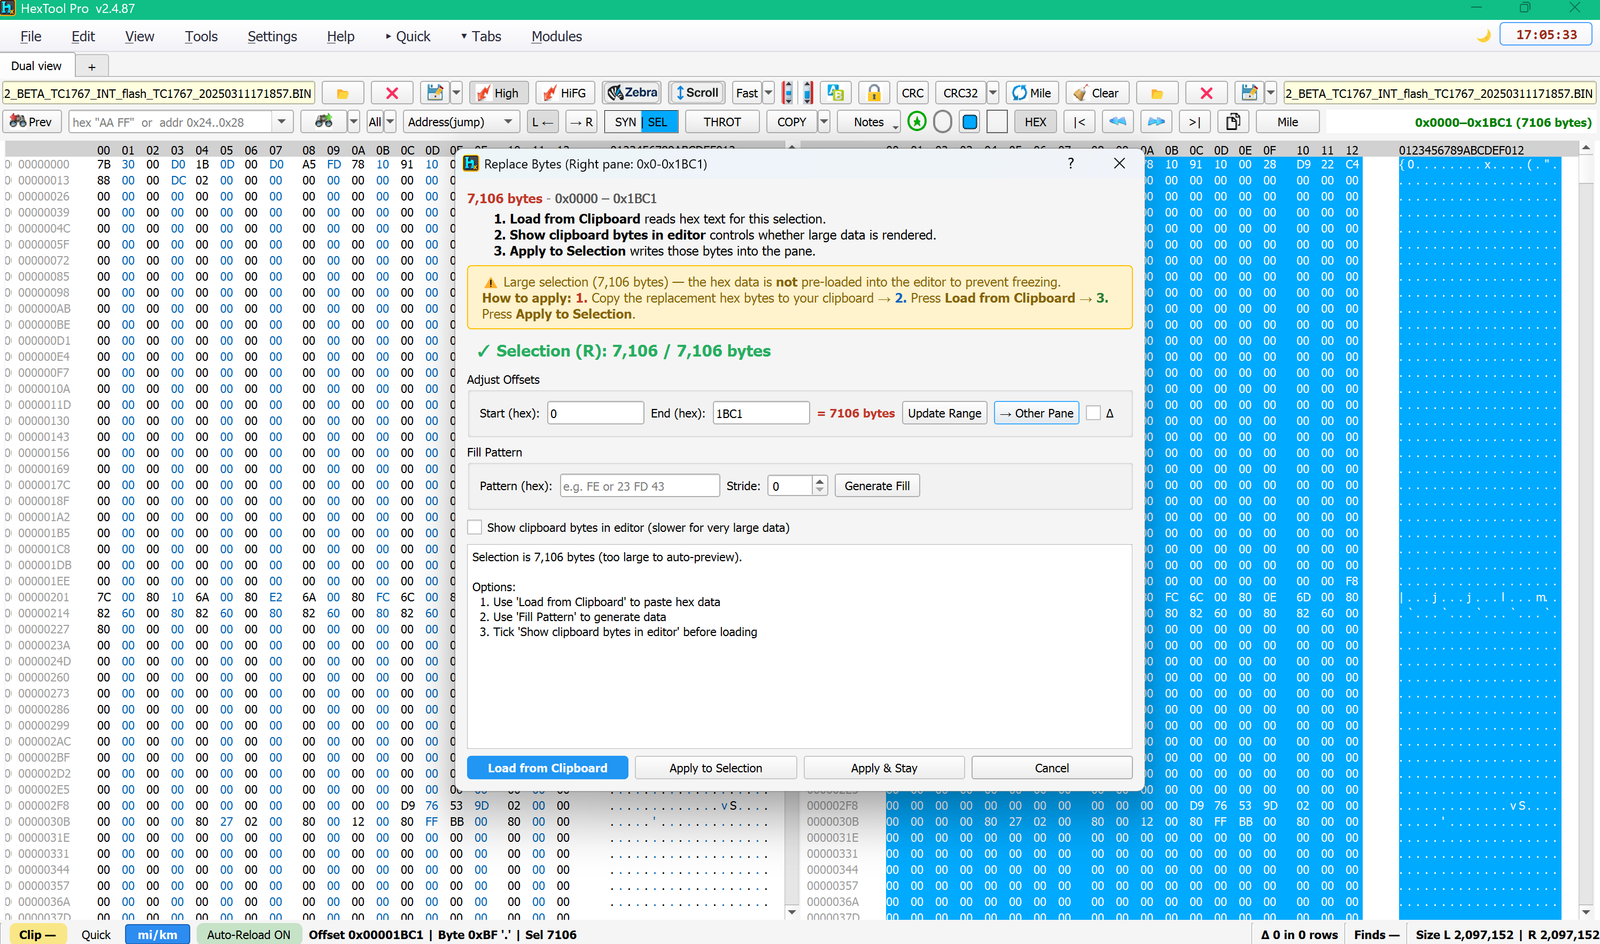
On very large selections (thousands of bytes), HexTool does not pre-load the hex data into the editor, to avoid freezing the UI. Instead it shows a warning and a 3-step path:
Copy the replacement hex bytes to your clipboard.
Press Load from Clipboard.
Press Apply to Selection.
Buttons
Apply to Selection — writes the bytes and closes.
Apply & Stay — writes the bytes but keeps the dialog open (for applying multiple edits in a row).
Cancel — closes without applying anything.
Tip: when doing RSB on large selections, it's good practice to turn Copy on Selection OFF first — otherwise every selection change also copies to clipboard, which can cause lag on big ranges.
Requirements
A selection made in either pane before opening the dialog.
Hex Functions / Notes
Notes
Video walkthrough
What is this?
A way to label byte ranges in a loaded file with your own text (e.g. "Pin", "ISN", "Checksum") so you can find your way back to them later — the notes are saved per file and offered back to you automatically next time you open it.
Auto-restore on open
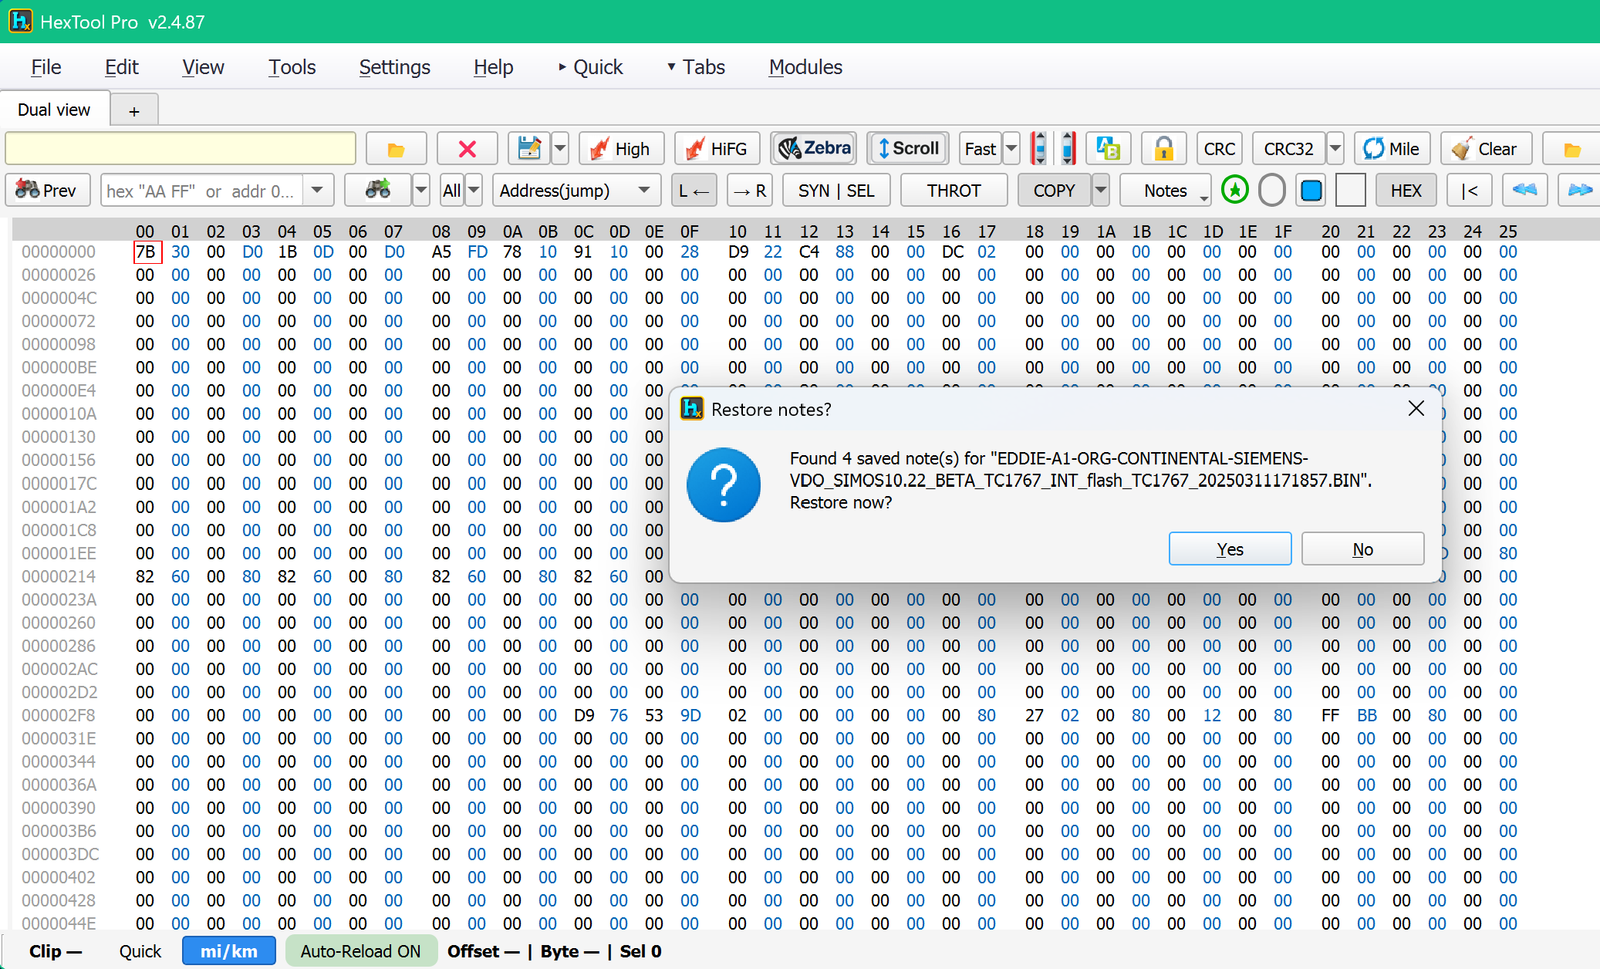
If a file you're opening has saved notes from a previous session, HexTool asks first: "Found 4 saved note(s) for '<filename>'. Restore now?" — Yes loads them back onto the current view, No opens the file with a clean slate (the saved notes aren't deleted, just not applied this time).
The Notes menu
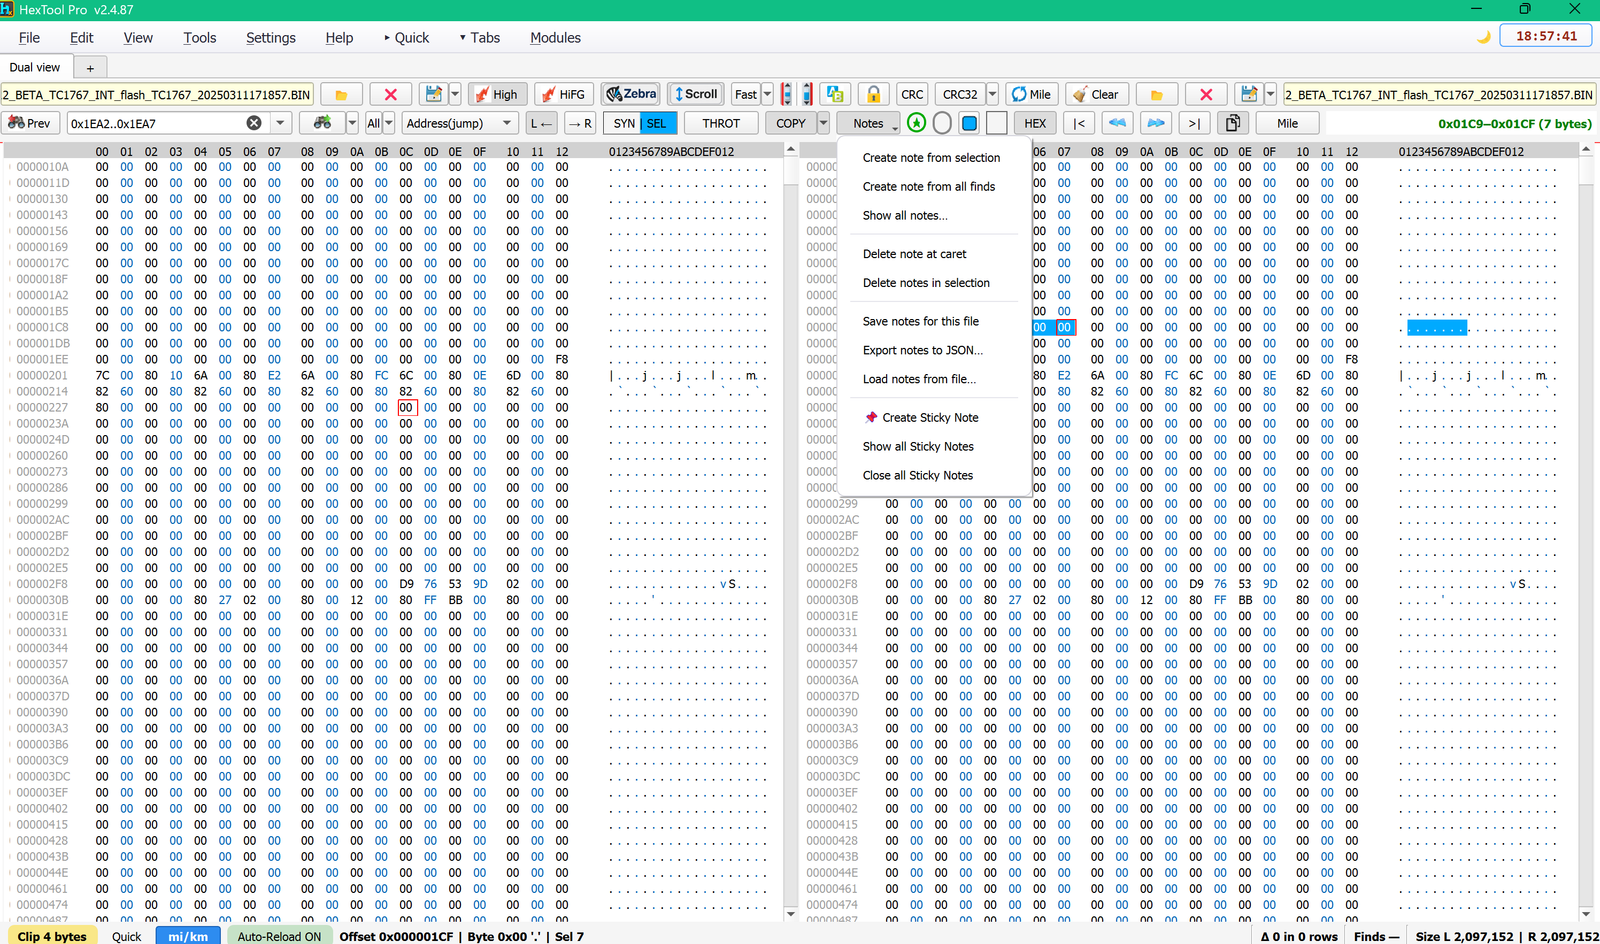
Opened from the Notes button in the toolbar:
Create note from selection — labels the currently selected byte range.
Create note from all finds — labels every match from the last search in one go.
Show all notes — opens the notes table (see below).
Delete note at caret / Delete notes in selection — removes notes under the cursor or inside the current selection.
Save notes for this file — persists notes to disk, keyed to the file (this is what powers the restore prompt above).
Export notes to JSON… / Load notes from file… — share notes between files/machines, or back them up outside HexTool's own storage.
Create Sticky Note / Show all Sticky Notes / Close all Sticky Notes — free-floating text notes, unrelated to any byte range (see below).
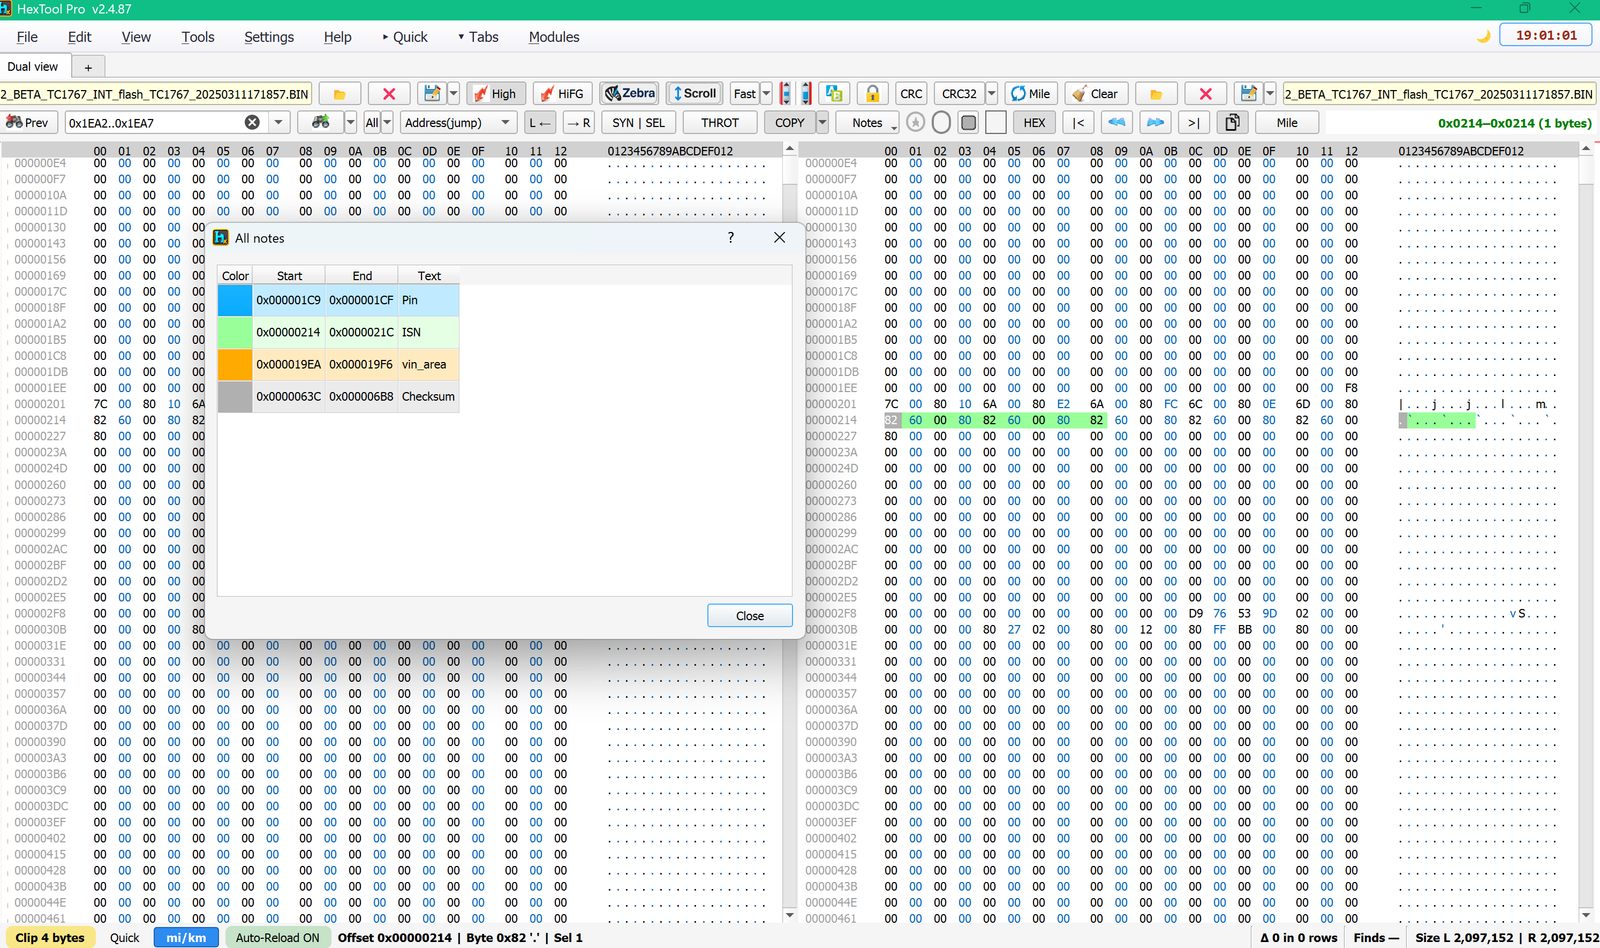
Show all notes
A table of every note in the file: Color, Start/End offset, and Text. Each note also highlights its byte range directly in the hex view in that same color, so you can see at a glance which regions you've already identified (e.g. a blue "Pin" block at 0x1C9–0x1CF, a green "ISN" block at 0x214–0x21C, an orange "vin_area" block, a gray "Checksum" block).
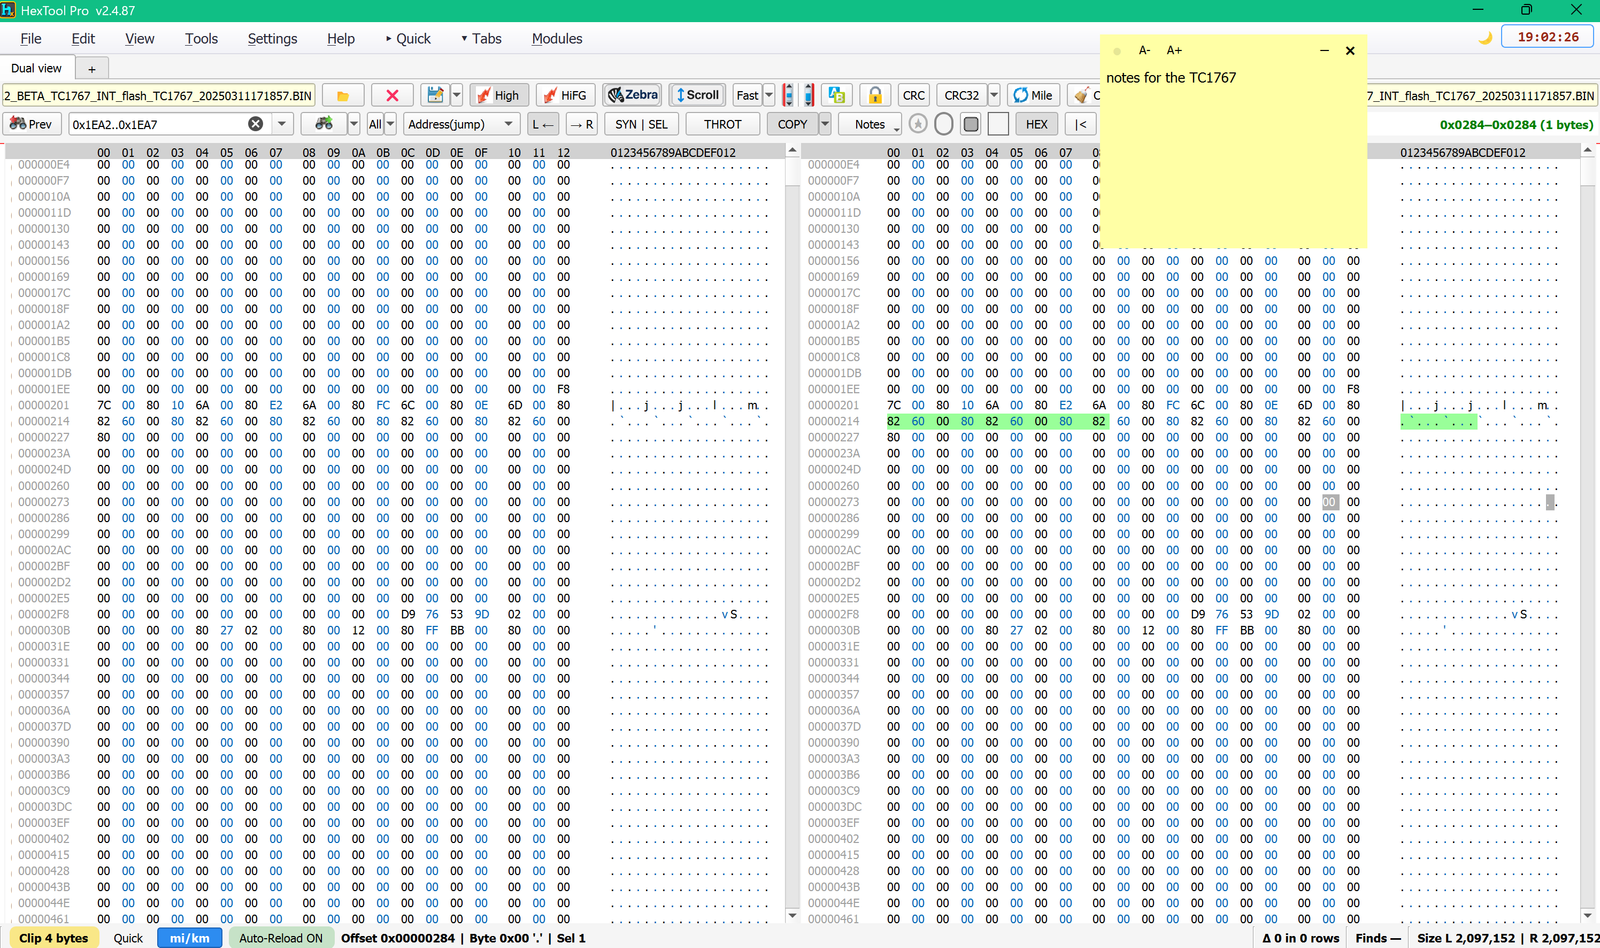
Sticky Notes
A small yellow floating window for free-form text that isn't tied to any offset — general reminders about the file you're working on. It has its own A- / A+ font-size buttons and minimize/close controls, and stays on top of the hex view until you close it.
Typical use cases
Marking known fields (PIN, ISN, VIN area, checksum) the first time you work out their offsets, so you don't have to re-derive them next time.
Leaving yourself a note about what's odd/unfinished about a specific dump.
Coming back to a file weeks later and having HexTool remind you what you'd already found.
Requirements
A file loaded (notes are always tied to a specific file by name).
🛠️
Coming soon
This guide is being written and will be published here soon. Check back shortly — documentation is added regularly.